Creating, Editing, and Deleting Testimonials
First off, we’ll need to create a testimonial. Simply navigate to the WordPress admin dashboard, and find the “Testimonials” link under the “Apptivo” section of the left column. On this page you will see a form with multiple fields. We will fill in these fields with the information for our new testimonial, only the name and testimonials text field are required. The other fields are optional, and can be included/excluded using custom templates.
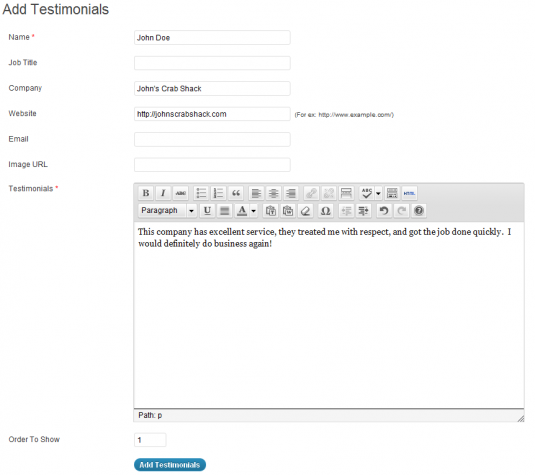
Once you have finished filling in the fields, just click the “Add Testimonials” button to create the new entry.
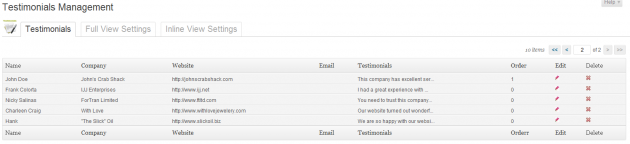
Upon creating the testimonial, you will notice it now appears in a list at the top of the screen. All future testimonials will be placed in this list, which provides links to either edit the testimonial information, or delete it completely. Upon clicking the pencil icon, the form at the bottom of the page will be completed with the information from the chosen testimonial. You can then modify these fields as needed, and then click the “Update” button at the bottom to save.
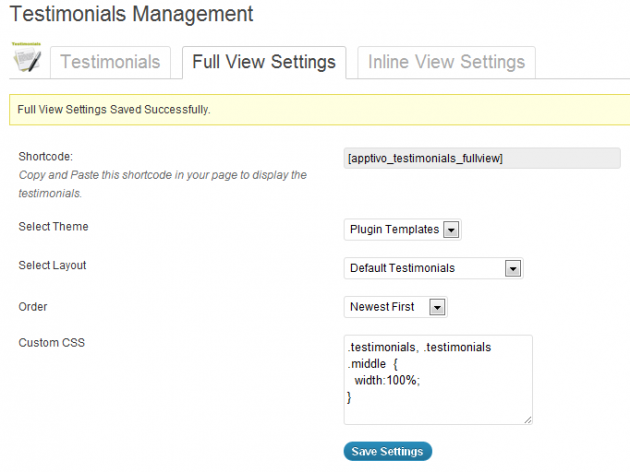
Full View Settings
The tab for “Full view Settings” allows you to customize a component that can be used to display all of your testimonials in an organized manner. Typically websites will have a single dedicated page, which will display the “Full View” testimonials. In order to retrieve the shortcode for the first time, you’ll need to select your desired settings, and save them. After the first time you save the Full View Settings, you will be presented with the proper shortcode to integrate with your site.
Select Theme
For this exercise, leave the default value of “Plugin Templates”. This field controls where you would like to load templates from. The plugin comes with several templates by default, and we’ll cover creating custom templates in the advanced configuration section.
Select Layout
This field will allow you to select a template to use for the page, by default you have two templates available. You can create and select your own customized templates, which is covered in the advanced configuration section.
Order
This field allows you to control how the testimonials will be sorted when a user navigates to this page. You can select to order them chronologically, randomly, or “Custom”. If you select custom ordering, you will be able to set an individual order value to each testimonial. The testimonials will then be displayed based on this order value.
Custom CSS
This field is used to modify the look & feel of the testimonials page by entering in your own CSS code. This section is covered in advanced configuration.
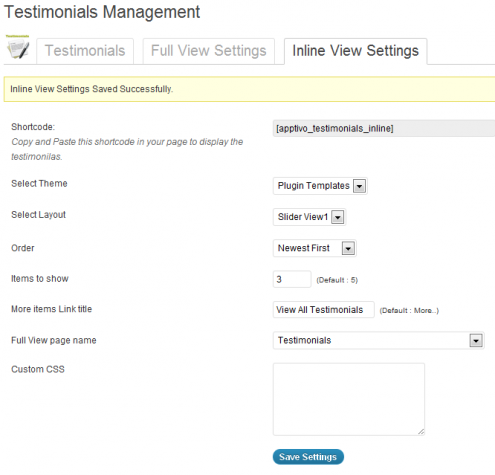
Inline View Settings
The tab for “Inline View Settings” allows you to customize a component that is used to display a few of your latest or featured testimonials on any page of your site. Unlike the “Full View”, the “Inline View” is meant to be placed onto pages with content other than just testimonials, such as showing a couple testimonials on your homepage. The Inline view is typically used to show a small number of testimonials, and provide a link for the user to view the “Full View” testimonials page. Before configuring the inline view, you must properly set up the full view settings as shown above.
Select Theme
For this exercise, leave the default value of “Plugin Templates”. This field controls where you would like to load templates from. The plugin comes with several templates by default, and we’ll cover creating custom templates in the advanced configuration section.
Select Layout
This field will allow you to select a template to use for the page, by default you have two templates available. You can create and select your own customized templates, which is covered in the advanced configuration section.
Order
This field allows you to control how the testimonials will be sorted when a user navigates to this page. You can select to order them chronologically, randomly, or “Custom”. If you select custom ordering, you will be able to set an individual order value to each testimonial. The testimonials will then be displayed based on this order value.
Items to show
This field controls the number of testimonials which will be displayed when you use the inline view shortcode. The default value is 5, although typically the normal application will use 2 or 3.
More items link title
At the bottom of the inline view will be a link that leads the user to the “Full View” testimonials page. This field controls the text that is shown to the user for this link. For example, some sites may wish to say “View All Testimonials” or “Show All”.
Full view page name
This field allows you to select which page contains your “Full View” of the testimonials. This field is required so the “More items link” sends users to the proper page. This dropdown will automatically list all pages on your site, just select the page which will contain all testimonials. If you have not created a page yet, it is recommended to create a page now.
Custom CSS
This field is used to modify the look & feel of the testimonials page by entering in your own CSS code. This section is covered in advanced configuration.
Apptivo Business Site Developer Guide Navigation