Browse by Solutions
Browse by Solutions
How do I Create New Invoice?
Updated on March 7, 2017 01:44AM by Admin
First off, if you haven’t yet, take a look at the Invoices Quick Start Guide.
You have the ability to create an Invoice from scratch, or you can create from another invoice, create from a timesheet, or create from a project, or from a work order, or create from a order, or create a recurring Invoice.
For this example, let’s start off with the most basic method, creating a quick invoice:
- Log in and access Invoices App from your universal navigation menu bar.
- Click on “Create New Invoice” button in left navigation panel.

- Select whether you will be billing for products sold, billing for services rendered, or if your invoice will include both.

- Now we will fill in the basic invoice information.
- Search for a customer by typing in their name, and results from the customers app will automatically appear. Contacts for the customer will auto populate and choose a contact from the drop down.

- If you set up automatic invoice # generation in configuration, you don’t need to supply an Invoice number here.
- Select the date for the invoice, which will typically be today’s date unless you are future or post dating the invoice.
- If you wish to provide a discount on the services/products, you can enter it just below the invoice date.
- You can supply a message for the customer to be included in the invoice.

- Select the payment term, then add a reference to either the purchase order number, or the number for a service work order.
- Choose the template you would like to use for this Invoice else default template will apply.
- Select currency, this option will be visible if you have been selected multi currency from settings.

- Now we are ready to start adding the services we will be billing for.
- For services, write down a task name, enter the number of hours spent on the task, and how many dollars per hour you will be billing. Lastly, if you need to charge any taxes for this service, select the proper tax code.

- If you are billing for more than 1 task, click the “+”button to create another line.

- If you are billing items, the process is slightly different.
- Instead of entering in the products, we will select products stored in the Items App. If the item does not exist yet, you can click the “New” button to create a new item. The Rate will be automatically calculated, simply enter the quantity of product, and the tax code that applies. The description of the item can be collected in the “Notes”editor window automatically. From here you can customize the text effectively.

- Once again, you can add multiple items by clicking the “+”button.

- Now we’re all done. You’ll notice all values are automatically calculated at the bottom of the site.
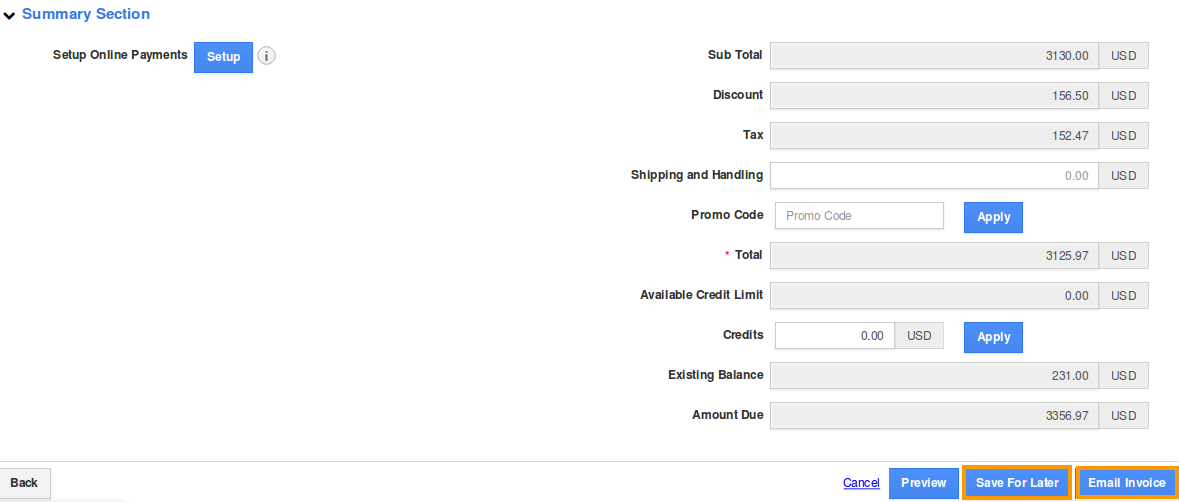
- The next step is up to you. Either save this invoice for later if you wish to manually print and deliver the invoice; or you can email this invoice directly to your customer, and allow them to pay instantly online.
Related Links:
Flag Question
Please explain why you are flagging this content (spam, duplicate question, inappropriate language, etc):

