Browse by Solutions
Browse by Solutions
How do I get the values of custom fields from customers app when creating invoice?
Updated on March 18, 2018 11:46PM by Admin
Importance of using Invoicing application for your business
No matter the size of your business its always better implement a good CRM. The invoicing app in the CRM allows you to send timely invoices to your clients and customers. Apart from that it also makes your work easier. Automated invoice is usually integrated with the existing business processes and other systems. Some of the benefits of using an efficient invoicing application.
Advantages of using an efficient invoicing system
Lets go through the steps quickly.
No matter the size of your business its always better implement a good CRM. The invoicing app in the CRM allows you to send timely invoices to your clients and customers. Apart from that it also makes your work easier. Automated invoice is usually integrated with the existing business processes and other systems. Some of the benefits of using an efficient invoicing application.
Advantages of using an efficient invoicing system
- Manage Subscription Billing - Cloud based invoicing software such as Apptivo Invoicing software supports services that are billed on month/recurring basis.
- Reduced Administration - Having an efficient invoicing software reduces administration overhead.
- Minimized errors - An invoicing app also reduces the errors that occur when the invoices are processed manually.
- Create Transparency - You should be able to answer the queries of your clients and customers. Therefore, its necessary to access the information easily. Putting in place an efficient invoicing system ensures hat the customer queries are addressed immediately, thereby making customer care simpler.
- Reporting is made easier - Having an efficient invoicing app integrated in your system make its easier to generate reports. Using these reports you can quickly identify your most profitable customers.
Lets go through the steps quickly.
To Add Reference App and Fields in Invoices Master Layout
After creating custom fields in customers app, follow the below steps to add those fields or refer those fields when creating invoice.
- Login and access Invoices App from your universal navigation menu bar.
- Click on “More” icon and select "Settings" located at the app header bar.

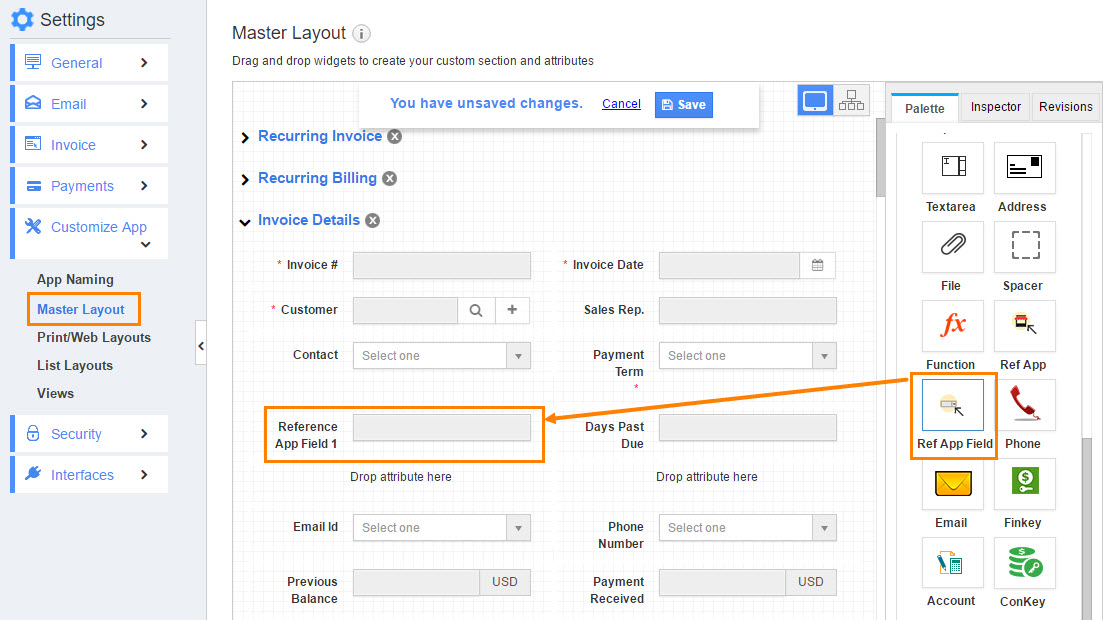
- Click on “Customize App” drop down and select "Master Layout" from left navigation panel.

- Add Reference App and required Reference Fields from Palette pane from right side of the dashboard.

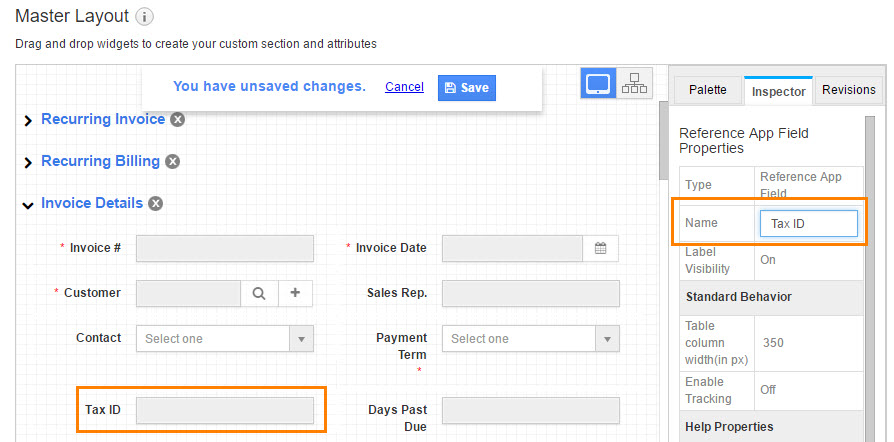
- Click on Reference App field, on the "Inspector" section rename the reference app field to "Tax ID".
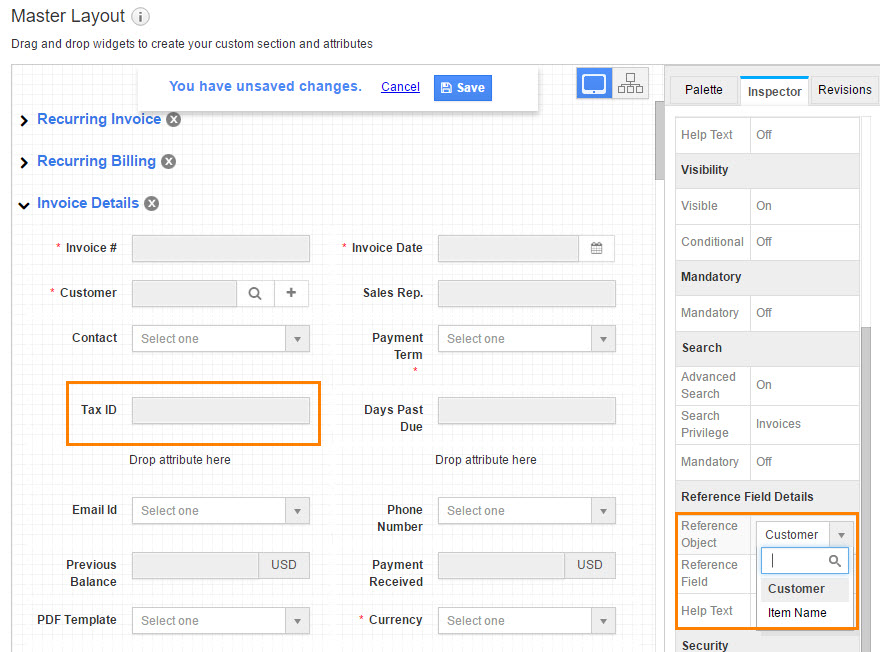
- Scroll down on the inspector column and configure the "Reference Field Details" section as shown in the image below:

- Select the "Reference Object" as "Customers".
Note: This drop down drives the objects(Customer and Item Name) integrated with invoice creation.
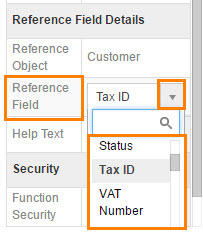
- After selecting reference object as customer, select the "Reference Field" as "Tax ID".
Note: Reference field depends on Reference object because it drives the fields found in the value of Reference Object. - Repeat the above steps to add reference field "VAT Number".
- Click on "Save" button to save the changes.
- After saving the master layout, go to invoice creation page. Select the customer, the custom field values will be auto populated.
Related Links
Flag Question
Please explain why you are flagging this content (spam, duplicate question, inappropriate language, etc):

