Browse by Solutions
Browse by Solutions
How do I create Accounting Rules in Invoice?
Updated on March 18, 2018 11:31PM by Admin
You can customize Accounting rules in Settings. Use accounting rules to determine revenue recognition schedules for your invoice lines. You can assign a different accounting rule to each invoice line. It is similar to workflow feature. The only difference being that you need to create a standard template for the memo and that should be posted on to each journal entry.
Lets go through the following steps to understand better.
To Create Accounting Rules in Invoices
- Log in and access Invoices App from universal navigation menu bar.
- Click on “More” icon and select “Settings” option.

- Click on "Settings -> Accounting Rules -> Invoice" from left navigational panel.

- Toggle on "Enabled" button and click on "Create" blue button.
- You can view the create page where you can define the following:
- Name: Name of the accounting rule.
- Memo: Financial description which should be displayed on Ledger.
- Event: It specifies when the accounting rules should be executed while creating the expense report or while updating the expense report by checking on radio button "Create" and "Update" respectively.
- Priority Score:Rank of the accounting rules which is defined by this priority number.
- Period: Select the particular period from the drop down at which time the journal should be created on ledger. For Instance : Event as "Update", Priority score as "10", Period as "Approved on".

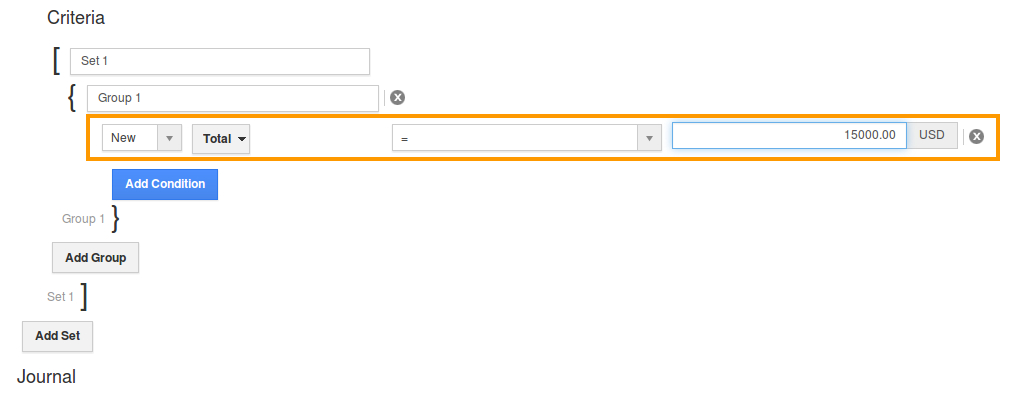
- Define the criteria which is the space where the condition can be defined by selecting attributes and its equivalent values. This example illustrates the criteria and actions as shown below:
{
Set 1
{
Group 1
{
Total=15000
}
}
}
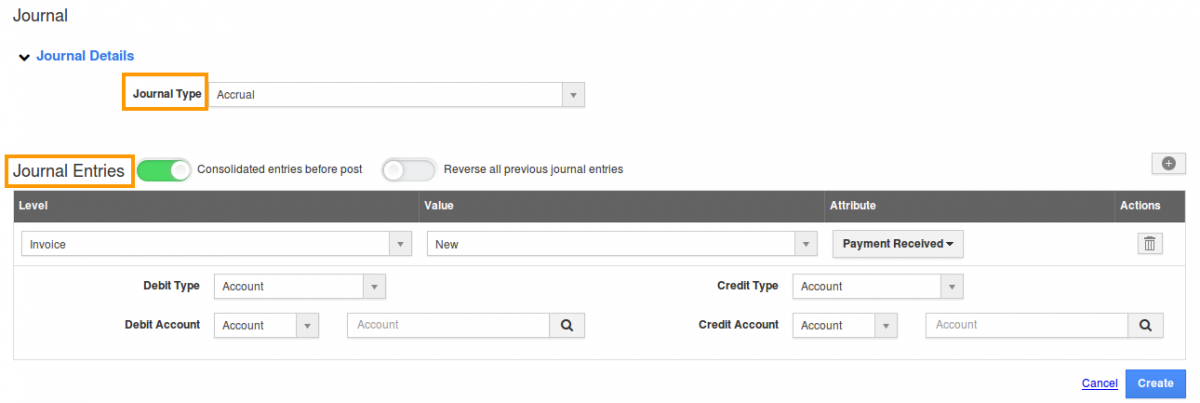
- Under the Journal session you can define the "Journal Type" and "Journal Entries".

- Select the type from "Journal type" drop down under which invoices with satisfied criteria gets created on ledger. For Instance: Accrual
- Journal Entries allows to add single and multiple entries along with the consolidated and reversal options
- By enabling "Consolidated entries before post", if the multiple entries have same debit or credit type it will be consolidated in a single line.
- By enabling "Reverse all previous journal entries" (Note: The event check box should in "Updated" option), reverse journals will be created along with original journal record.

- Underline level of journal session enter the required details like Level, Value, Attribute and then line level sessions like Credit type, Debit type, Credit account and Debit account.
- Click on "Create" blue button.
Related Links
Flag Question
Please explain why you are flagging this content (spam, duplicate question, inappropriate language, etc):

