- Login to your Apptivo and select Report from the left panel of your home page.
- You will be redirected to the Report activity. In the Report activity, select Settings from the App Header.
- To create a new report, select Create from the Reports page in Settings.
- In the Create Report page, you can add a name and description of the report. To keep the report in use, enable the enabled toggle.
- Enable the Filter toggle to filter out the data when generating a report. You can filter out the data based on the financial year, quarterly period, or custom period.
- You can also set the privileges on who can access the report. These privileges are configured in the Employees App of Apptivo. Only those employees have the selected privilege can generate the report.
- Further, the report page is divided into three sections to add values accordingly.
- Context Columns
- Activities Columns
- App Columns
Context Columns
- In this section, you can determine the employees to be added to the report. It works based on criteria. If an employee matches the criteria in the context column, then the employee is added automatically to the Report.
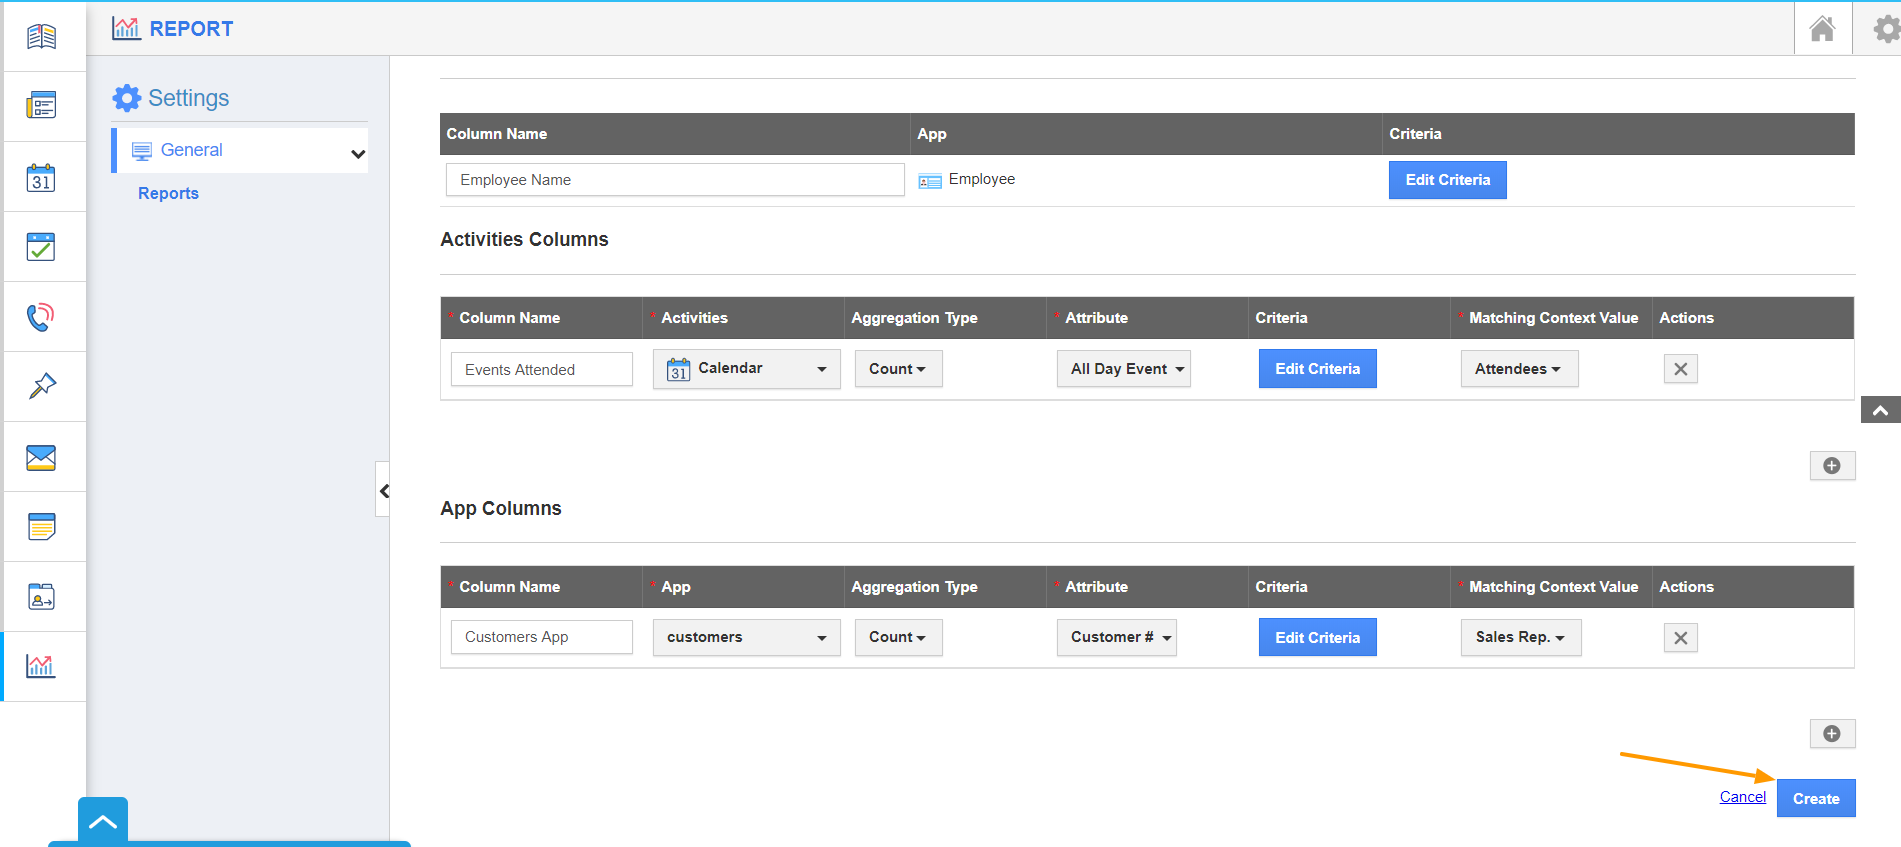
- In the Column name, add a name for this column, Here, I have added the column name as Employee Name.
- On selecting Set Criteria, the Criteria side panel comes into view. On Insert Criteria, the attributes available in the Employees App will be listed.
- You can select a particular attribute. Here, the condition is set to list out the employees if their date of joining is from January 1, 2020.
- Select Create. The configuration is complete for the context columns.
Activities Columns
- In the Activities Columns, you can decide on the activities to be listed in the Activities Column. Select the (+) icon to expand the list.
- In the Column Name, you can add a name for the Activities Column.
- In the Activities, select an activity for which the report is to be generated. Select the aggregation type to be sum or count. In the Attribute column, you can set the attribute based on which the sum or count is to be calculated.
- Select Set Criteria, to render the report with activities matching the criteria.
- Here, the criteria are set to include in the activity count if the Title is not empty. Select Create to add it.
- In the Matching Context Value, you can decide based on which employee attribute should the Employee be added. Here, the count will be added to an employee if he/she is added as an attendee to All Day Event.
- To add more than one activity or attribute to included, click the (+) icon.
App Columns
- In the App Columns, you can determine the app details to be listed in the Report for an employee. Choose the (+) icon to expand the list.
- Add a name for the App Column in the Column Name.
- In the App, select an app from which the report is to be generated.
- Select the aggregation type to be sum or count.
- In the Attribute column, you can set the attribute upon which the sum or count is to be calculated. Here, Customer# is added.
- Select Set Criteria, to render the report with records matching the criteria.
- Here, the criteria are set to include in the report if the customer# is not equal to 10. Select Create to add it.
- In the Matching Context Value, you can decide the employee attribute based on which the count or sum is to be added to an employee. Here, the Sales Rep is selected.
- To add more than one column in the report, click the (+) icon.
- Once the setup is complete, select create. A new report is created.
- Go to the Report home page. The created report will be present in the left panel. Select it to view the report.
- By selecting the All dropdown, you can filter the records based on your team, employees, or yourself.
- You can select the year filter to generate a report for a particular time period. You can view the report based on the year, quarterly period, or custom time period. By selecting custom, you can filter records based on created on and/or modified on dates.
- You can make use of the and/or operators to filter either created on or modified on records.
- To export the report, select the Export button → .CSV.
- The report will be downloaded in .CSV format.
Note: This feature is available in Plan E.


