Hi All! Have we mentioned how much we are indebted to you? You all are awesome and we appreciate your feedback always and we keep improving our mobile apps based on your requests. While most of the team is focussed on the next major version of our product, we are here to happily present you the latest updates deployed on July 07, 2018. This release brings in the following set of new features and minor improvements.
iOS All-In-One App Updates – V6.0.3
- Custom Conversion in Leads App
- Dependency Conditions for Ref App fields
- Address Attribute support in Ref App fields
- Estimate creation from another Estimate
- Added Discount Field to Estimates
- Email Template Attachments
- Email Signature
- Reference Section
- RTE Support
- Number Maximum Range
- Section Conditional Dependency for Activities and CRM apps
- Conditional Feature in Activities
Download our latest version of iOS All-In-One App.
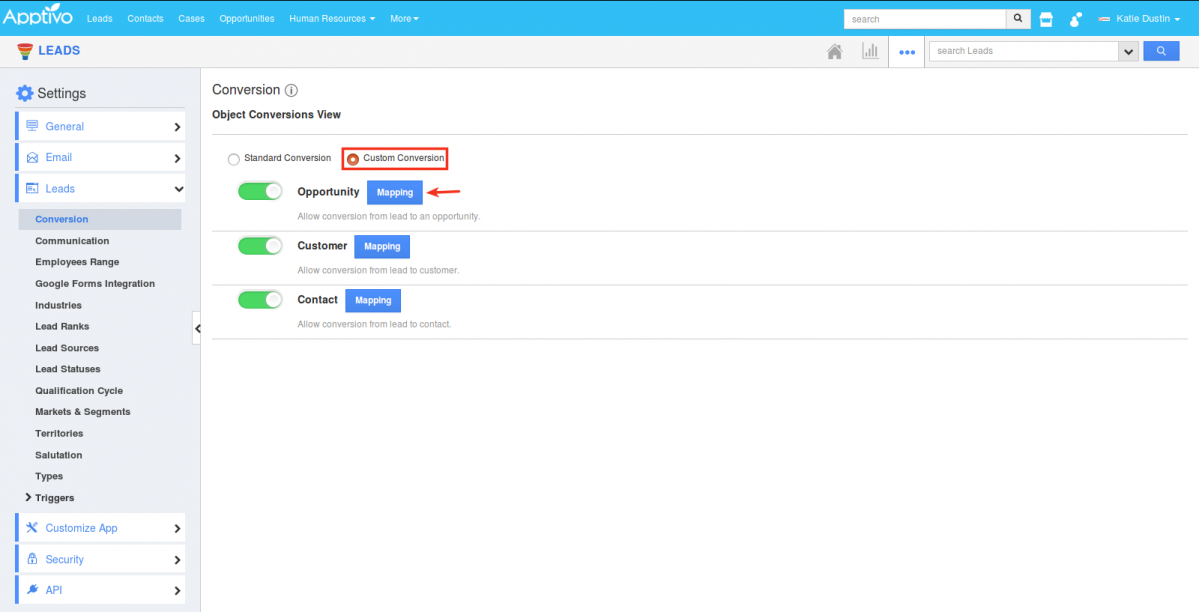
Custom Conversion in Leads App
In this update, we have enhanced the conversion feature in the Leads App. This update will now give you the ability to map the attributes of the source app (Leads App) with the destination app, according to your business requirements. Note: The custom conversion should be configured from the web version. Go to Settings -> Leads -> Conversion -> Custom Conversion.
|
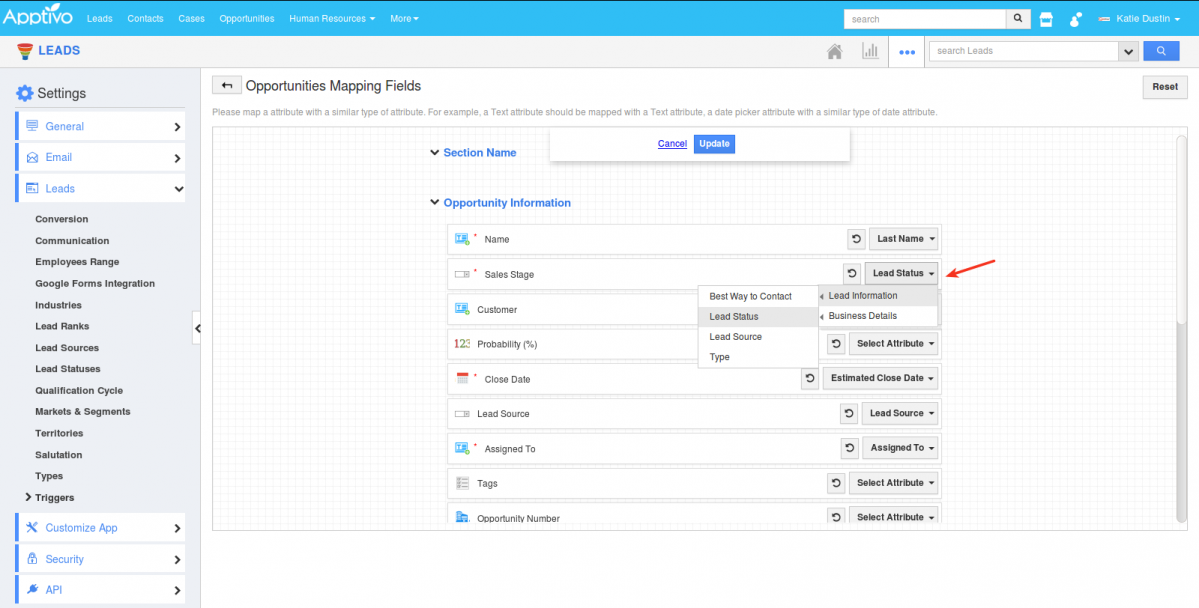
On clicking Mapping, you can now select and map the fields as per your requirement, based on which the conversion will be carried.
|
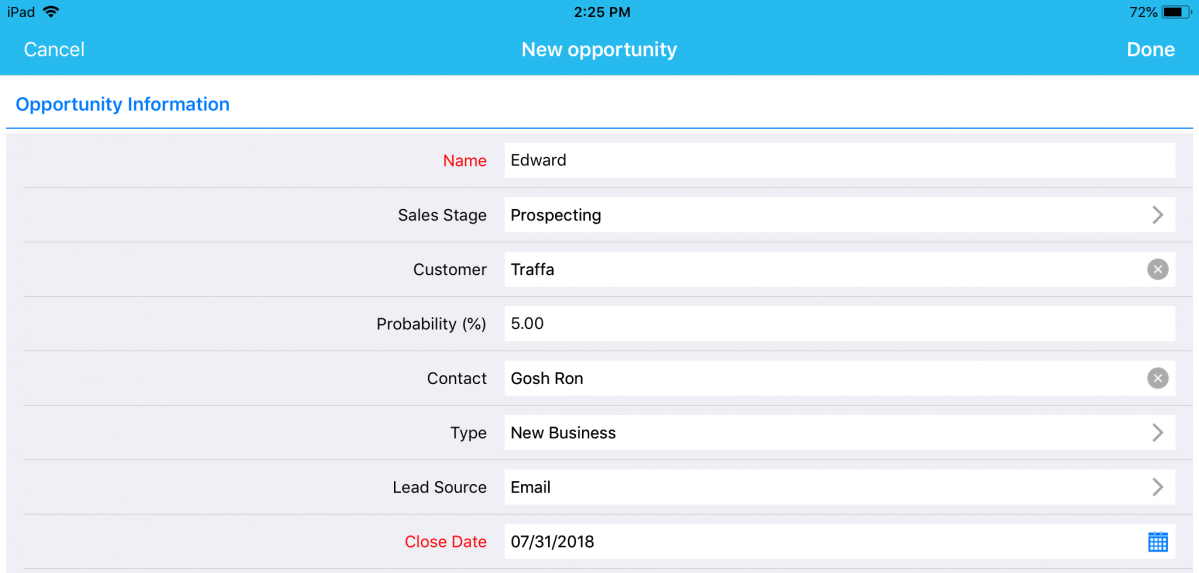
Based on the mapping of the fields, when you convert a lead to an opportunity from your iOS device, the values will get populated accordingly.
|
Dependency Conditions for Ref App fields
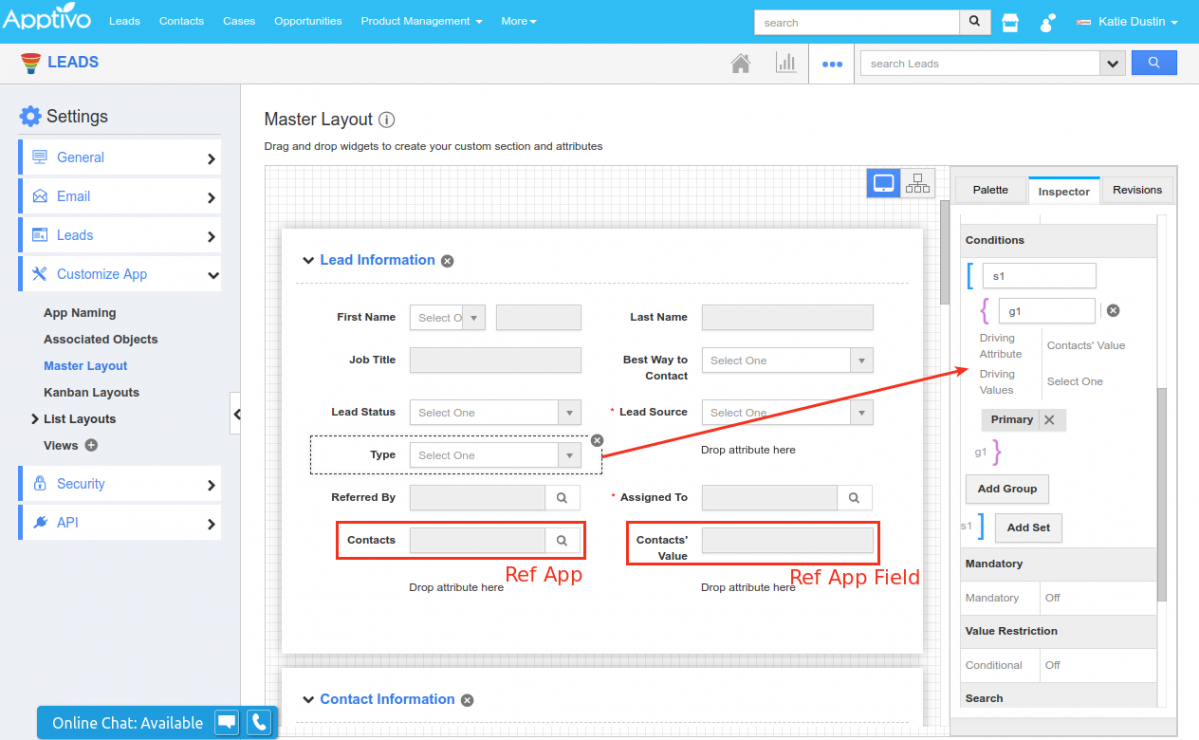
In this release, we have further improved the Dependency Conditions (Visibility, Mandatory, Value). That is, you can now set dependency conditions using the Ref App Fields too. (Note: You need to configure this setting from the Web version which will be reflected instantly in the iOS All-In-One App)
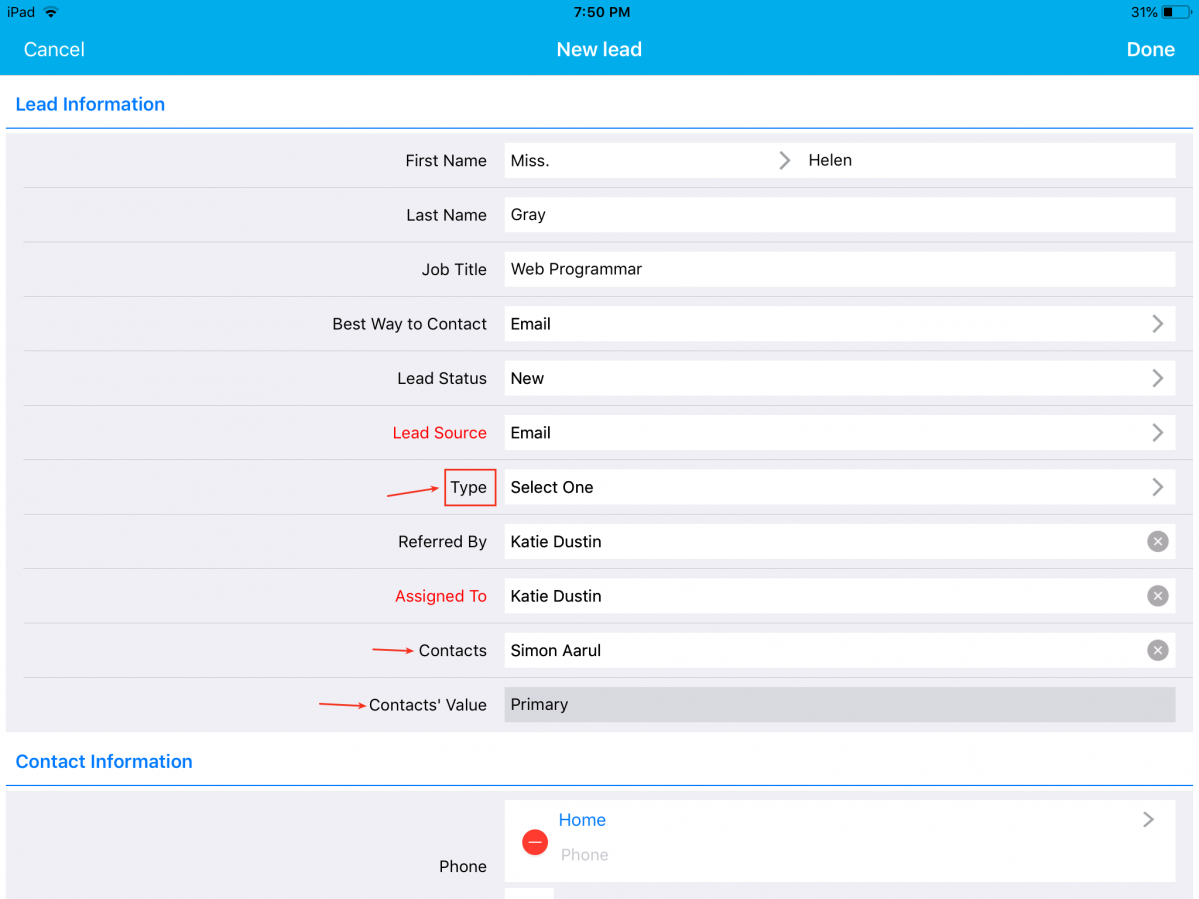
For instance: Consider Leads App. Go to Settings -> Customize App -> Master Layout. Here, we have configured the Ref App as Contacts and the Ref App Field as Contacts’ Value. We are now setting the Conditional Visibility Dependency (the field Type should be made visible only when the Contacts’ Value is Primary) for the field Type, where you can use the Ref App Fields now. (Note: As of now, only custom created fields can be used to set dependency conditions)
|
So now when creating a lead from your iOS device, the Type field will not be visible in the Creation page. Now select a Contact whose Value is Primary and the Type field will be made visible, as shown in the image below:
|
The Type field will be hidden, when the Contacts’ Value is not set to Primary.
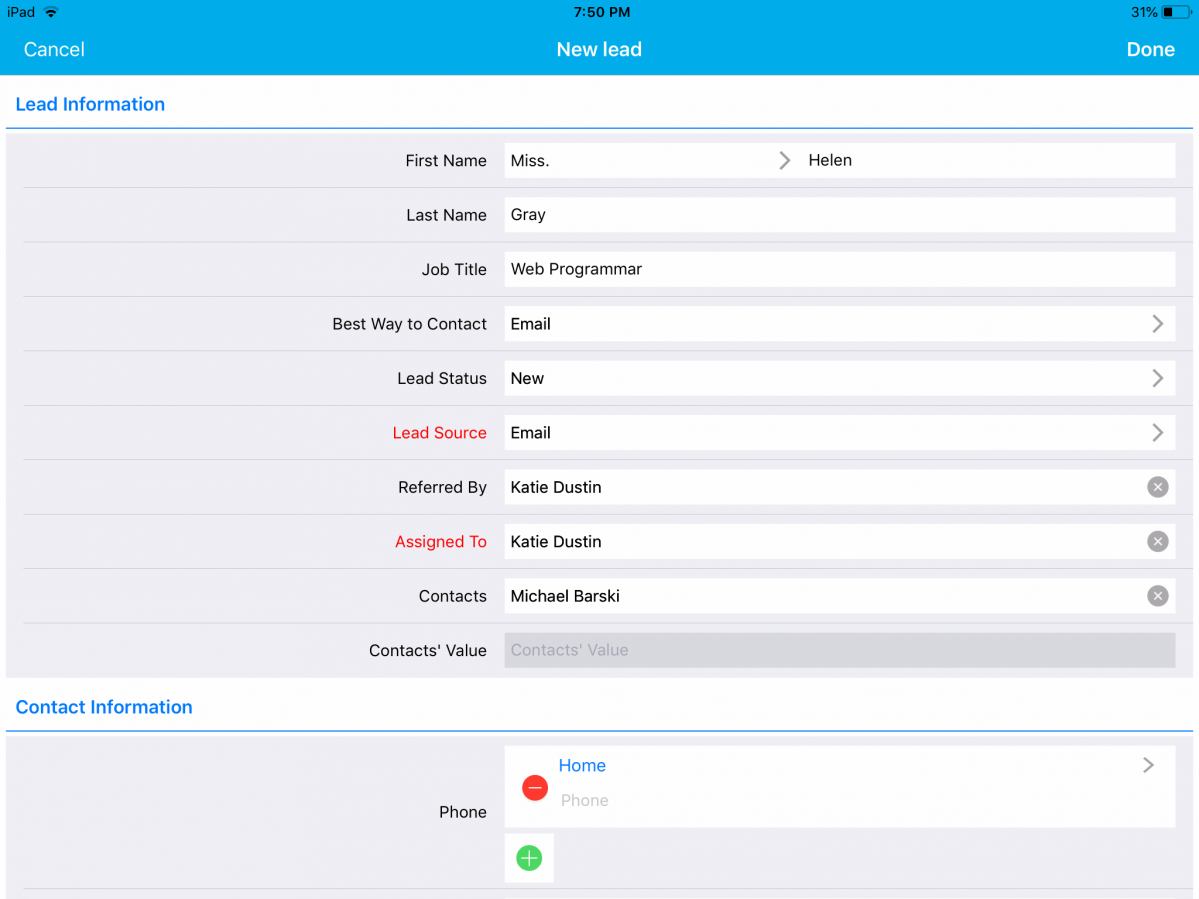
|
Address Attribute Support in Ref App fields
In this release, we have provided the support of Address Attributes in the Ref App Fields. That is, the address attributes of an app can be pulled and referenced in another app via the Ref App Fields. (Note: This configuration is to be done from the web version that will get reflected in your iOS device instantly)
For instance: Consider the Estimates App. Here, on selecting the Customer Name you would want the Address Information associated with the customer to be displayed. To do so, go to the Estimates App Settings (in the web) -> Customize App -> Master Layout. Set the Reference App to Customers and the Reference App Field to Customer Billing Address.
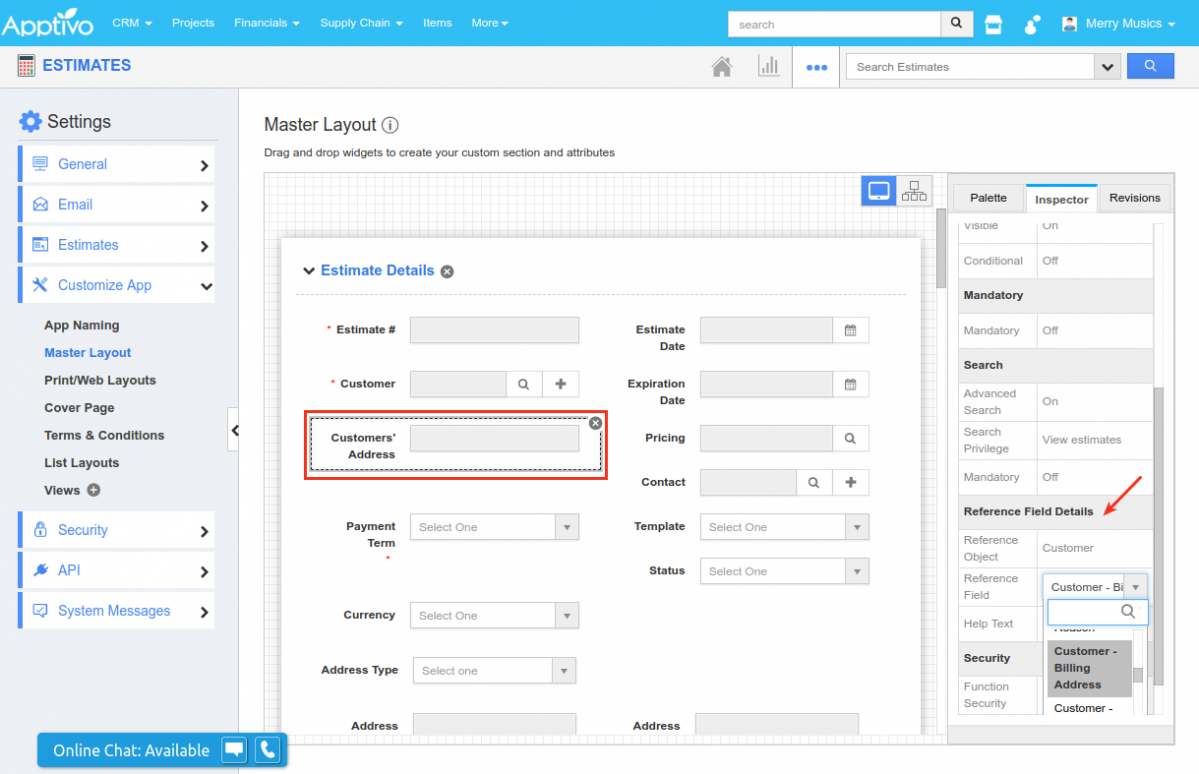
|
So now when creating an estimate from your iOS device, on selecting a customer, you can view the billing address as shown in the image below:
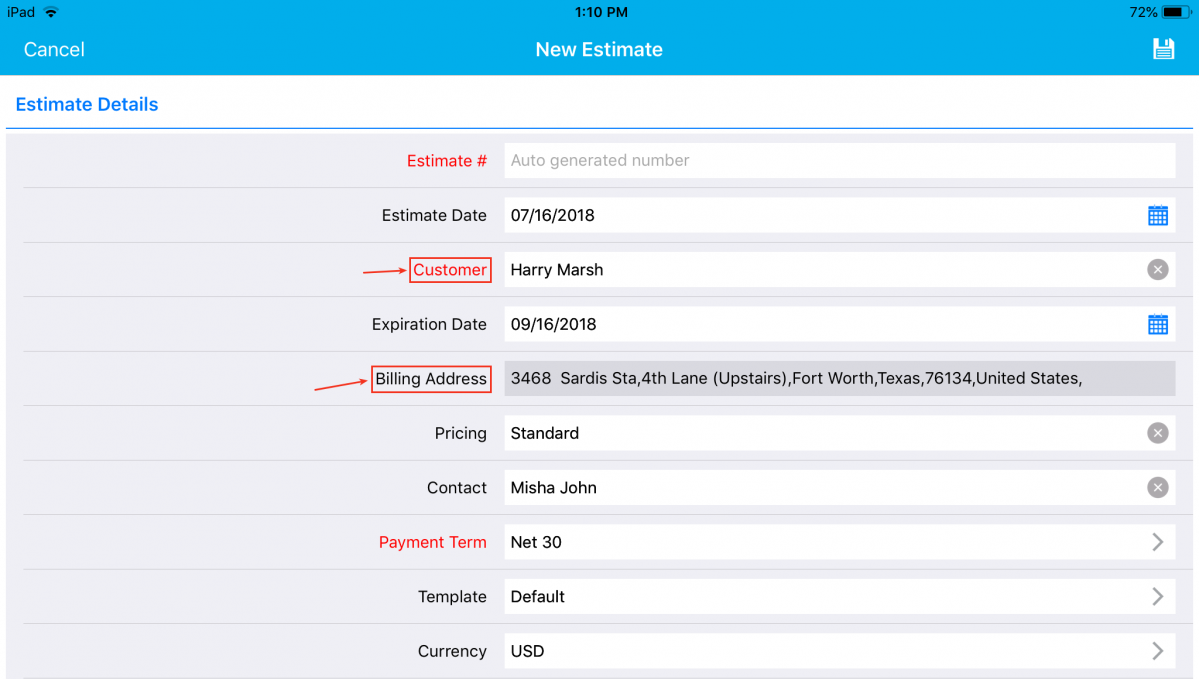
|
Estimate Creation from another Estimate
A cool update in this release is the ability to create an estimate from another estimate. This feature lets you select an existing estimate from which you want to create a new estimate. To do so, click on the “+” icon -> From Another Estimate, found at the top right corner in the Estimates App.
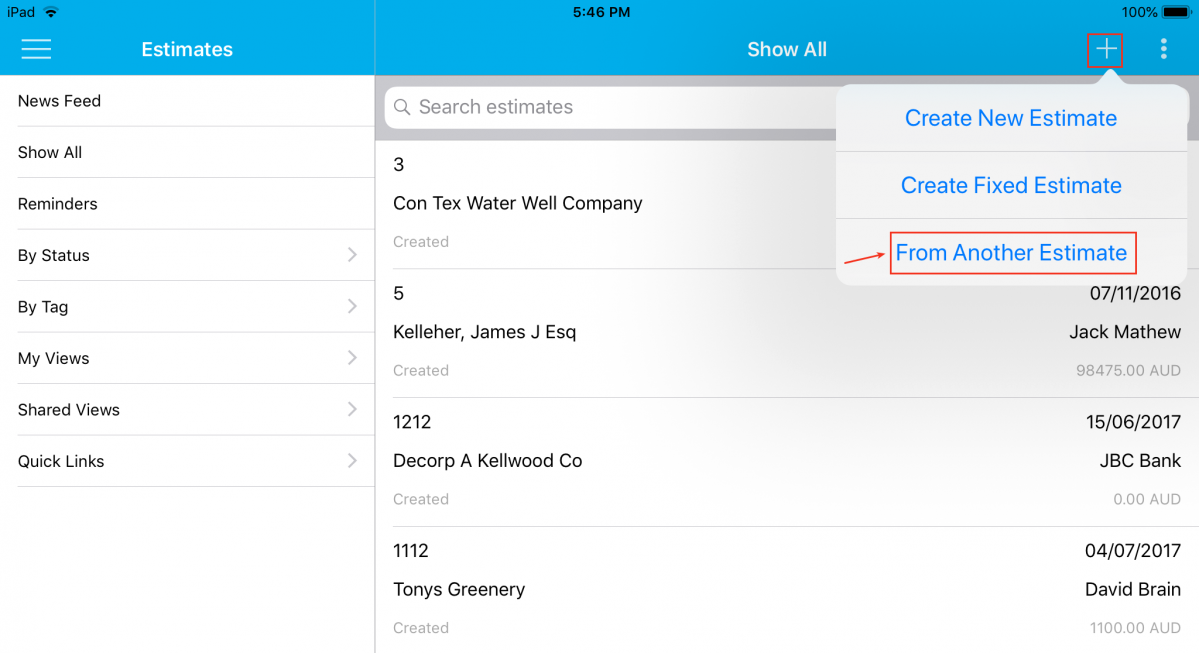
|
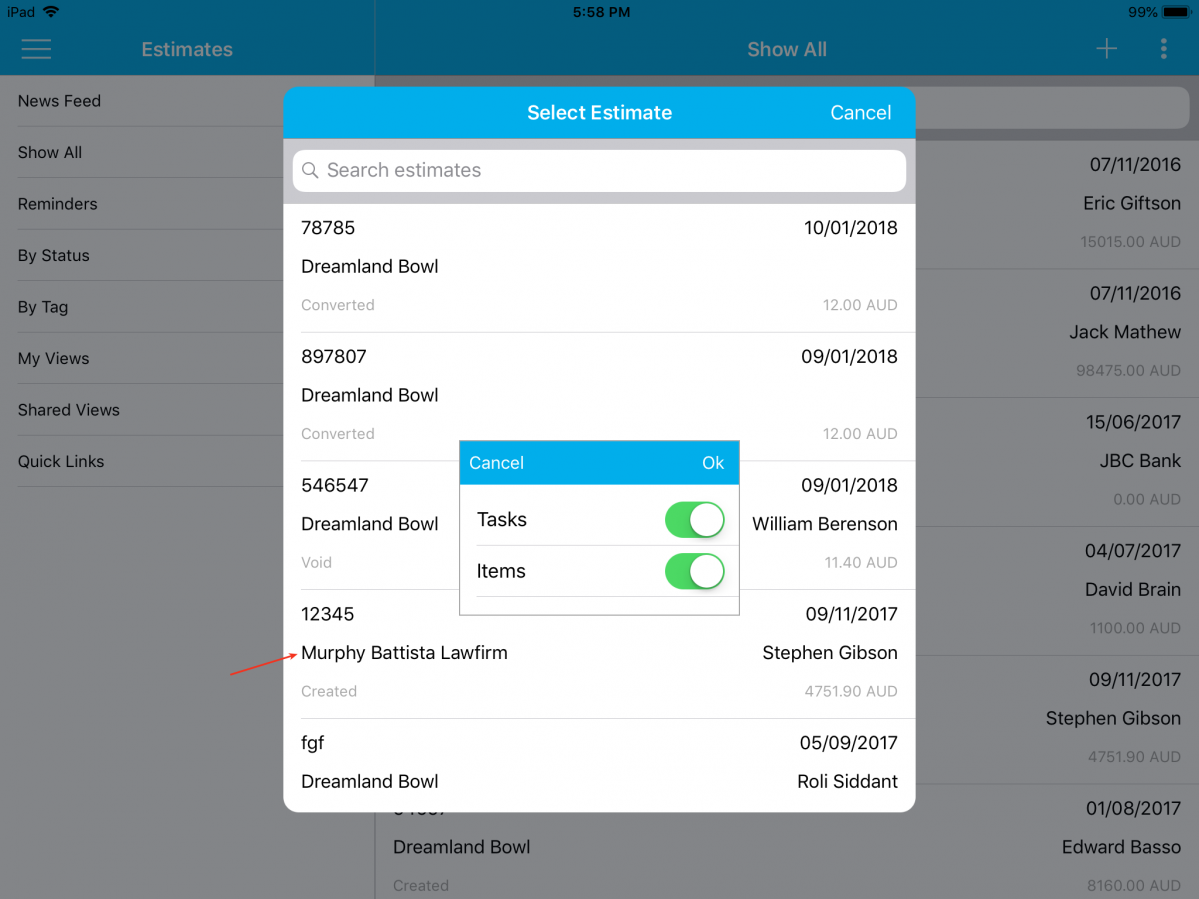
You will now be displayed with the Select Estimate popup, where you can select the required estimate from which you would want to create a new one. On selecting the estimate, you will be displayed with the following toggles – Tasks & Items, giving you the ability to select either tasks or items or both to be copied from the existing estimate. Click Ok.
|
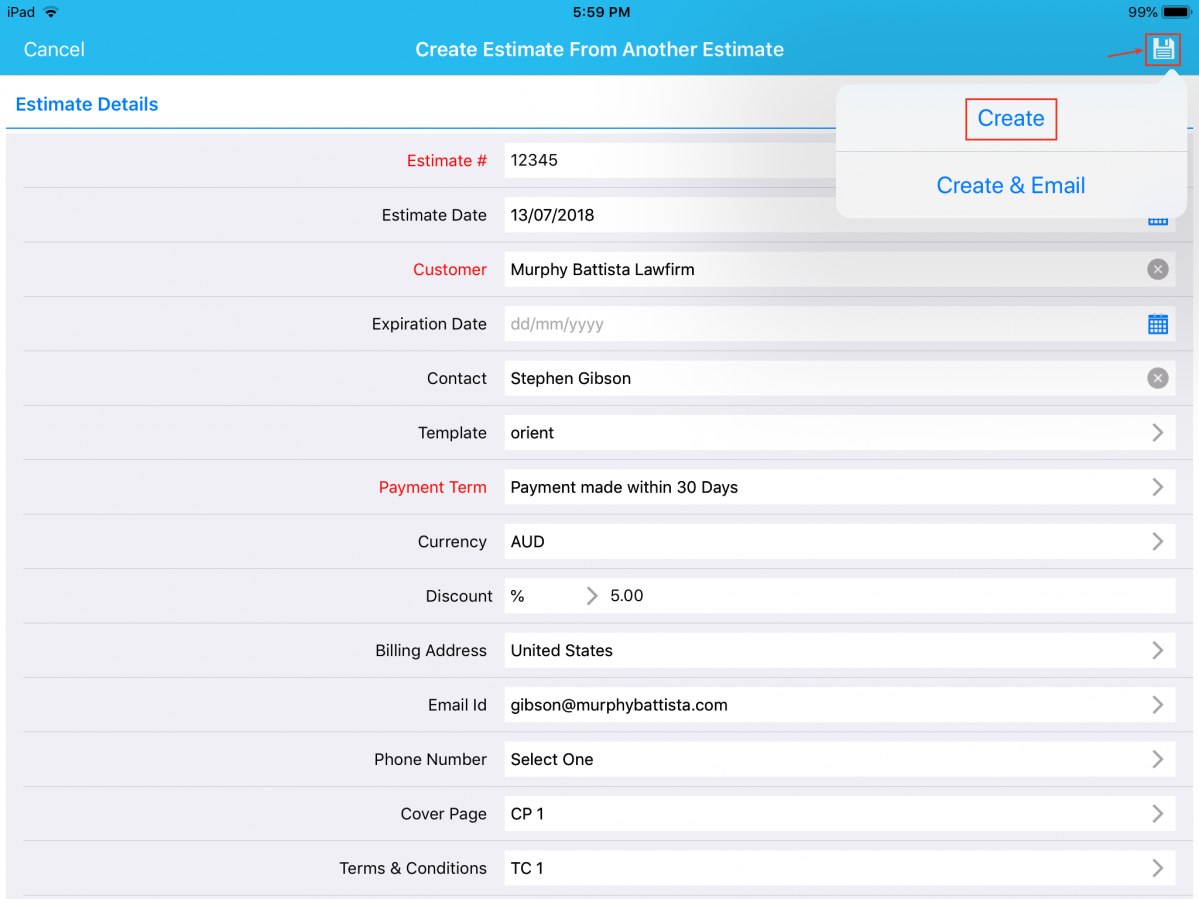
The details copied from the existing estimate will be displayed as shown, where you can make the necessary changes. Finally, click on the Save icon found at the top right corner -> and click on Create.
|
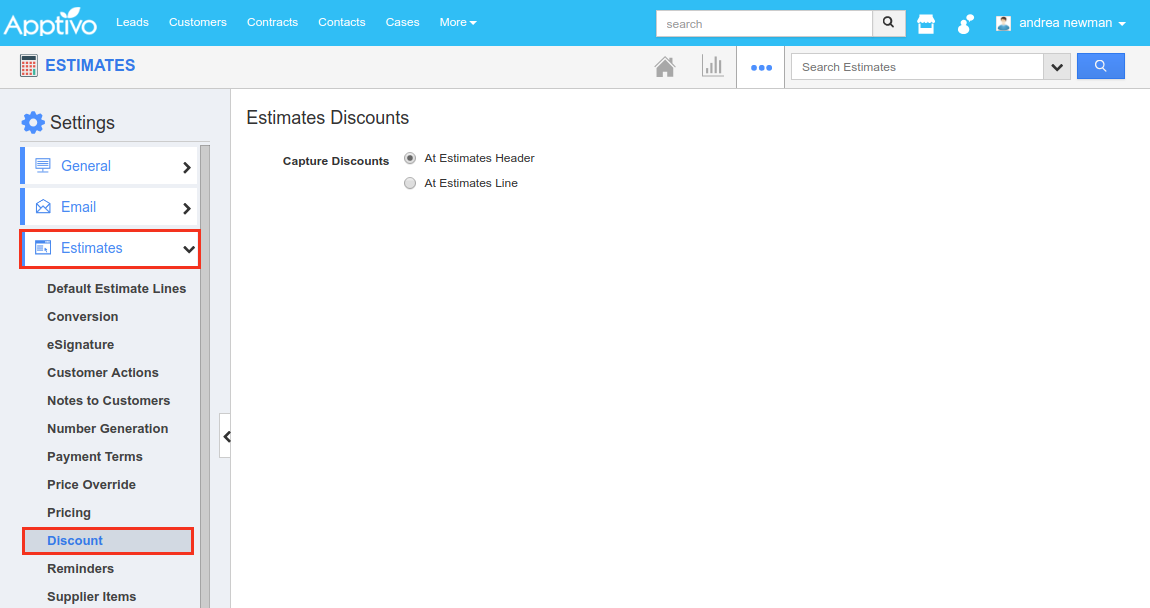
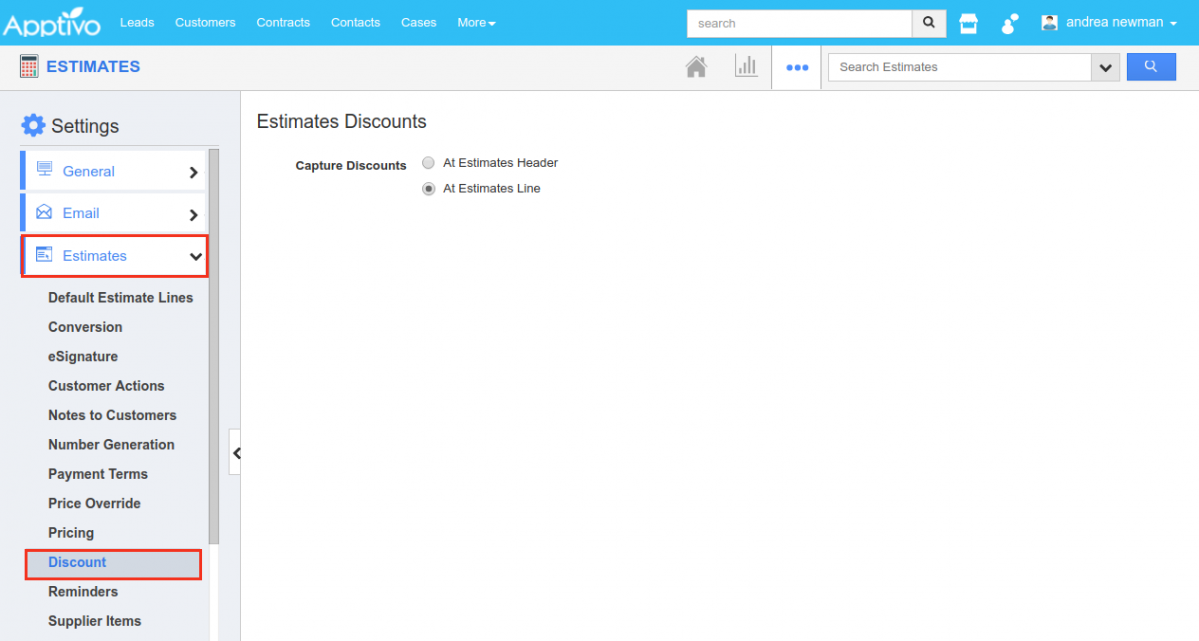
Added Discount Field to Estimates
In this release, we have added the Discount field newly to the Line Level in the Estimates App. In this field, you can give offers/discounts individually for the products/items to your customers while creating estimates. To make it more user-friendly, we have also provided you the ability to configure the position of the Discount Field in the estimates.
- Header Level
- Line Level
(Note: All configurations should be done in the web version which will be reflected instantly in your iOS device)
To configure the position, go to Estimates App Settings -> Estimates -> Discount -> and select the position where you would want to capture your discounts, as shown in the below image: (here, we have selected Header Level discount)
|
Now based on the configuration you have done, when creating estimates from your iOS device, you can view the discount field located at the header level:
|
This Discount Field can also be added to the Estimate PDF, you send to your customers.
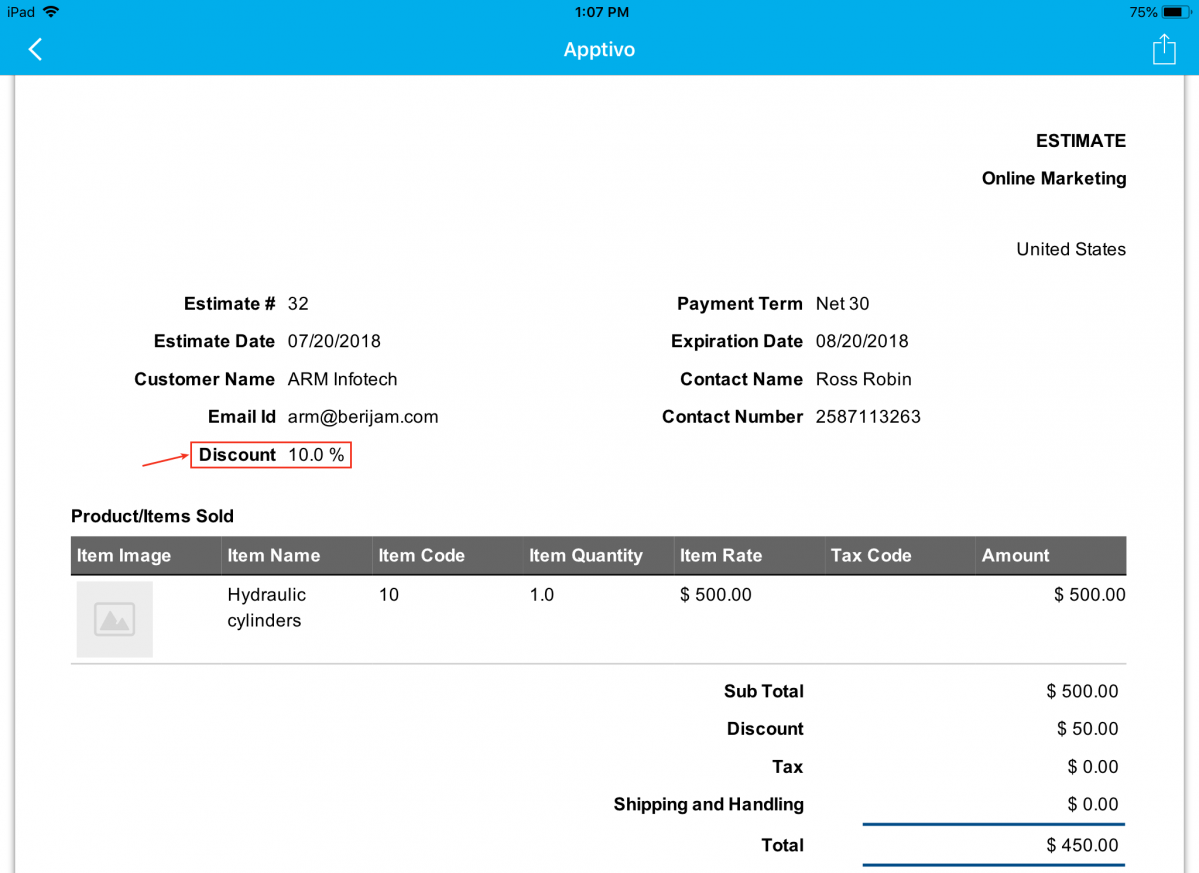
|
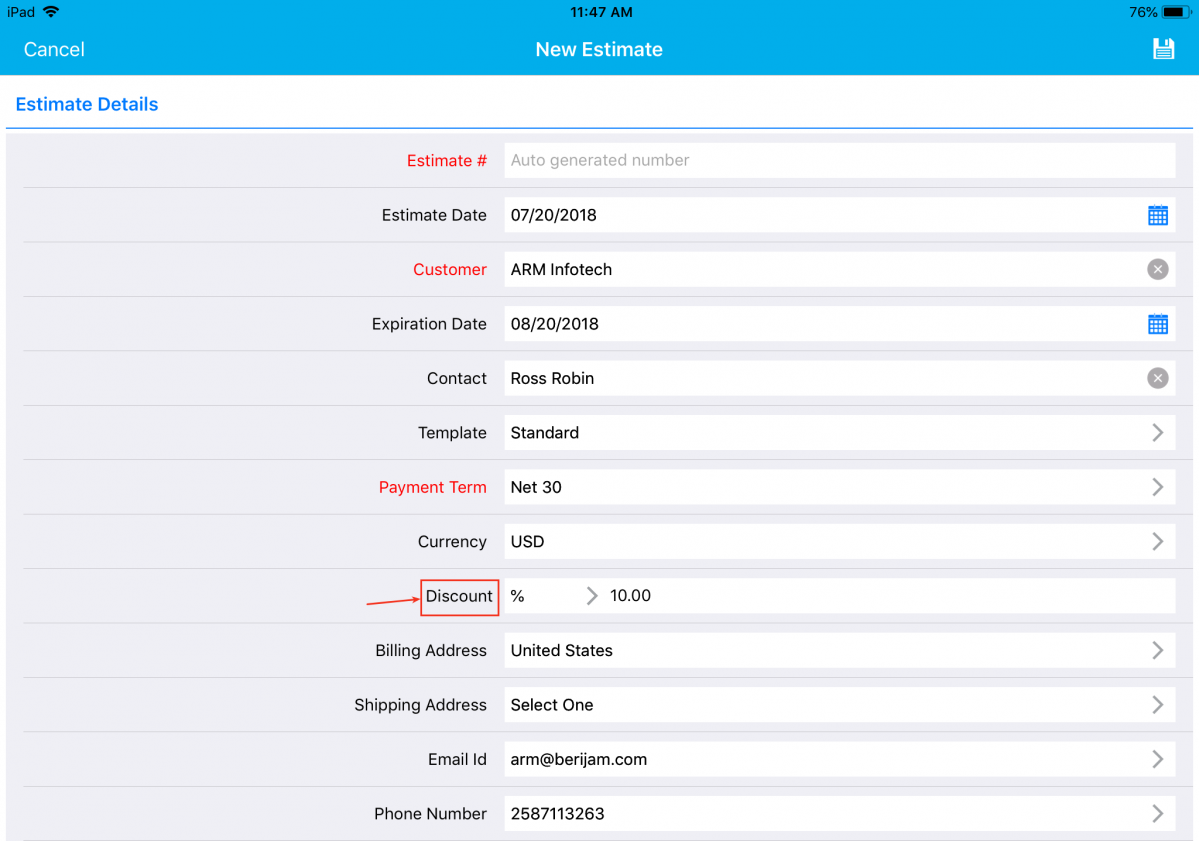
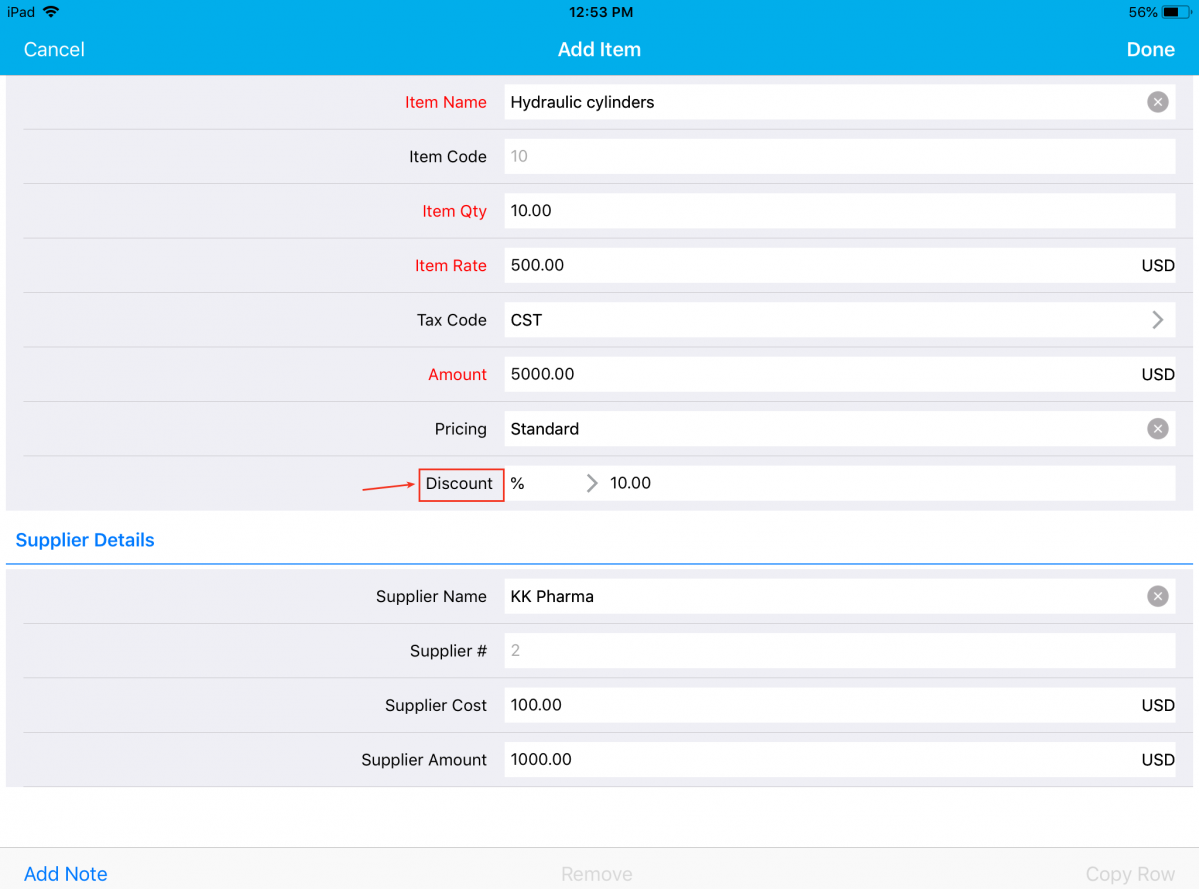
Similarly, by selecting the Discount to be captured at the Estimates Line Level:
|
When creating estimates from your iOS device, you can view the discount field located at the estimates line level, as shown in the image below:
|
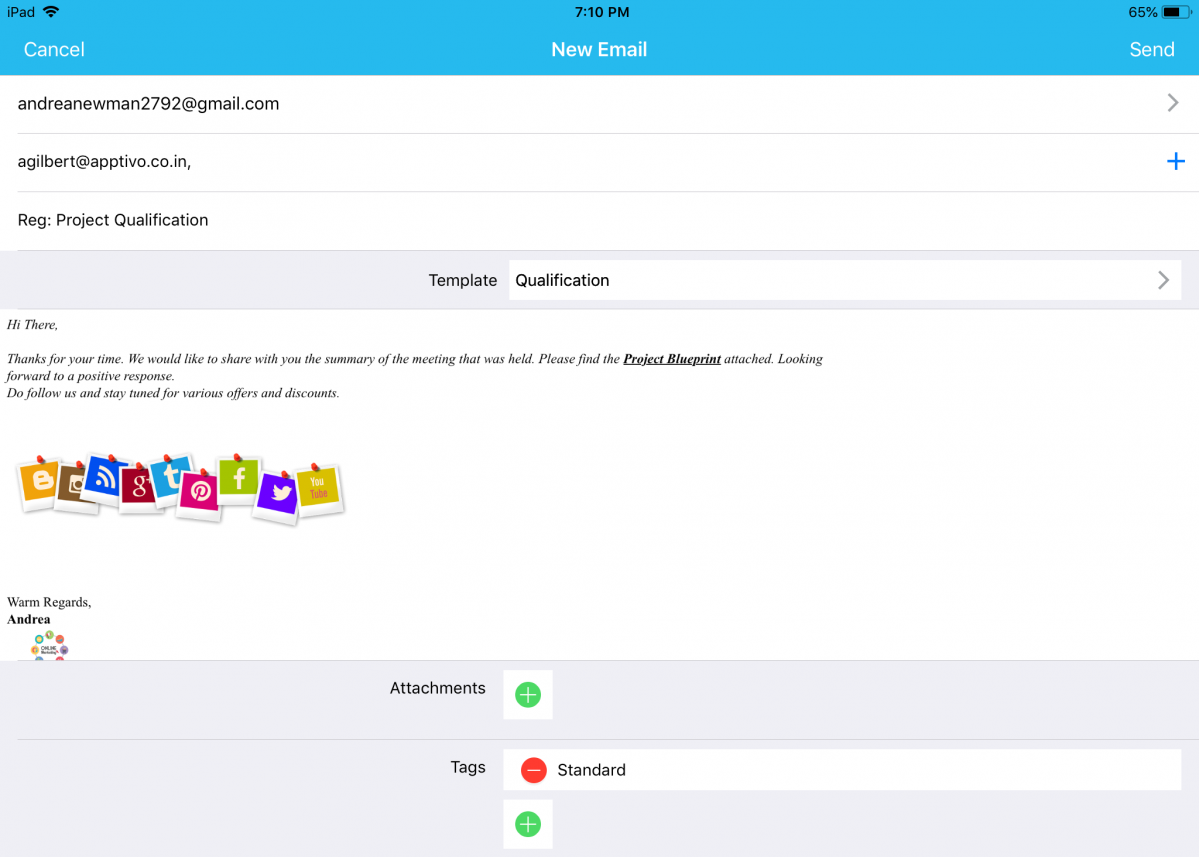
Email Template Attachments
Email Templates & Email Attachments aren’t something new in Apptivo. The enhancement made is that it will now support the Attachments feature in the Email Templates. Create email templates with attachments from the web version and on selecting that template when sending emails from the iOS All-In-One App, the attachment added will automatically be populated.
For instance: Consider the Leads App. To add an attachment to a template, go to the web version Leads App Settings -> Email -> Email Templates -> create or select an existing template -> and add an attachment.
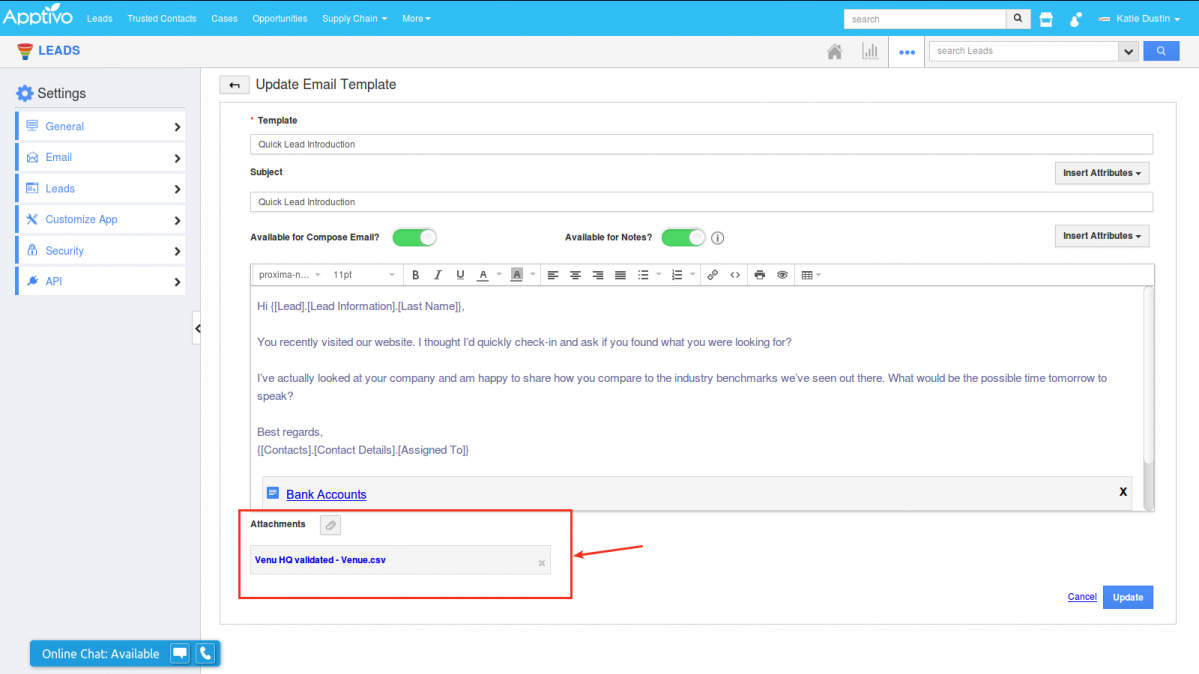
|
Now on composing a new email from your iOS device, and selecting the above-configured email template, you can view the attachment being added automatically to the mail you send.
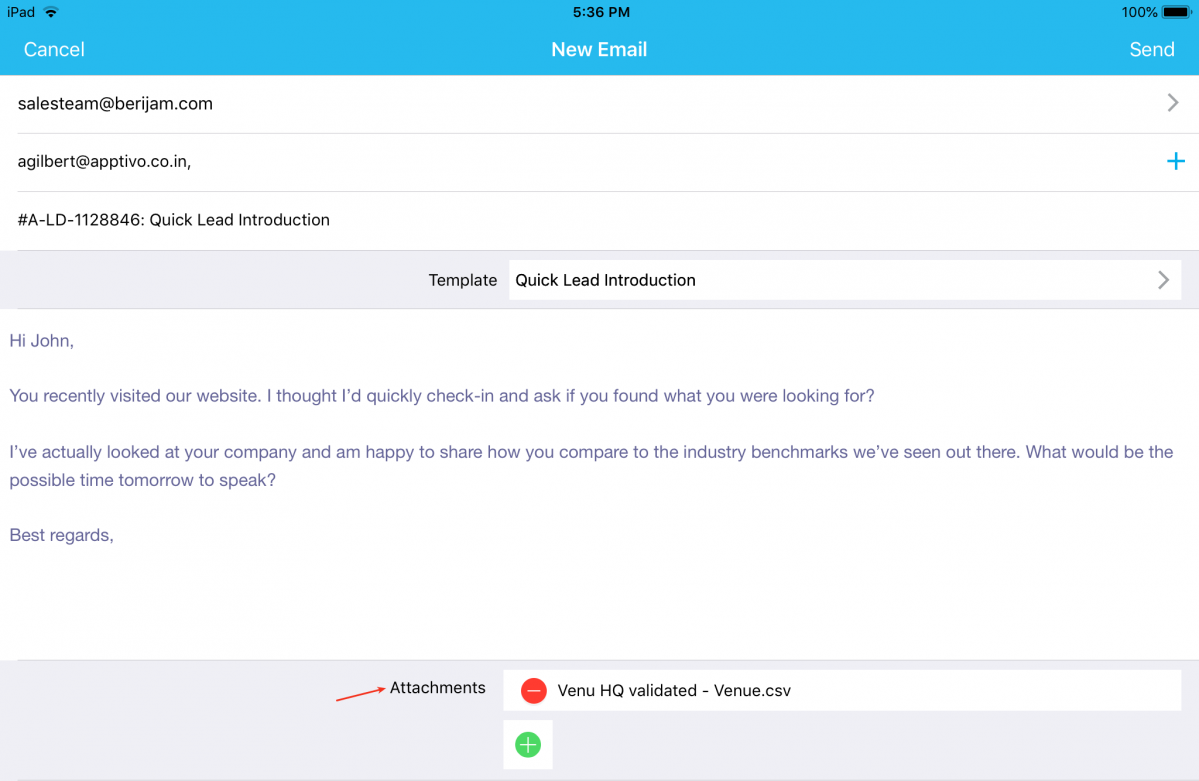
|
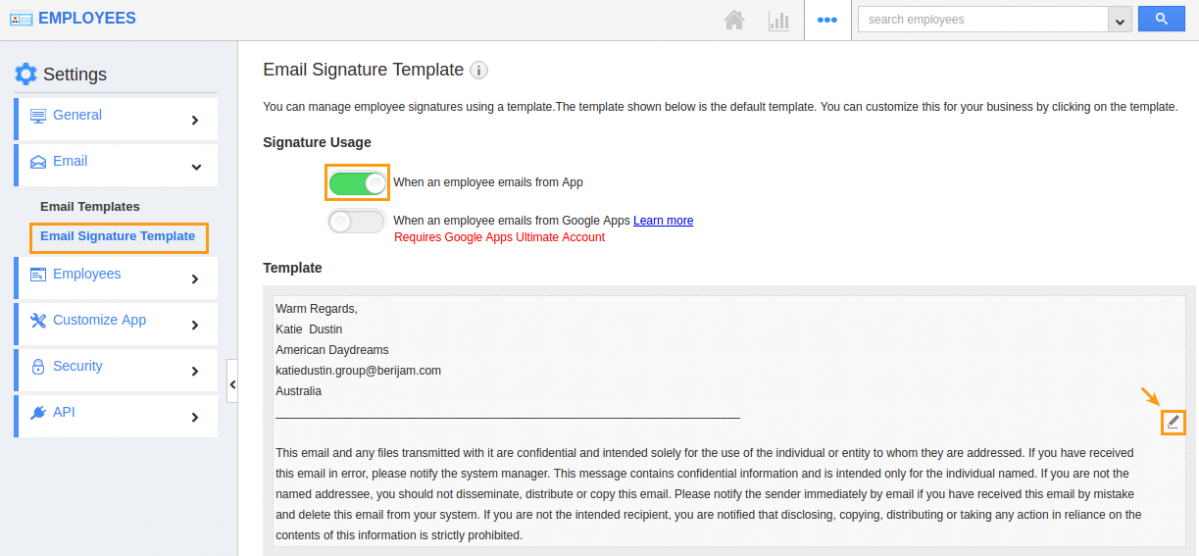
Email Signature
One of the notable features in this release is the addition of Email Signatures to emails. With this update, an email signature will automatically be inserted to every email you send out from your iOS All-In-One App.
Note: The email signature should be configured from the web version.
To configure it, go to Employees App Settings -> Email -> Email Signature Template. Enter the email signature of your choice and save the changes.
|
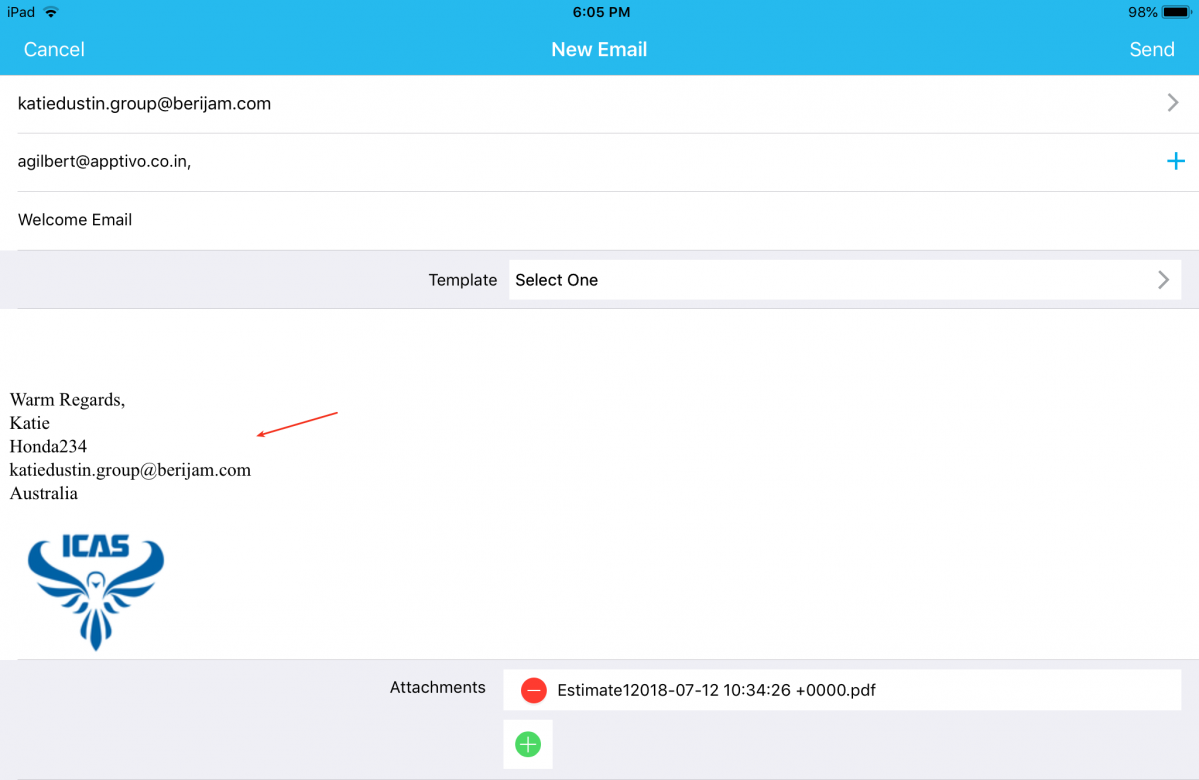
Now when you send out an email from the All-In-One App, the configured email signature will be attached automatically to every email, as shown in the image below:
|
Reference Section
In this release, we have implemented the feature of Reference Section. This feature gives you the ability to view the fields of a custom section of an app in any other app of your preference.
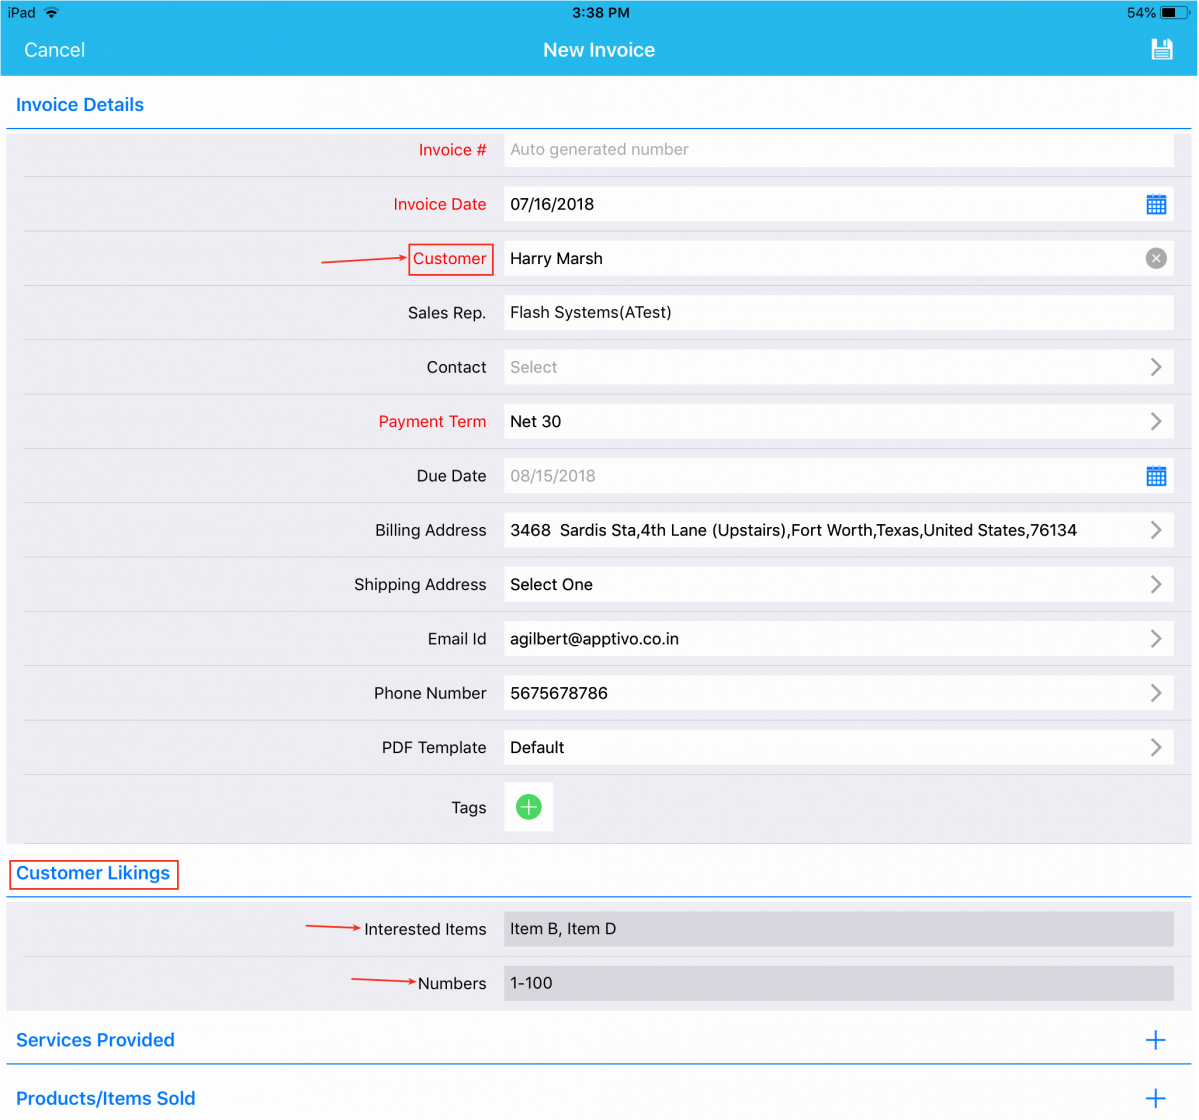
For instance: Consider the scenario, where you would like to view certain details of the Customer in the Invoices App. In that case, a custom section can be created in the Customers App and that can be referenced in the Invoices App. (All configurations are to be done in the web version)
On successful configuration, now go to the Invoices App where it can be referenced and create an invoice. On selecting, the reference section attributes will be auto-populated enabling you to view customer details in the invoices created.
|
RTE Support
We have enabled the RTE (Rich Text Editor) support in all the apps, enhancing the look and feel of the text editor. So far, on selecting the templates when sending out emails, the template contents with images will be disarrayed and with no images being fetched. We have now worked on it which pulls in the template contents as such. And to be fair, this offers you a great experience. You can now have the texts and images in the way you want it to be.
|
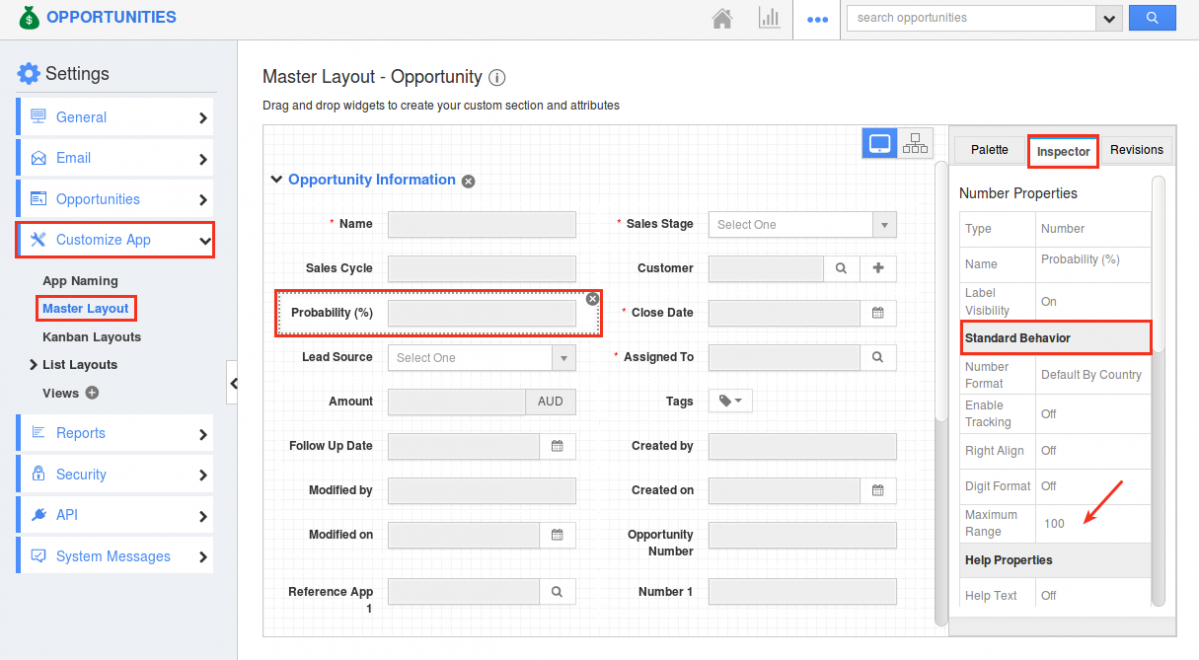
Number Maximum Range
The Maximum Range field in the Number attribute is where you can set and define the maximum number range that can be entered in that number field. This Maximum Range for numbers should be configured in the web version, which will get reflected in your iOS All-In-One App.
For instance: Consider the Opportunities App. In a lot of cases, the Probability value cannot be greater than 100. To do so, go to Opportunities App Settings -> Customize App -> Master Layout -> click on the Probability field -> enter the Maximum Range as 100 under the Standard Behavior section of the Inspector tab. Save the changes.
|
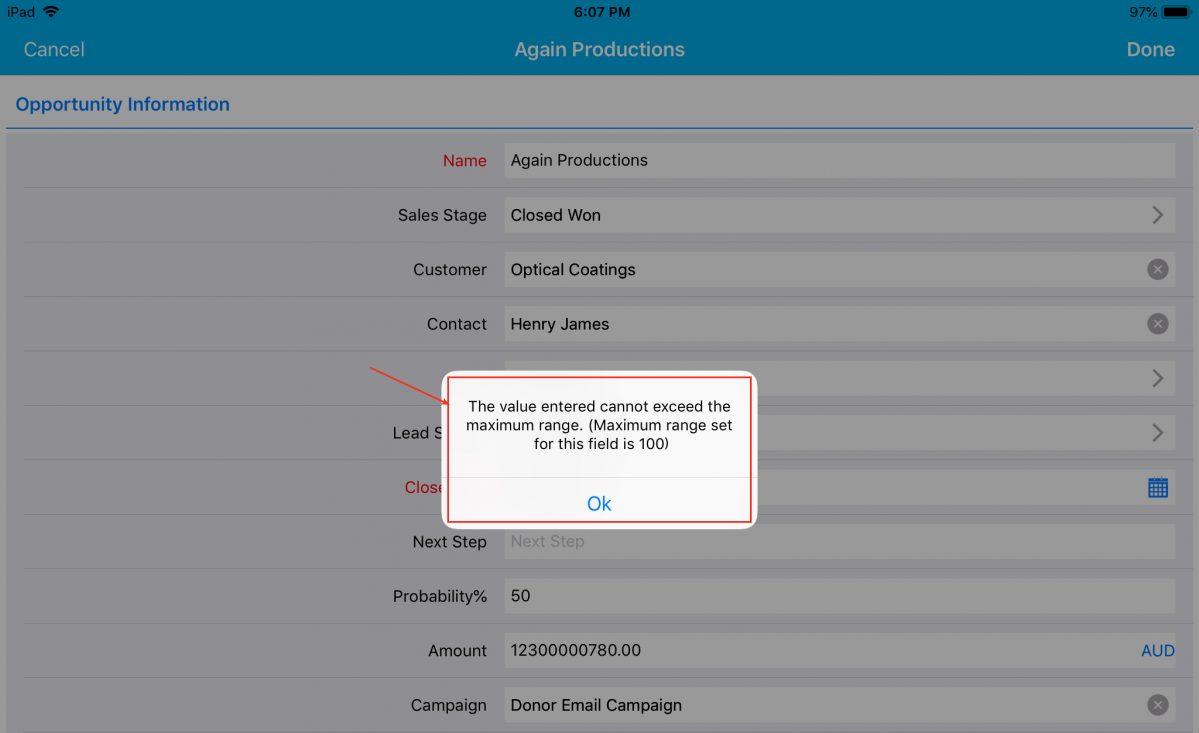
Now in your iOS device, on entering a value greater than 100 in the Probability field, you will be notified with an Error pop up as shown in the below image:
|
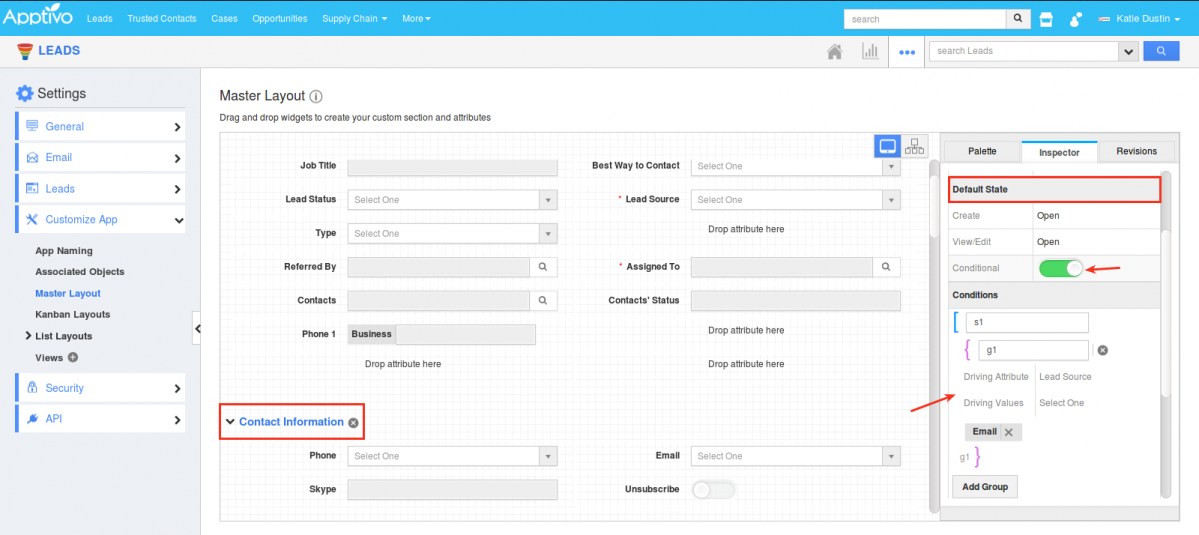
Sectional Visibility Dependency for Activities and CRM Apps
We have implemented the Sectional Visibility Dependency for both the Activities and CRM Apps. With this feature, you can make a section to show or hide based on the condition you set.
Note: You need to configure this setting from the Web version which will be reflected instantly in your iOS device on refreshing.
For instance: In the web version. go to the Leads App Settings -> Customize App -> Master Layout. Click on Contact Information section -> enable the Conditional toggle ON under the Visibility section and define the condition as “Lead Source = Email”. This depicts that, when Lead Source is set to Email, the section Contact Information will be visible.
|
And now in your iOS device, on selecting Lead Source as Email, you can view the Contact Information section as shown in the image below:
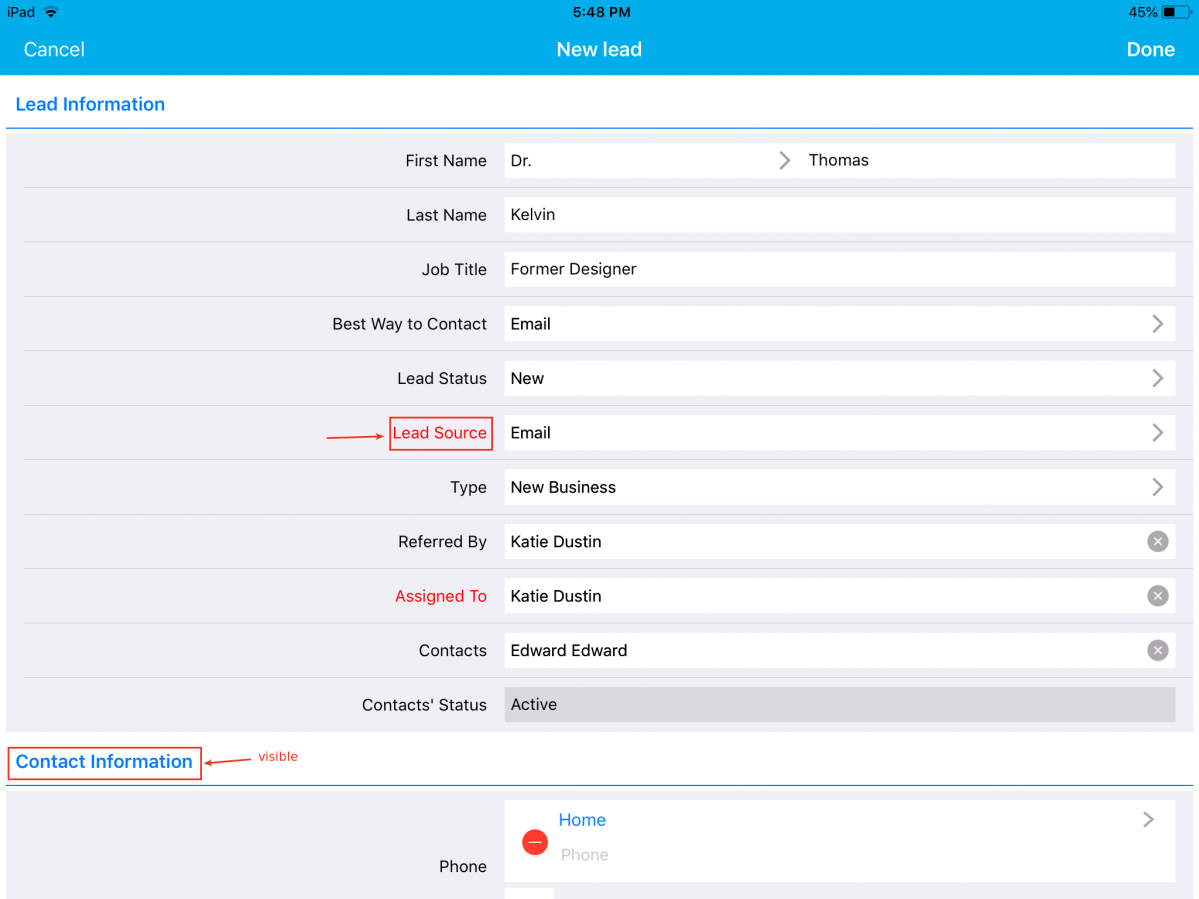
|
When Lead Source is set to something else other than Email, the section will be hidden:
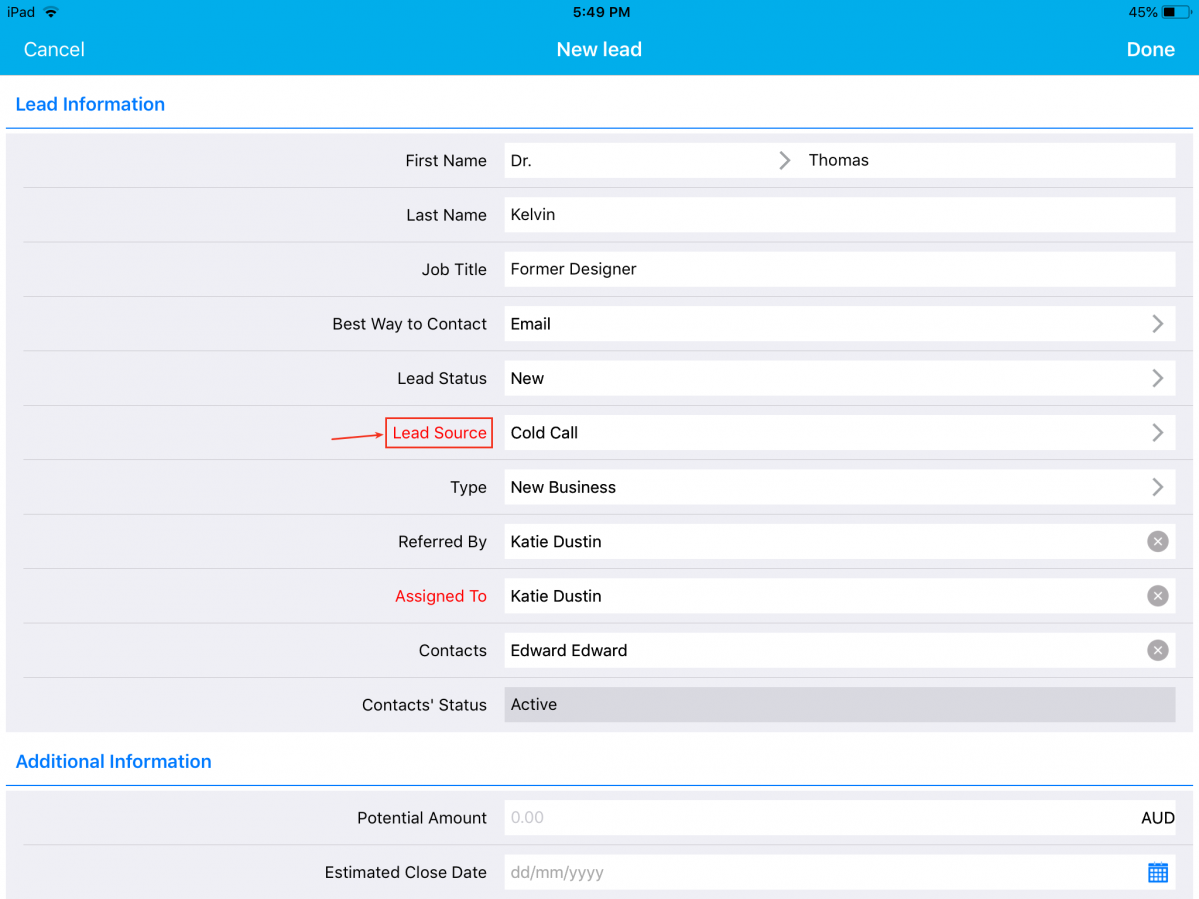
|
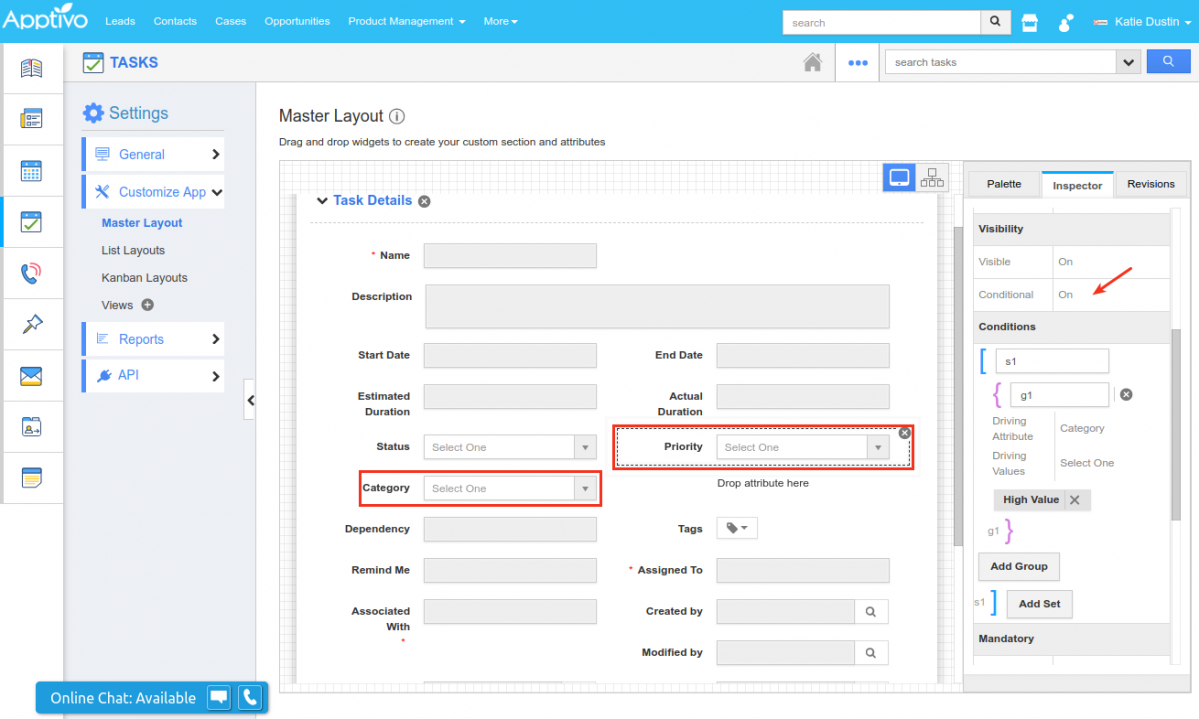
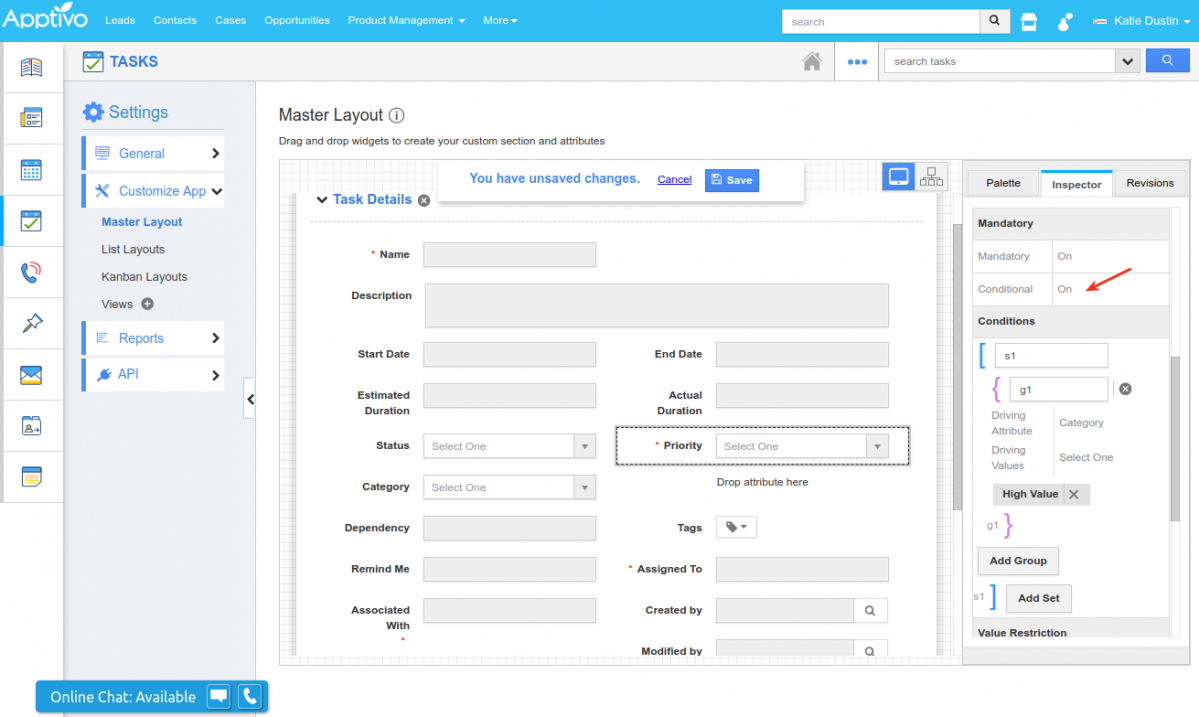
Conditional Feature in Activities
The fields or attributes found in the activities can be given different levels of conditional dependencies. With this feature, you can give the following three types of access at the entity levels for both the standard and custom fields. (Note: All these customizations should be done in your web version which will get reflected)
Conditional Visibility Dependency
With this feature, you can make an attribute visible when a certain criterion or condition is met. You can provide a condition to be satisfied to make the field visible on the creation page. For instance: Consider the Tasks. Go to Settings -> Customize App -> Master Layout -> Click on Priority field and enable the Conditional toggle ON under Visibility section from the Inspector tab and specify the condition.
|
This depicts that the field Priority should be made visible when the Category is set to High Value. So now when creating a task from your iOS device, the Priority field will initially not be visible in the Creation page.
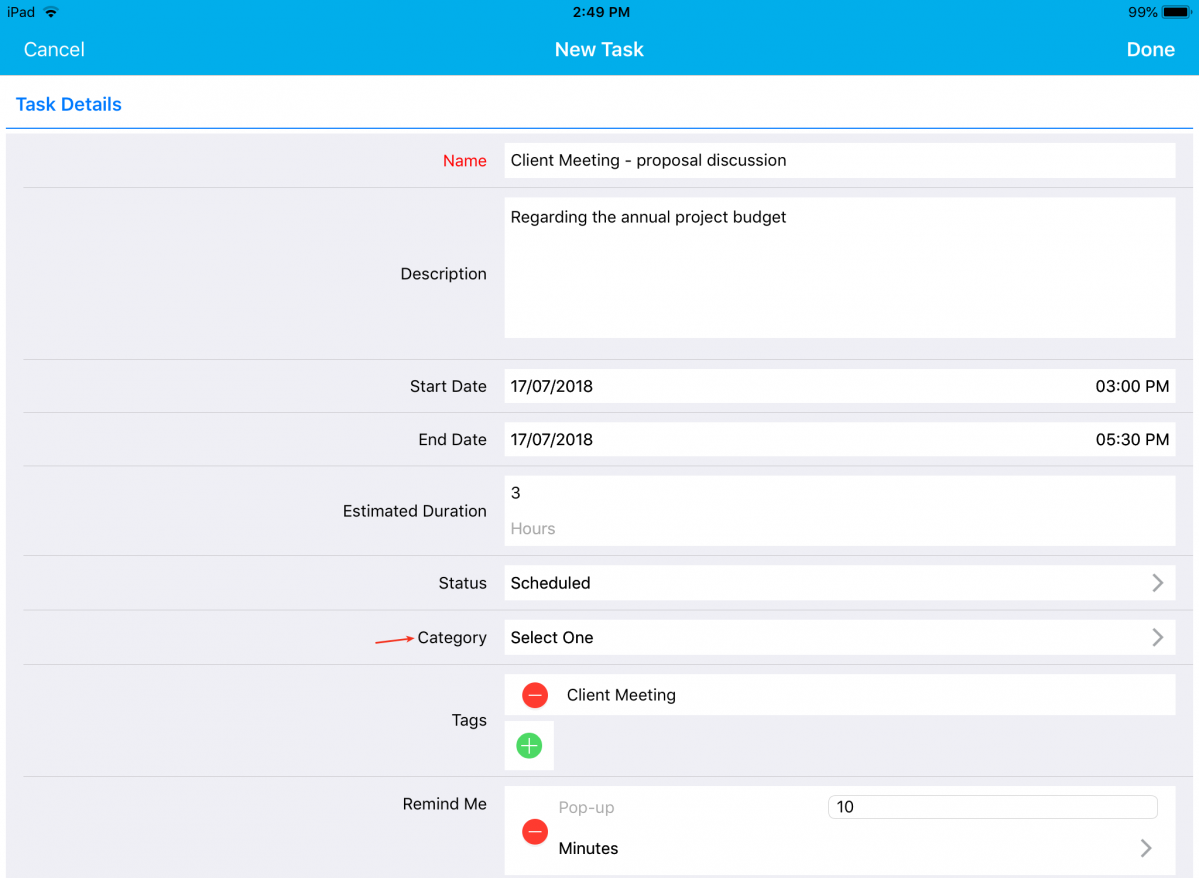
|
The Priority field will be made visible when Category is set to High Value, as shown in the below image:

|
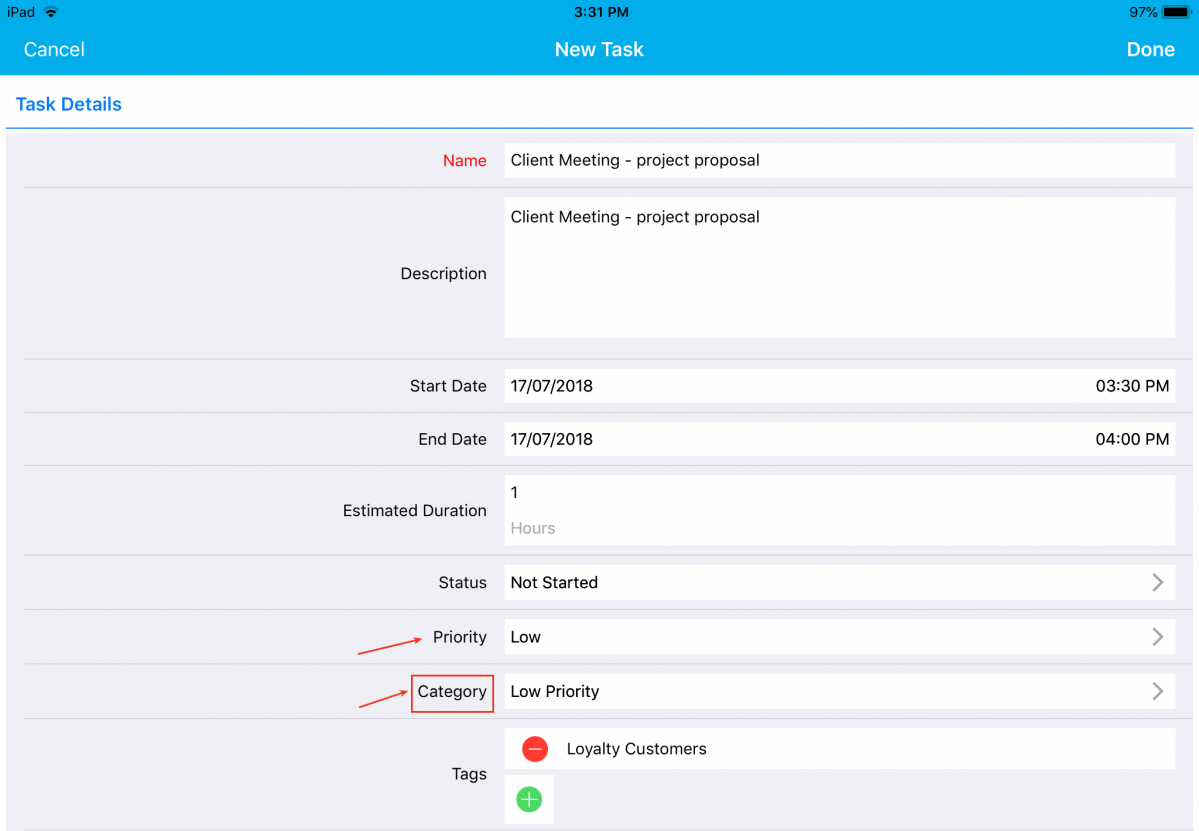
Conditional Mandatory Dependency
With this feature, you can make an attribute mandatory when a certain criterion or condition is met. You can provide a condition to be satisfied to make the field mandatory on the creation page. For instance: Consider the Tasks. Go to Settings -> Customize App -> Master Layout. Click on Priority field and enable the Conditional toggle ON under Mandatory section from the Inspector tab and specify the condition.
|
This depicts that, the field Priority should be made mandatory when the Category is set to High Value. So now when creating a task from your iOS device, the Priority field will initially be a non-mandatory one in the Creation page.
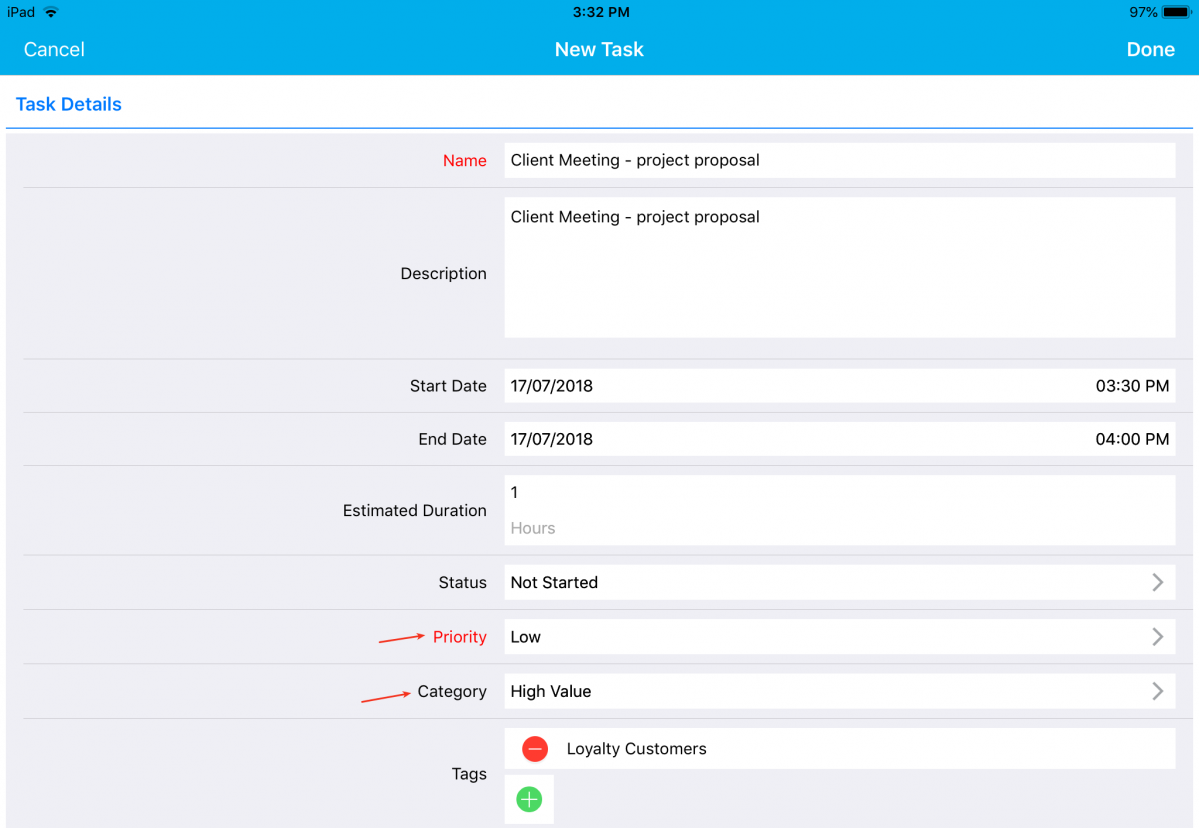
|
The Priority field will be made mandatory when Category is set to High Value, as shown in the below image:
|
Conditional Value Dependency
With this feature, you can define a criteria/condition based on which an attribute value can be restricted, when the defined condition is met. You can provide a condition to be satisfied to make the field’s value to show/hide on the creation page. For instance: Consider the Tasks. Go to Settings -> Customize App -> Master Layout. Click on Priority field and enable the Conditional toggle ON under Value Restriction section from the Inspector tab and specify the condition.
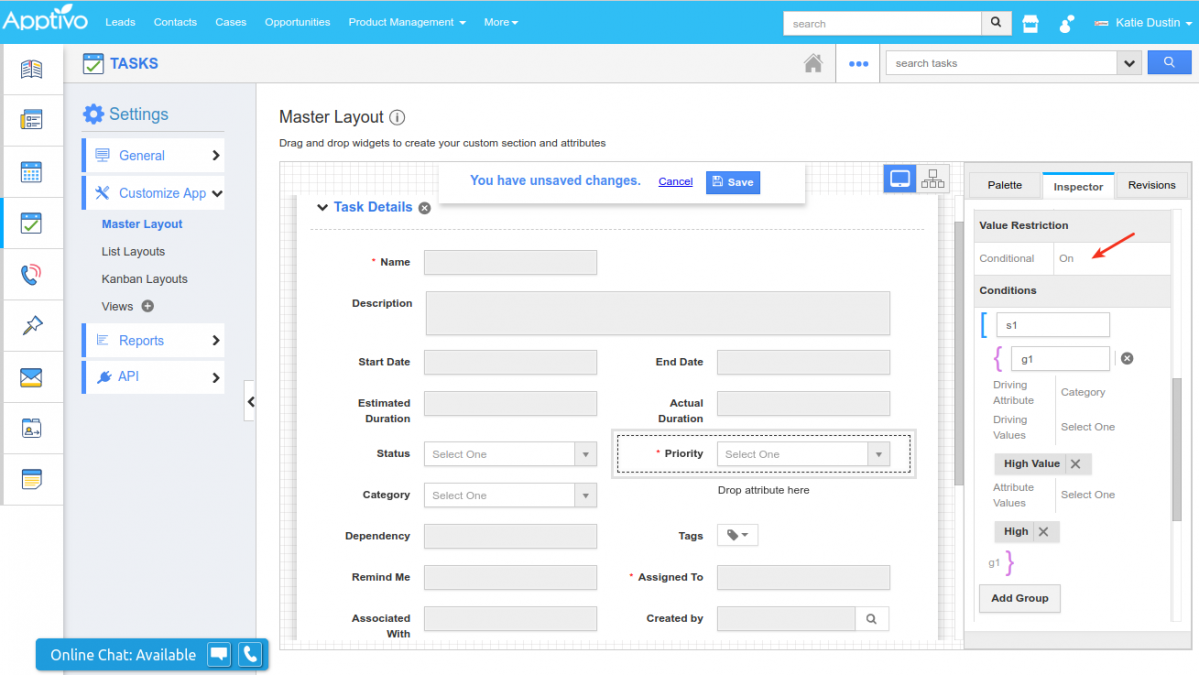
|
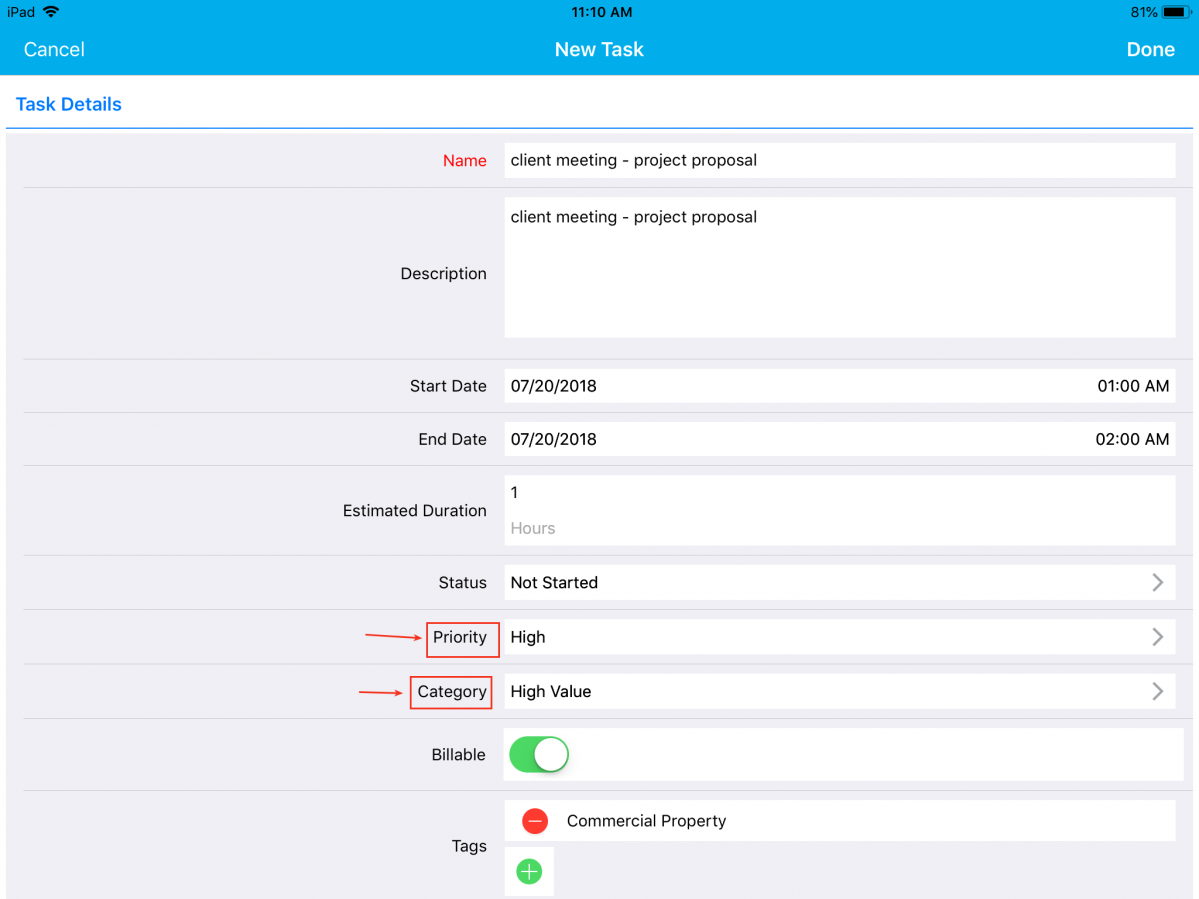
This depicts that, the field Priority should automatically be set to High when the Category is set to High Value. So now when creating a task from your iOS device, the Priority field will be set to High when Category is equal to High Value.
|
Download our latest version of iOS All-In-One App.
Give these features a try and feel free to contact our support engineers anytime you require at support@apptivo.com. Stay tuned for much more feature updates and releases.
Latest Blogs

Role Of CRM In Travel And Tourism Industry
Travel and tourism have been a significant part of everyone’s life since the ancient period. When we skim through the pages of history, It should be noted that humans were initially nomads before they became settled in one place. They...
Read more →
WHAT IS CRM TECHNOLOGY?
Introduction CRM is a technology that helps manage the entire customer information and interactions in order to build and maintain superior customer relationships. The CRM solution replaces spreadsheets and other different applications, which makes it easy for the businesses to...
Read more →
Everything you need to know about the Annual Maintenance Contract!
1. What is an Annual Maintenance Contract? 2. Benefits of Maintenance Contracts 3. How can Apptivo CRM help you manage maintenance agreements and vendors? 4. Summary Think about getting the confidence that the machinery is well-maintained and performing optimally, without...
Read more →
