You can create estimate either using a Manual Quote Process or using an Automated Quote Process. Creating estimate in Estimate App is quite simple and easy to manage detailed estimate, application has tight integration with CRM, so the customer and contact data in estimate helps you to view and navigate into respective application.
- Manual Quote Process – This is the general estimate creation process describing line items with description or services included in business.
- Create new estimate
- Create fixed estimate
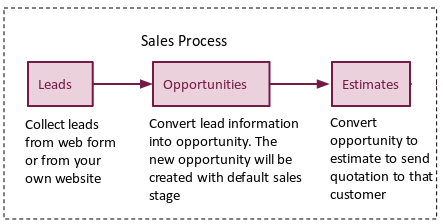
- Automated Quote Process – This process involves work flow from opportunity to estimate.
Work Flows from CRM to Financials
In Apptivo, there are number of work flows followed from lead to invoice, based on the business requirement the modules can be used and integrated.
Create New Estimate
To create an estimate, fill in the following information:
Estimate Details:
- Customer – Name of the customer.
- Contact – Name of the customer’s contact.
- Estimated Date – Date of estimation.
- Expiration Date – Date of expiration.
- Estimate # – This is an auto generated or manually entered number to identify the estimate. Customize through Estimates App -> Settings -> General -> Estimate Number Generation.
- Template – Select the custom template of Estimate that your customer want to look and feel of your estimate. Customize through Estimates App -> Settings -> PDF Templates.
- Currency – Choose your preferred currency. Configure through Estimates App -> Settings -> Payment Settings -> Multiple Currencies.
- Payment term – Terms of payments, it may be immediate or payment after 15 days/30 days/45 days. Create your own term through Estimates App -> Settings -> Payment Terms -> Create.
- Discount – Fill the numbers according to the option (percentage or fixed). (It’s an Optional Field)
- Notes to Customer – A short description to customer by default Apptivo will provide a description.(It’s an Optional Field)
- Items – Search and select the item or create a new item.
- Description – Add item description for a selected item using “Add Note” icon.
- Quantity – Quantity of an item.
- Rate – Price per item.
- Tax Code – Tax code to be applied for the item.
- Custom Sections/Attributes both in header and line level – Any previously defined custom sections or attributes, such as a priority selector or purchase order number, display on the creation page.
- Supplier Name – Select the supplier name which is associated with selected item.
- Supplier# – This will be auto populated.
- Supplier Cost – This will be auto populated from the supplier item’s cost.
- Amount – This is auto calculated from item’s quantity and supplier cost.
- Subtotal Discount, Tax, Shipping and Handling and total – These are the fields which are accumulated with the above given data’s.
Estimate Creation was last modified: November 3rd, 2020 by