Creating, Editing, and Deleting Jobs
First off, we’ll need to create a new job opening. Simply navigate to the WordPress admin dashboard, and find the “Jobs” link under the “Apptivo” section of the left column. On this page you will see a form with multiple fields. We will fill in these fields with the information for our job, only the title and description field are required. The other fields are optional, and can be included/excluded using custom templates.
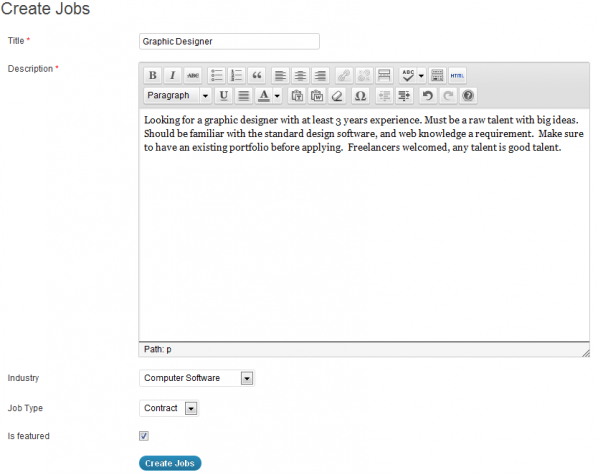
Once you have finished filling in the fields, just click the “Create Jobs” button to create the new entry.
Upon creating the job, you will notice it now appears in a list at the top of the screen. All future jobs will be placed in this list, which provides links to either edit the job information, or delete it completely. Upon clicking the pencil icon, the form at the bottom of the page will be completed with the information from the chosen job. You can then modify these fields as needed, and then click the “Update” button at the bottom to save.

Configuration
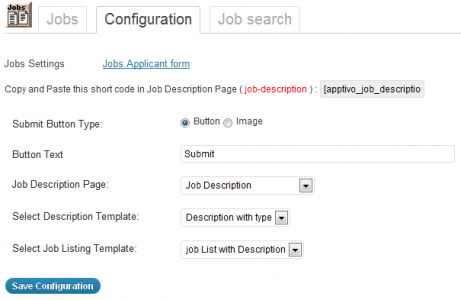
Jobs Settings
Submit Button Type
You can configure this form to either display an HTML submit button with your text, or you can create a custom image to use for the button.
Button Text/Button Image URL
Based on the previous selection, you will either provide the text that appears on the button, or a URL where the button image can be found.
Job Description Page
This field allows you to select the page which the job description will be displayed on. This allows you to create customized templates and easily wrap default text around every job listing. The dropdown will automatically list all pages on your site, just select the page which will contain the job description. If you have not created a page yet, it is recommended to create a page now.
Select Description Template
This field allows you to select the template to be used when displaying job descriptions. While the job description page allows you to wrap content around the job listing, this field allows you to use custom templates to change what is shown inside of the job description.
Select Job Listing Template
Similar to the description template, the job listing template allows you to configure how the listings of jobs in your firm will be displayed.
Jobs Applicant Form
Job Applicant Page
This dropdown allows you to select the page which the standard job application form will be displayed. The page can be customized to display content around the application form per business needs. The dropdown will list all pages on the site automatically, simply select a the page you wish to show this form on. If you have not created a page for the application for yet, please do so now.
Template Type & Template Layout
Template and Template Types allow you to control the HTML structure and layout of the form. For details on creating custom templates, see the advanced configuration section.
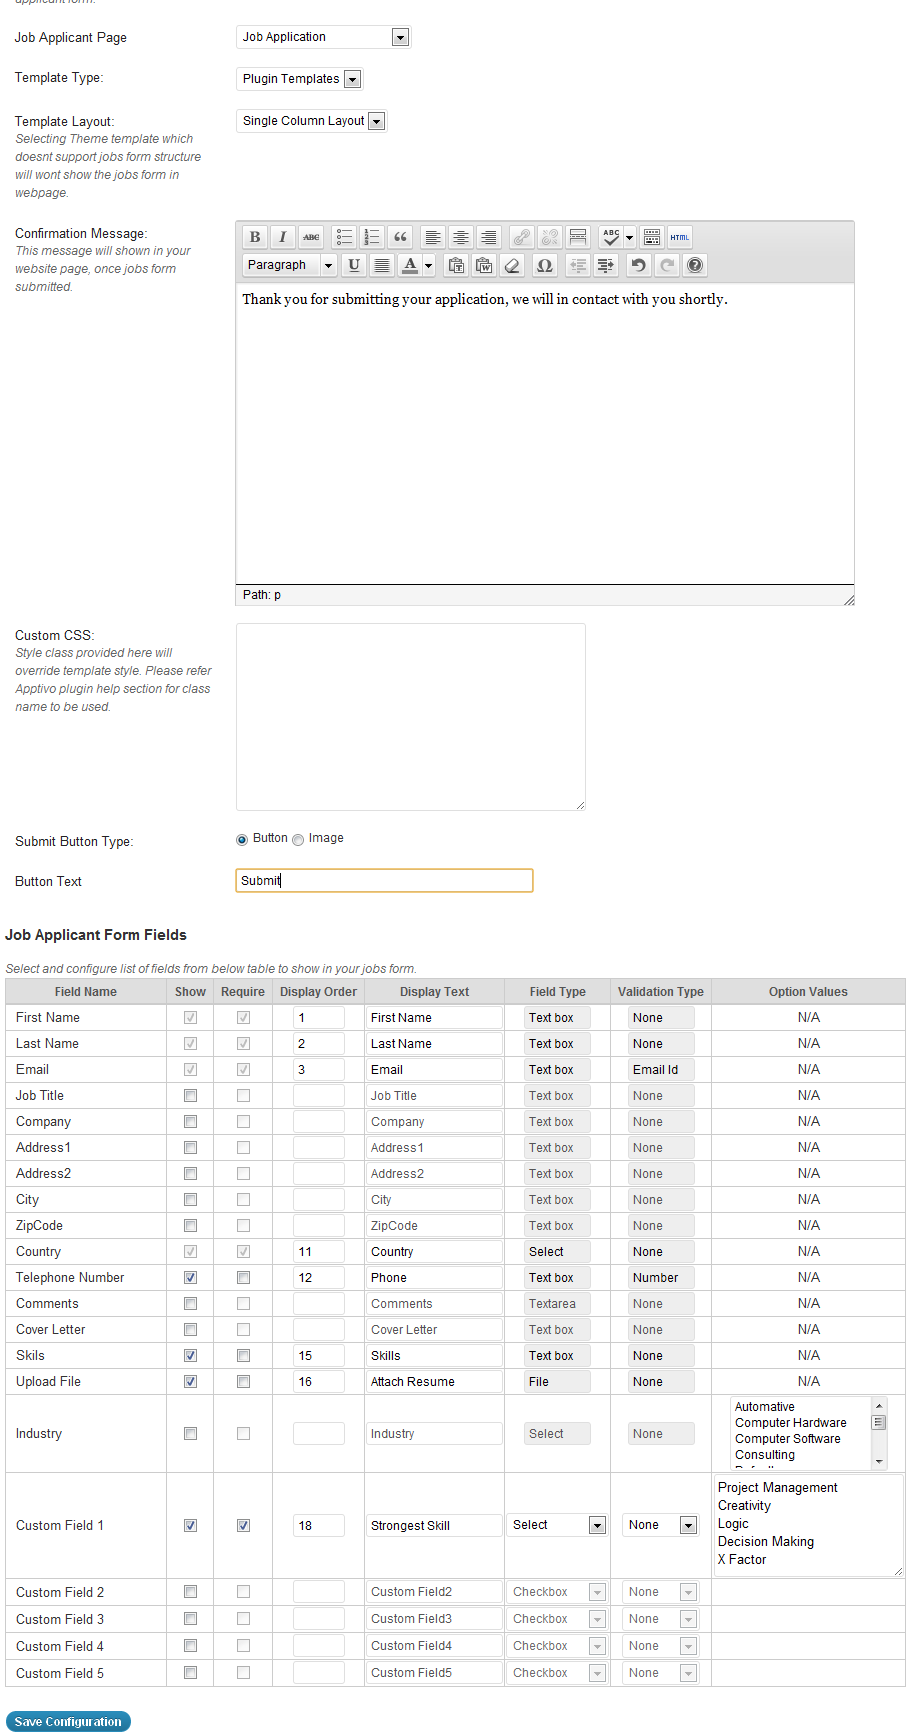
Confirmation Message
This is the message that will appear to the end-user when they submit the form. Custom CSS Custom CSS allows you to change the look & feel of the form itself. For details on using custom CSS, see the advanced configuration section. Submit Button Type You can configure this form to either display an HTML submit button with your text, or you can create a custom image to use for the button. Button Text/Button Image URL Based on the previous selection, you will either provide the text that appears on the button, or a URL where the button image can be found. Job Applicant Form Fields Here is where you configure what fields are collected from the candidate. You can add a field by checking the “show” box, and force a user to complete the field by selecting “require”. Also, customize the order the fields appear in, and the text that is shown next to the field as well. If you would like candidates to submit their resume, use the “upload” field available in this section. It will provide the user with a field where they can select a file from their desktop and upload into the website. Custom Fields If you desire to add a different field to collect with your form, you can add up to 5 custom fields. There are 5 different types of fields you can add, outlined below: Job Search
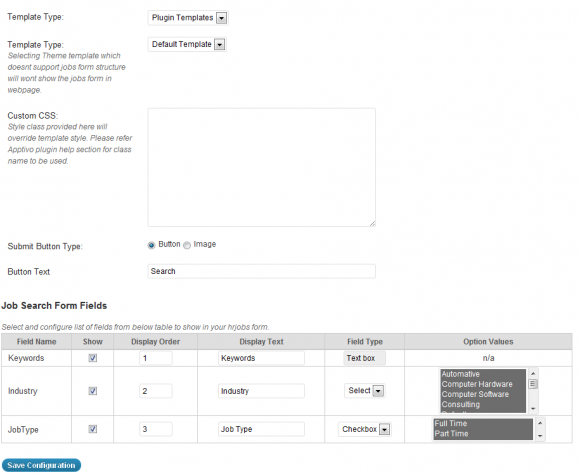
Template Type & Template Layout Template and Template Types allow you to control the HTML structure and layout of the form. For details on creating custom templates, see the advanced configurationsection. Custom CSS Custom CSS allows you to change the look & feel of the form itself. For details on using custom CSS, see the advanced configuration section. Submit Button Type You can configure this form to either display an HTML submit button with your text, or you can create a custom image to use for the button. Button Text/Button Image URL Based on the previous selection, you will either provide the text that appears on the button, or a URL where the button image can be found. Job Search Form Fields This area allows you to control which fields are available for users to search with. The keywords field will search the job title and description, and the industry & job type fields will filter for specific groups of matching results. Use the display order and display text to control the labels and ordering of the boxes. Apptivo Business Site Developer Guide Navigation
![]()
![]()
![]()