We, at Apptivo, are happy in sharing the latest feature updates and enhancements which were deployed on April 03, 2018. Keep yourself updated with our feature enhancements. Find below the list of features, which were worked on in the last release:
iOS All-In-One App Updates
Projects App
- Create Projects
- View & Edit Projects
- Create & Edit Milestones
- View and Edit Project Budget Information
- Related Requirements & Cases of a Project
- Employees & Contacts Association
- Work Log
- Project Gantt Chart
- Conversion to Project
Financials
- Customize the position of Pricing in Invoices App
- Customize the position of Pricing in Estimates App
Supply Chain
- Customize the position of Pricing in Orders App
- Back Ordering
CRM
- Categorize Contacts
- Opportunity Loss Reasons
- Default Billing Currency
- Ability to Sort Objects
- Counter Attribute in the Opportunities App
- Custom Calculations using Functional Attributes (Numeric, Date, String)
- Multi Select Dropdown
- Search Objects using the Created On and Modified On dates
- Conditional Visibility Dependency
Project Management
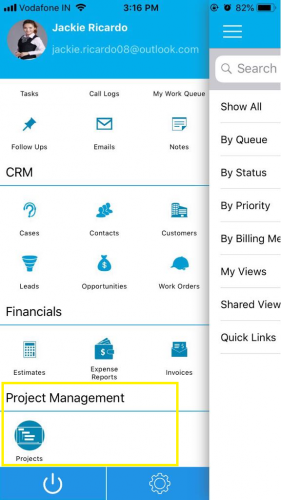
- Create Projects – We have added the Projects App to the All-In-One App bundle. With this new update, you can now have access to all your projects right from your iOS devices. This provides you the ability to create projects newly and also from the existing ones. To create projects, click on the Projects App under the Project Management category.
You will be redirected to the Projects homepage, where you can find the “+” icon, at the top right corner. Click on it.
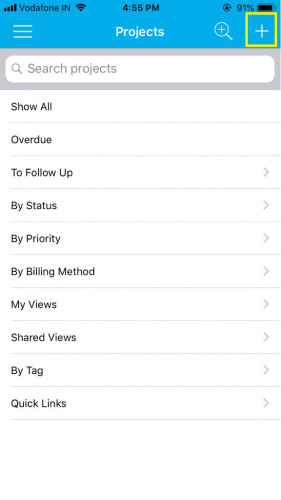
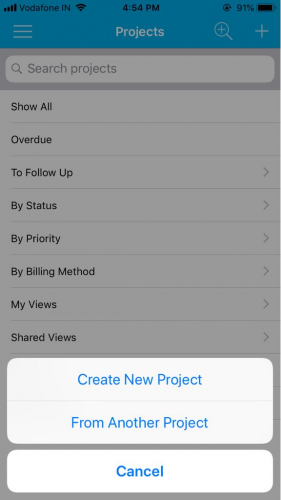
You can create new projects by clicking the Create New Project button in the Projects App. Similarly, click on From Another Project button, to create projects from existing ones.
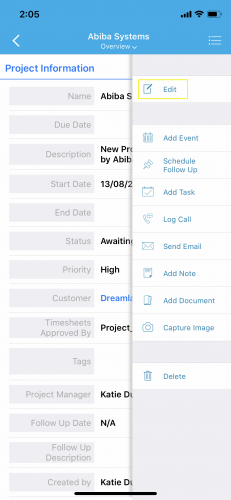
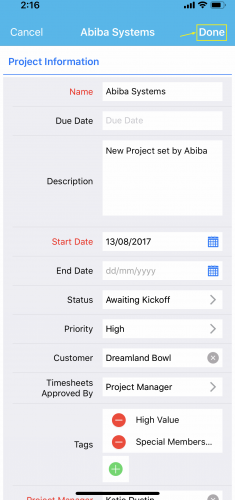
- View & Edit Projects – You can instantly view and edit the Projects via mobile app. Go to a specific project which needs to be edited. On the top right end corner, click on the More menu and select Edit option from the list.
Make necessary changes to the project and click Done to save the changes.
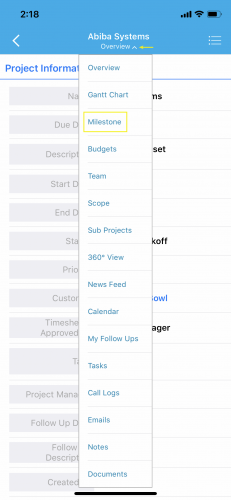
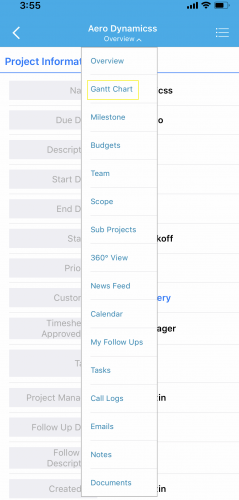
- Create and Edit Milestones – Milestone is a significant value added to the Projects App. You can create milestones from the Project’s Overview page by clicking on the Overview dropdown and selecting ”Milestone”.
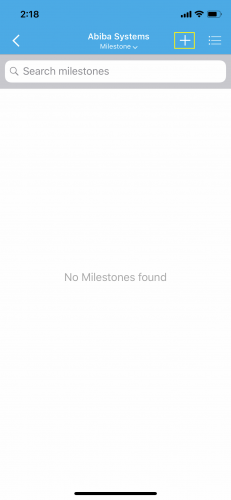
You can create a new milestone by clicking on “+” icon.
In the Create Milestone page, fill in the details and click on Done.

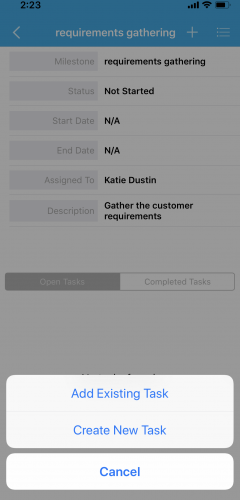
You can view, edit and delete the existing milestones. It is also possible to create or add tasks and view task details of the particular milestone. Open the created milestone and click on the “+” icon found, to Create New Task or Add Existing Task.
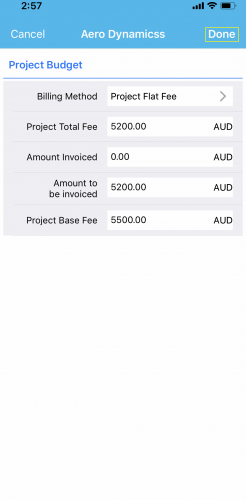
- View and Edit Project Budget Information – Project budget tab from the Overview dropdown allows you to view the total budget of that particular project. Click on Budgets from the dropdown list.
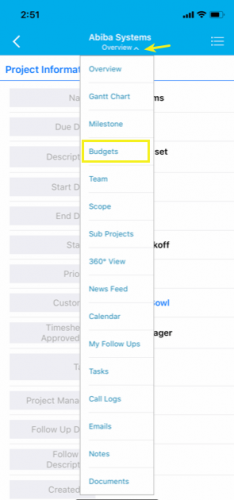
The Project Budget will now be displayed. You can edit the budget by clicking on the “Edit” icon.

Make the necessary changes and update it by clicking on the “Done” button.
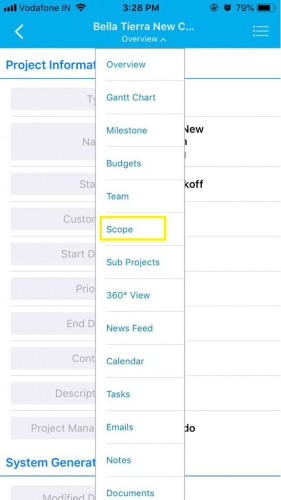
- Related Requirements & Cases of a Project – All the related requirements and cases of a project, can be added to a project for future references. These requirements and cases can be found in the Scope tab. Click on the Scope tab from the Overview page Grid icon.
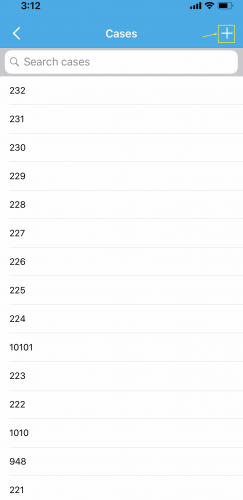
You can view the related requirements and cases of that particular project as shown in the below screenshot. You can add the related requirements & cases for a Project, by clicking on the “+” icon.

For instance: To add related cases to a project, click on the “+” icon. You can either add a case from the list displayed (created already) or they can also be created newly by clicking on the “+” icon, for carrying out the project successfully.
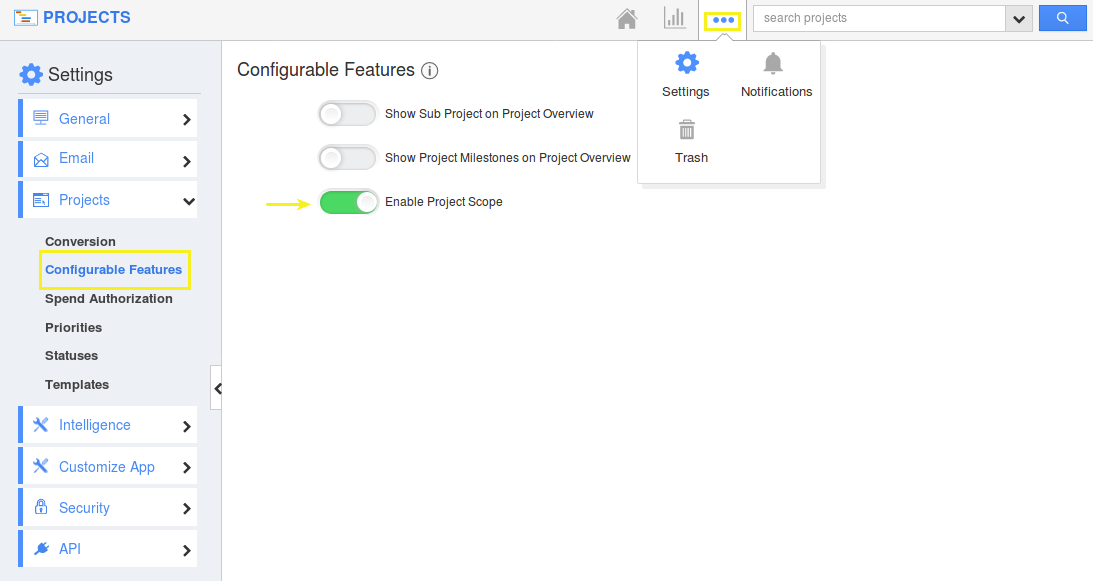
Note: In order to view the Project Scope in your iOS device, you need to configure it from the web version. Go to Project Settings -> Projects -> Configurable Features. There you need to Enable the Project Scope.
- Employees & Contacts Association – The Teams tab in the projects app, enables you to associate your employees & contacts to a Project. To do so, click on the Team from the Overview dropdown.
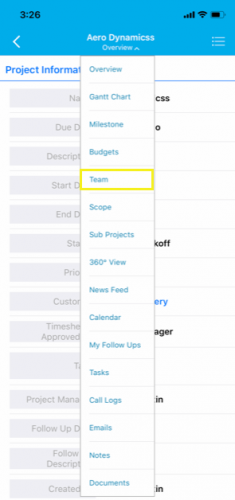
You will be redirected to the Team page, where you can view two teams – Employee Team and Customer Team.
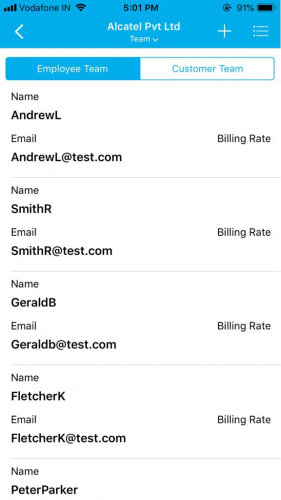
Existing employees and contacts can be selected and added to the project, by clicking on the “+” icon. For instance: To add a customer to the project, click on the “+” icon in the Customer Team tab.

Here, you can add existing contacts or also create them newly at run-time, by clicking on the “+” icon.

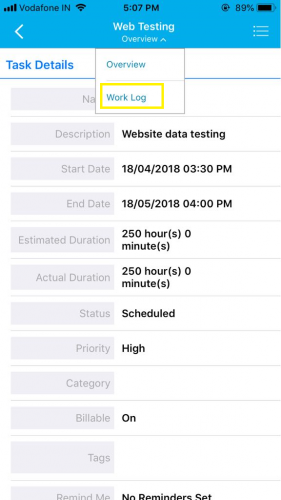
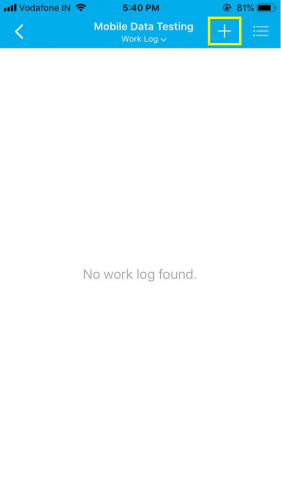
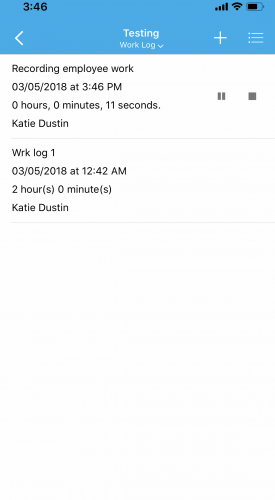
- Work Log – The time taken by your Employees to complete a certain task, can be effectively tracked using the Work Log feature. This keeps track of all your project activities. You can create your own work log by selecting “More” icon -> “Work Log” from the created tasks. Open a task and click on the Work Log from the Overview drop down.
In the Work Log page, you can view the existing work logs. Click on the “+” icon to create new work log.
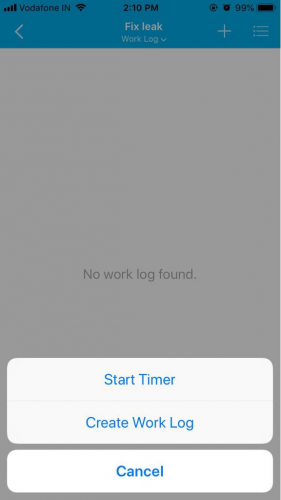
You will be displayed with two options, where new work logs can be created by clicking on “Create Work Log” and timer can be started by clicking on the “Start Timer”.
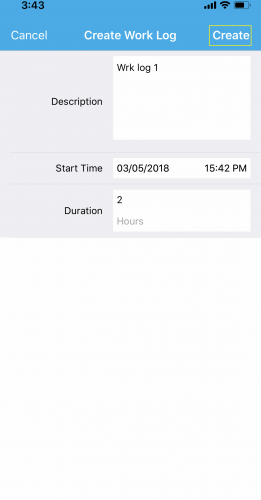
Click on Create Work Log. A pop up opens where you can create work log by providing description, start time and duration and click on Create button.
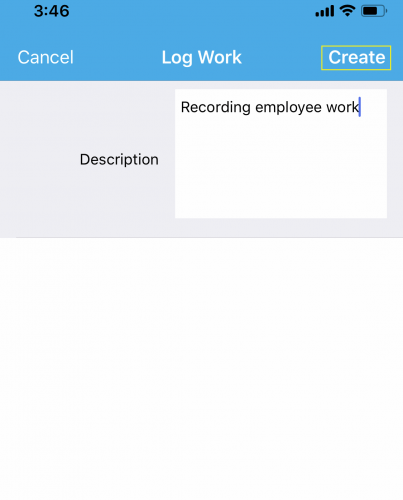
The timer can be started by clicking on “Start Timer”. A pop up will be displayed. Enter the description and click on “Create”.
Your timer gets started and you can either pause or stop the timer anytime, by clicking on the “Stop” and “Pause” icon and your worklog gets updated.
- Project Gantt Chart – You can view all the created Tasks and Milestones in the Gantt Chart, in a consolidated manner. You can view Gantt chart by clicking the “Gantt Chart” option present in Overview drop down.
You can view all the tasks and milestones as shown below:
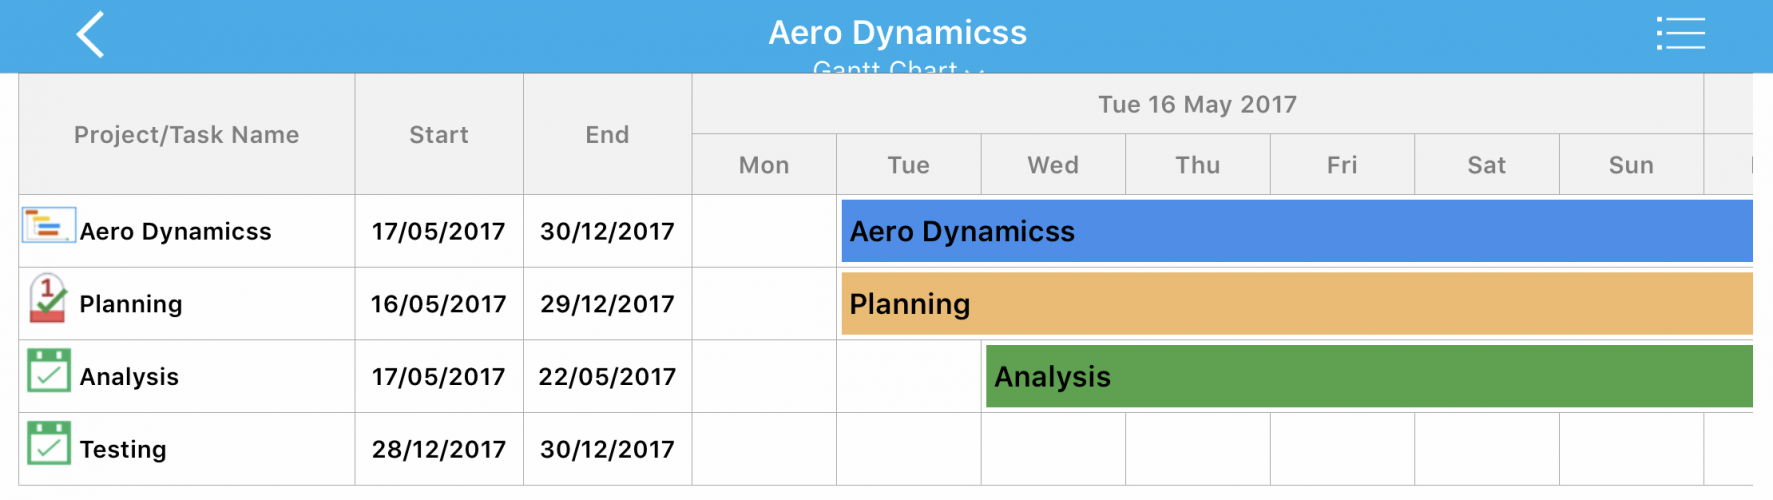
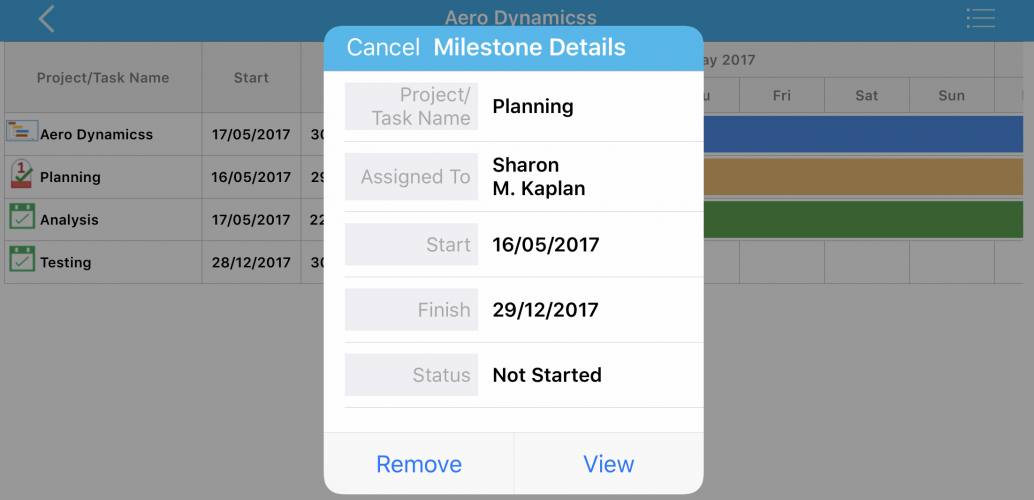
Now, by clicking on any particular Task or Milestone, you can view its quick information.
- Conversion – This conversion feature gives you the ability to convert Cases, Estimates and Opportunities to Projects effectively, without the need of creating a project from scratch.
- Case to Project – The cases created in the Cases App can be converted easily to Projects using the conversion feature available in the Cases Overview page. Click on the More icon found at the top right corner and select Convert.
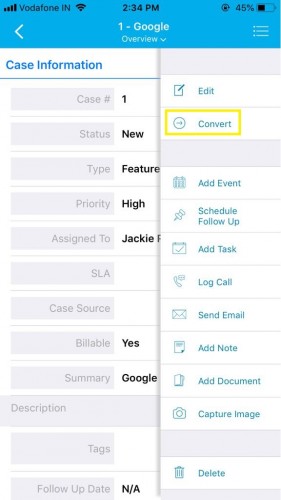
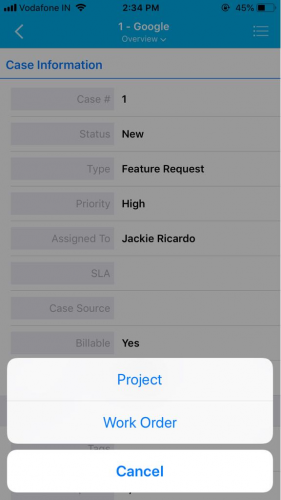
Here, click on Project to convert the case to a project.
- Estimate to Project – The estimates created in the Estimates App can be converted easily to Projects using the conversion feature available in the Estimates Overview page. Click on the More icon found at the top right corner and select Convert.
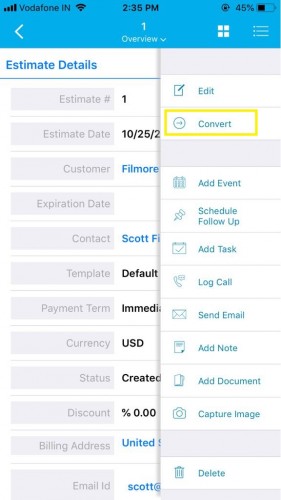
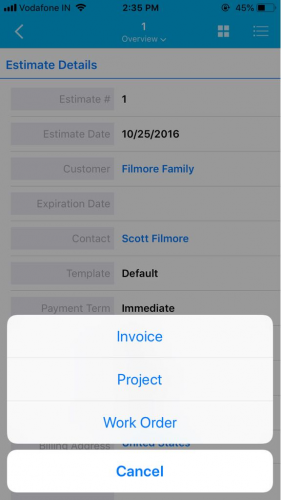
Here, click on Project to convert the estimate to a project.
- Opportunity to Project – Many opportunities who want to continue their workflow can be converted into Projects based on their criteria. The opportunities created in the Opportunity App can be converted easily to Projects using the conversion feature available in the Opportunities Overview page. Click on the More icon found at the top right corner and select Convert.
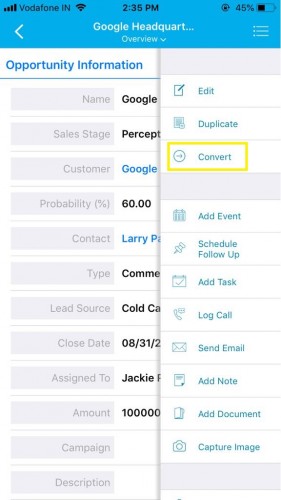
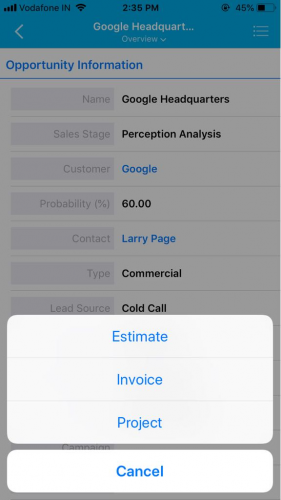
Here, click on Project to convert the opportunity to a project.
- Case to Project – The cases created in the Cases App can be converted easily to Projects using the conversion feature available in the Cases Overview page. Click on the More icon found at the top right corner and select Convert.
Financials
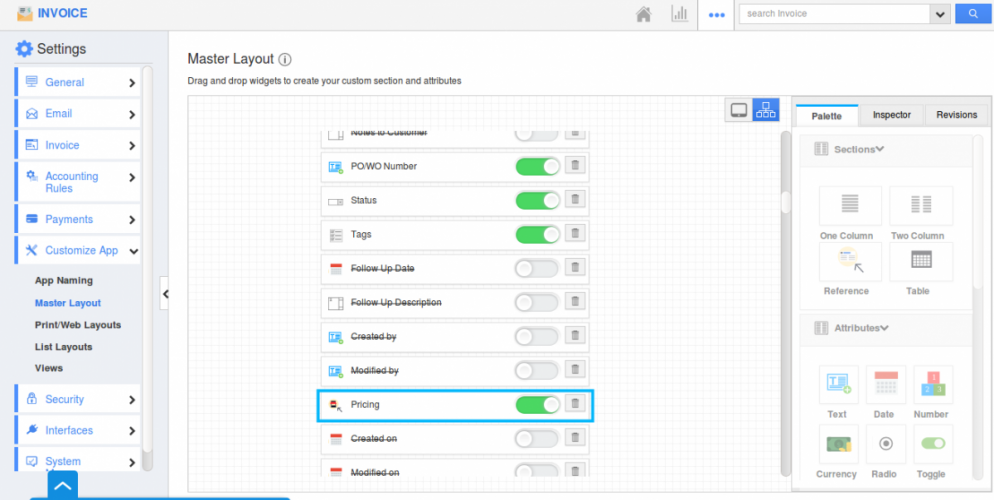
- Customize the position of Pricing in Invoices App – Besides having the Price List associated with the customer category, we have now included this feature as an individual field, which can be incorporated into both the Header level and Line level of the Invoice App.
The Pricing can be configured in the Master Layout of the web. To view this Pricing field, go to More -> Settings -> Invoice -> Pricing. You can create all your price lists from the Pricing App. For instance: We have selected “Enable Header level Price List”.
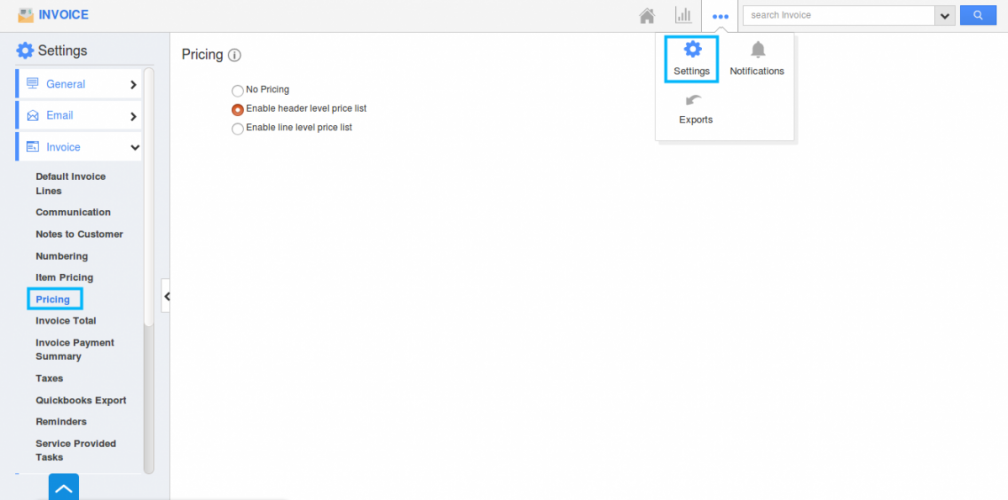
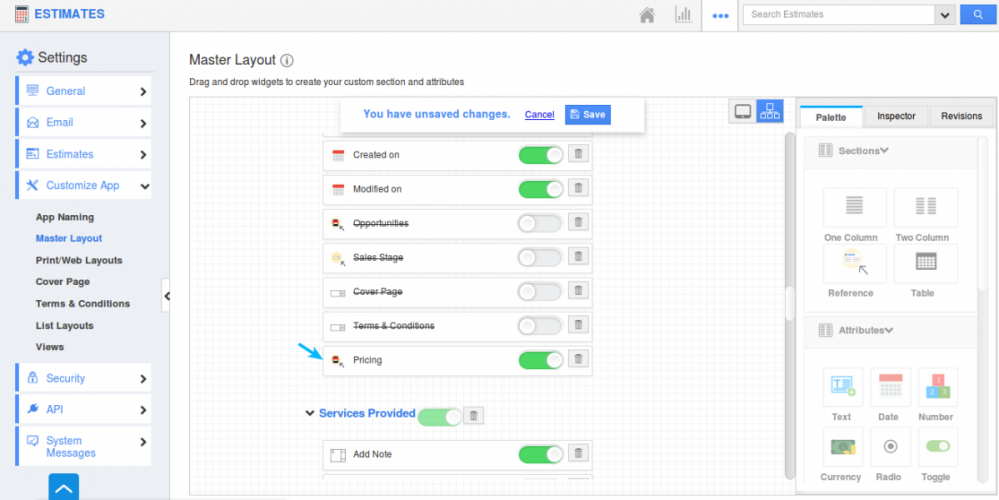
Note: Enable the Pricing toggle in Line level and Header level in Hierarchical view in Master Layout.
After configuration, in your iOS device, when you move on to Invoice creation page, you can view the “Pricing” field in “Invoice Details” section.
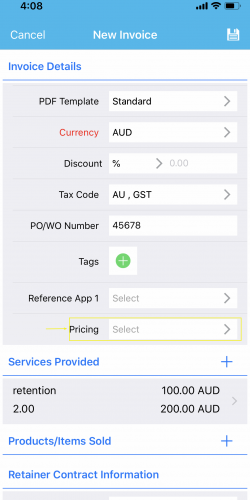
- Customize Pricing position in Estimates App – Other than having the Price List associated with the Customer category, we have now included this feature as an individual field, which can be incorporated into both the Header level and Line level of the Estimates App.
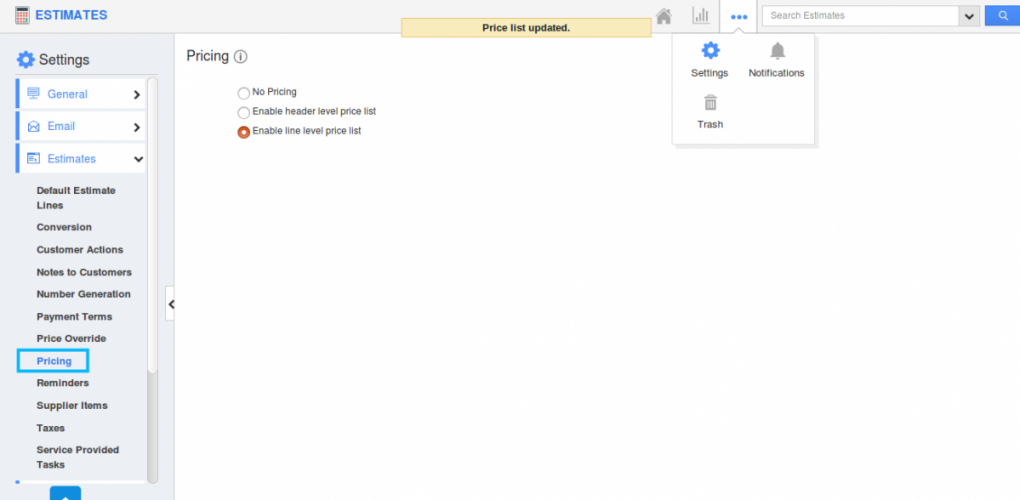
The Pricing can be configured in the Master layout of the web. To view this Pricing field, Move to More -> Settings -> Estimates -> Pricing. You can create your Price list in Pricing App. Here, we have selected “Enable Line level Price List”.
Note: For existing users, enable the Pricing toggle in line level and Header level in Hierarchical view in Master layout.
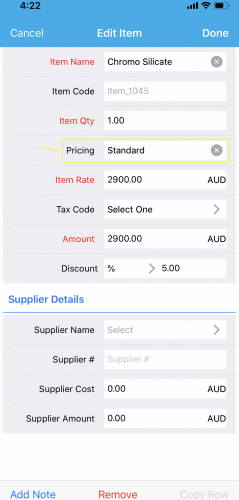
Once configured, In mobile devices, when you move on to Estimate creation page, you can view the “Pricing” field in “Products/Items sold” section.
Supply Chain
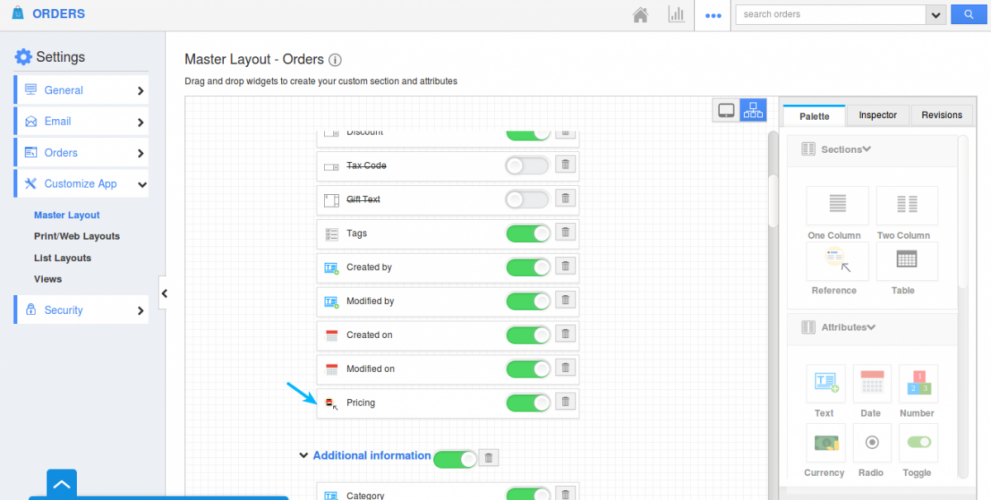
- Customize the position of Pricing in Orders App – In addition to associating the customer category with a Price List, we have now included this feature as an individual field, which can be incorporated into both Header level and Line level of the Orders.
The Pricing can be configured in the Master Layout of the web. To view this Pricing field, go to More -> Settings -> Orders -> Pricing. You can create all your price lists from the Pricing App. Here, we have selected “Enable Header level Price List”.
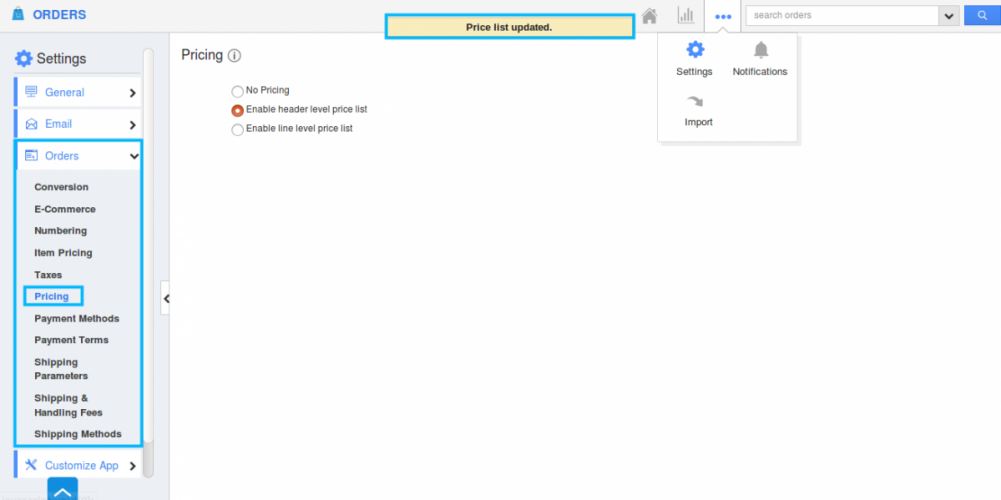
Note: In master layout, enable the Pricing toggle in Line and Header level in Hierarchical view.
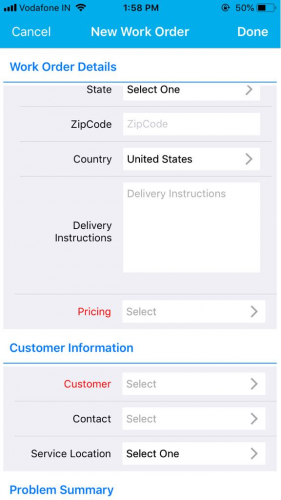
After configuration, in your iOS device, when you move on to Order creation page, you can view the “Pricing” field in “Order Details” section.
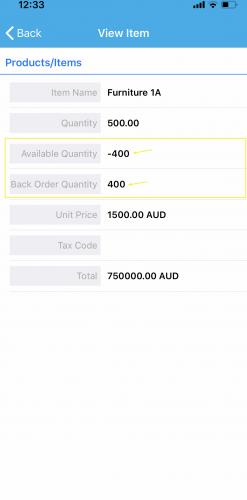
- Back Ordering – One of the most important feature deployed in this iOS release, is the BackOrder management. Backordering gives you the ability to create orders for an item or product which is temporarily out of stock (i.e., the ordered quantity is greater than the available inventory quantity).
On creating an order, you can view two additional fields – Available Quantity (which displays the available inventory quantity of the selected item) and the Back Order Quantity (which displays the number of items which are out of stock).
Once a Backorder is created, the order status will be set to “Backorder” in the Overview page.
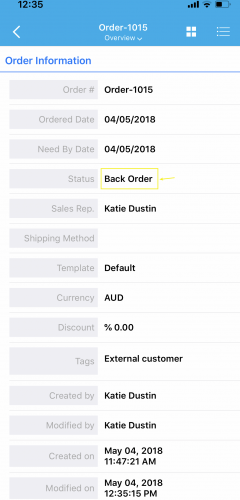
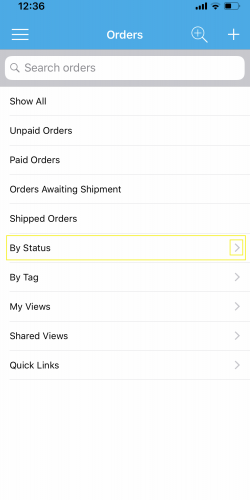
You can view all the back orders from the left navigation panel, under “By Status” -> “Back Order”.
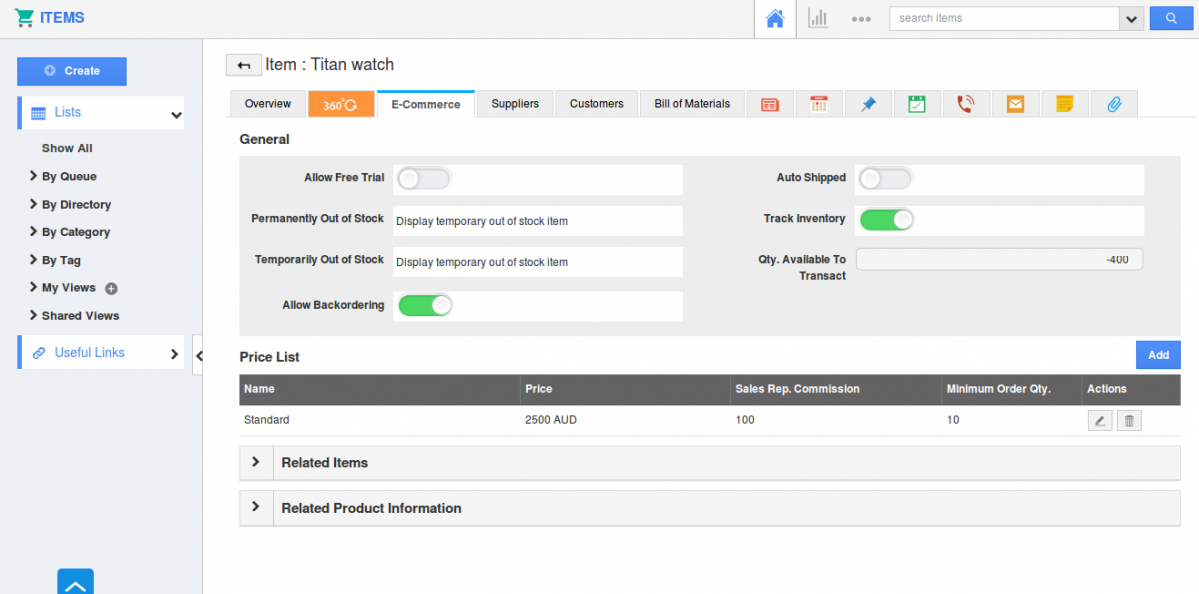
Note: In order to create backorders, you are required to enable the Allow Backordering toggle from the Items App in the web version. Select the required Item -> E-Commerce tab -> Allow Backordering.
CRM
- Categorize Contacts – With this update, we have included the “Contact Status” field under the Contact Details section. This feature allows you to categorize the contacts based on their statuses instantly – Active or Inactive. This can be accessed in the Creation page, Overview page and Duplication page. Users can search for the contacts using the “Status” field in the Advanced Search option also.
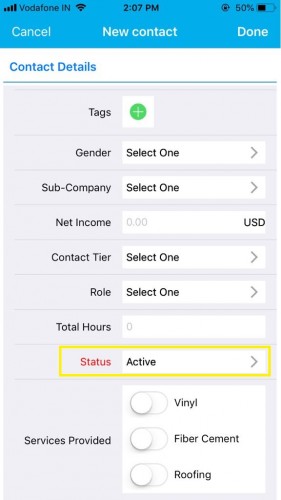
By default, Apptivo offers you with two standard statuses (Active & Inactive). You can also create your own status for the contacts. It can be done by clicking on the side drop arrow(>) and you will be directed to the Status page. Now, click on the “+” icon at the top right corner, to create a new status.

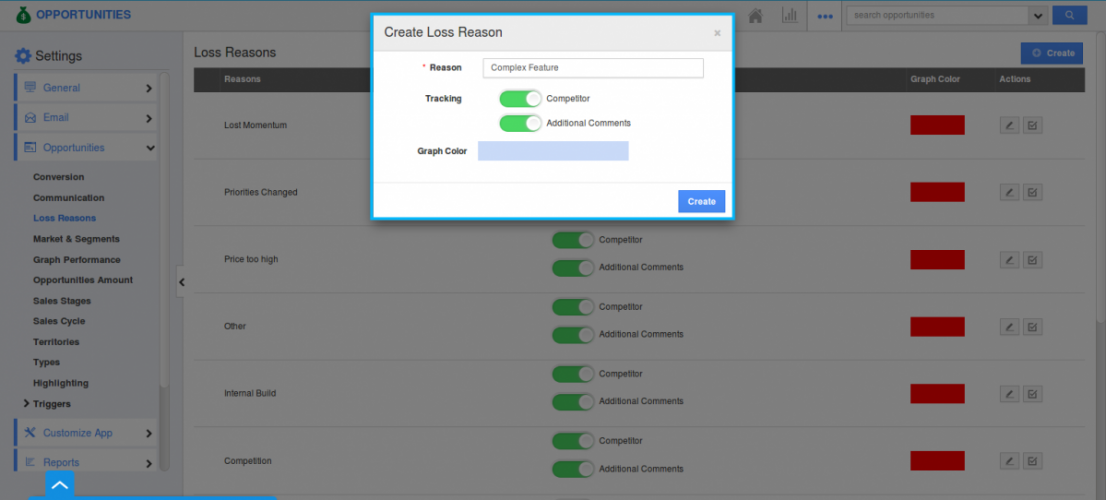
- Opportunity Loss Reasons – In this iOS release, you can now record the reasons for losing an opportunity in the Opportunities App, which can be used for future references. These loss reasons can be created in the web version, by clicking on More(…) icon -> Settings -> Opportunities -> Loss Reasons and click on “Create” button to create your own loss reason. You are also provided with some default loss reasons.
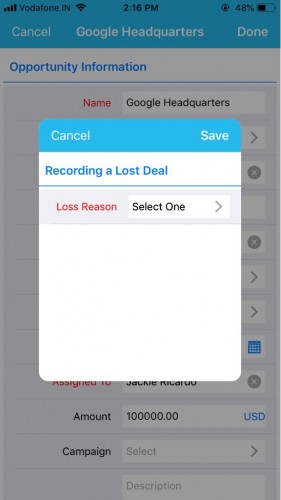
After creating loss reasons, now, when an opportunity moves to the “Closed Lost” sales stage, the “Recording a Lost deal” pop up appears in your iOS device, where you can select your loss reason from the drop down and record it for reference. Click on Save button.
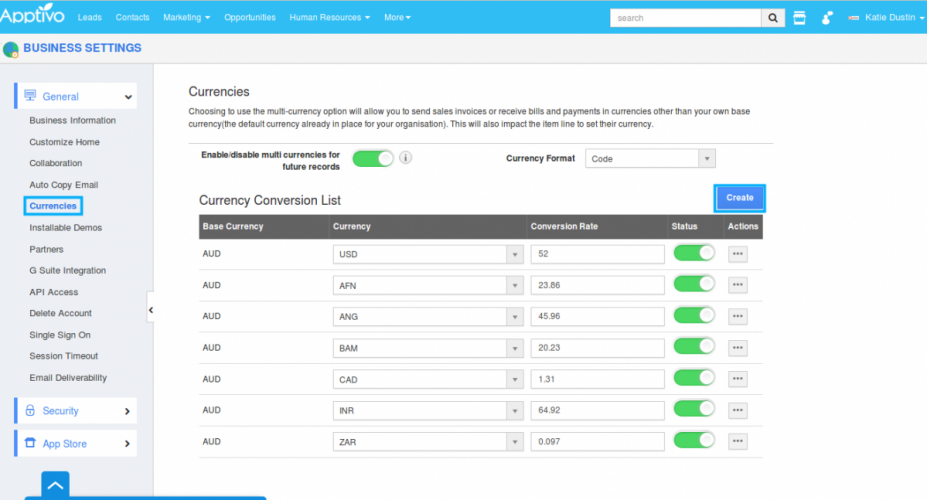
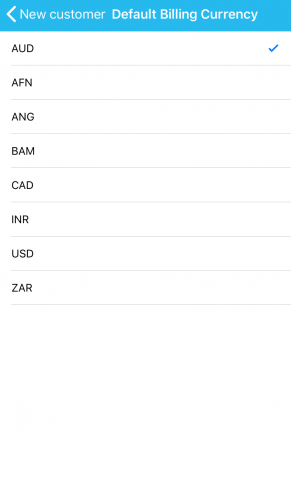
- Default Billing Currency – This feature of default billing currency, gives you the ability to view the default billing currency in your iOS Mobile App. You can create your own required currencies in the web version by clicking on Create button from General -> Currencies in the Business Settings. The currencies created here will be displayed under the “Default Billing Currency” field. You can set up your required currencies for your customers, and these will get reflected when you send an invoice or PDF.
When creating a customer, you can view the base currency while creating a new customer in iOS Mobile App.
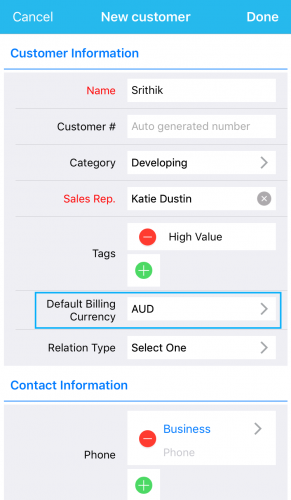
Click on the side drop arrow, which will open up a page with the list of currencies configured in the web version, where you can select your required currency. When duplicating the Customer, you can either keep the currency as same or you can select your own currency. You can view the currency in Overview page, edit or change currency when required for particular customer.
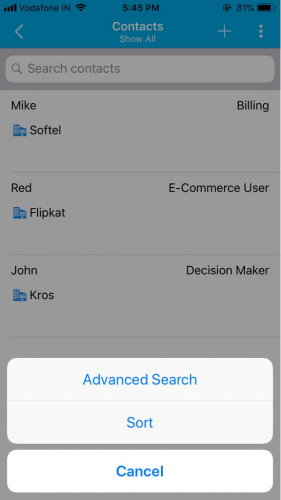
- Ability to Sort Objects – One other significant feature in this iOS update, is the ability of sorting all the fields of your Contacts, Customers, Leads and Opportunities either in the ascending or descending order.
Consider the Contacts App. Click on the “More” icon -> “Sort” option.
On clicking, you will be opened with the Sort By popup with the fields Sort Column and Sort Order. In the Sort Column field (displays you the fields present in apps list layout), select the column which you need to sort and select the sort order (default or Ascending or descending) in the Sort Order field.
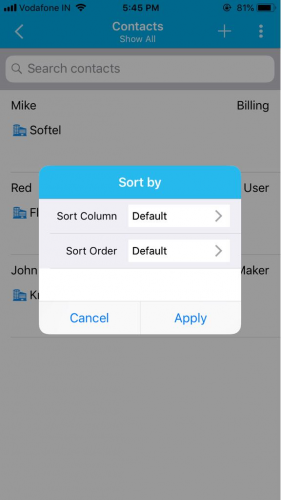
For instance: select the Sort Column –> Last Name & Sort Order –> Descending. Click on Apply to sort the records.

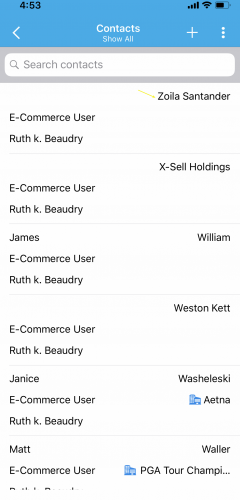
You can now view the contacts sorted in the descending order based on their last name.
- Counter Attribute in the Opportunities App – This feature of Counter Attribute, gives you the ability to create opportunities with custom unique numbers. The created opportunities can also be easily identified and retrieved anytime, using this counter attribute.
You need to configure the Counter Attribute from the Opportunities App in the web version, which will get reflected instantly in your iOS device. To configure, go to the Settings -> Customize App -> Master Layout. Drag and drop the “Counter” field in the required place. Scroll down till you reach the “Counter” section in the Inspector tab.
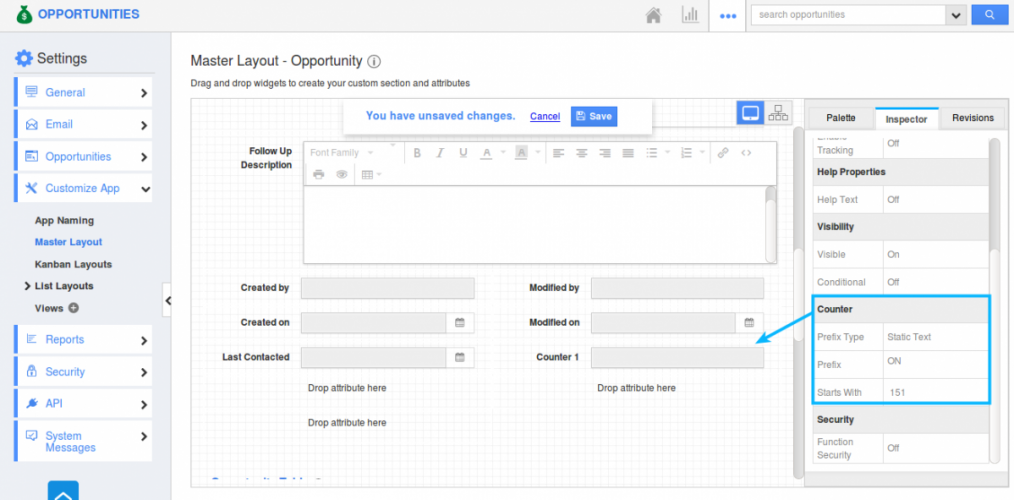
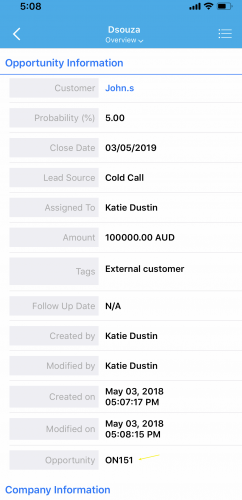
Now, provide the required “Prefix type”, “Prefix” and “Starts with”. For instance: Prefix type -> Static Text, Prefix -> ON, Starts with -> 151. When creating an opportunity, you can now view the counter attribute in your iOS device as below:
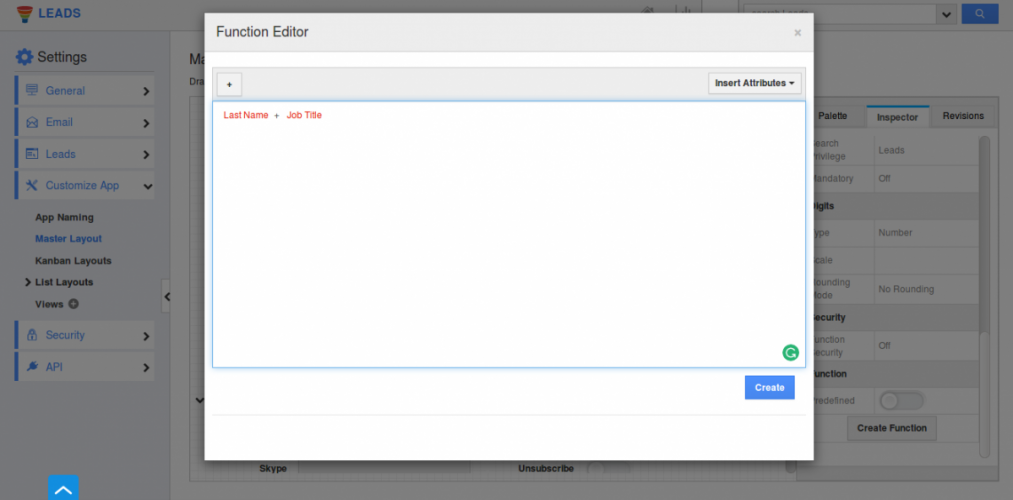
- Custom Calculations using Functional Attributes (Numeric, Date, String) – A noteworthy feature in this iOS update is the creation of custom formulas. For this, we have added the “Function” attribute, which includes three types of formulas – String, Numeric and Date.
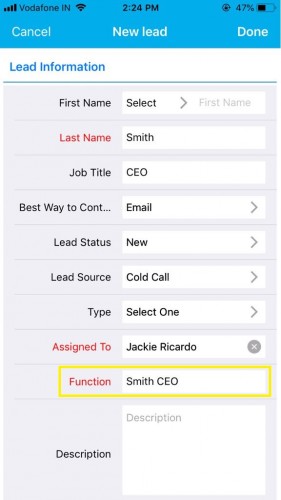
To make use of the functional attributes in your iOS device, you are required to configure it from web settings, which will get reflected in in your iOS device. For instance: consider the Leads App and select String Formula. With this you can now concatenate two or more string fields (here, we are concatenating Last Name + Job Title).
Now in your iOS mobile device, on creating a new lead, you can view the created function concatenated automatically.
- Multi Select Dropdown – We have added the Multi Select drop down to all the CRM apps – Customers, Contacts, Leads, and Opportunities. This drop down allows you to make multiple selections from the list given. Note: Before using the multi select drop down in your iOS mobile, you need to configure it from the web layout.
Let’s consider the Opportunities App. Go to Settings -> Customize App -> Master Layout -> Drag and drop the “Multi Select” field from the Palette.
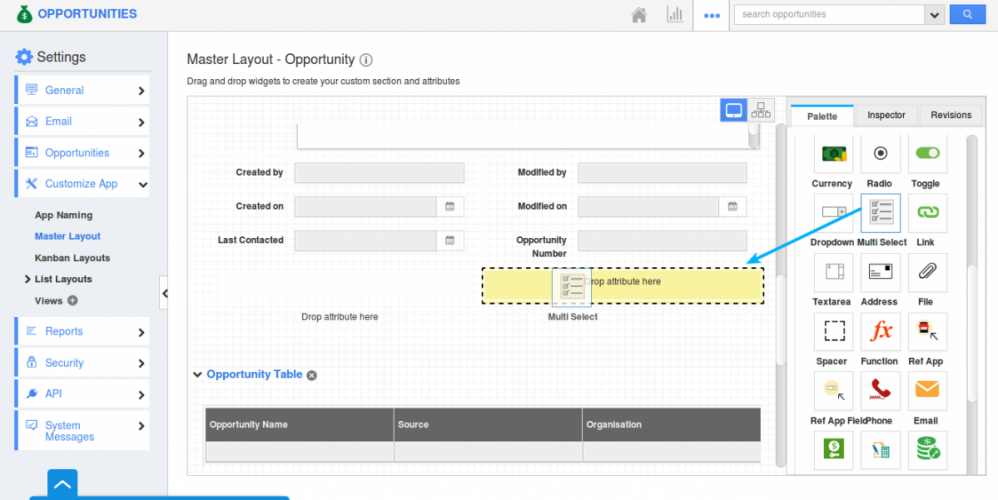
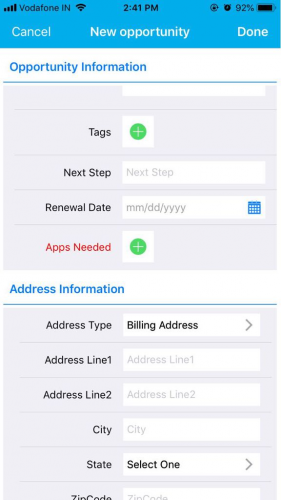
Click on the field and rename it accordingly from the Inspector tab. Provide the values and Save the changes. For instance: here, we have renamed it as Apps Needed with various apps as Values.
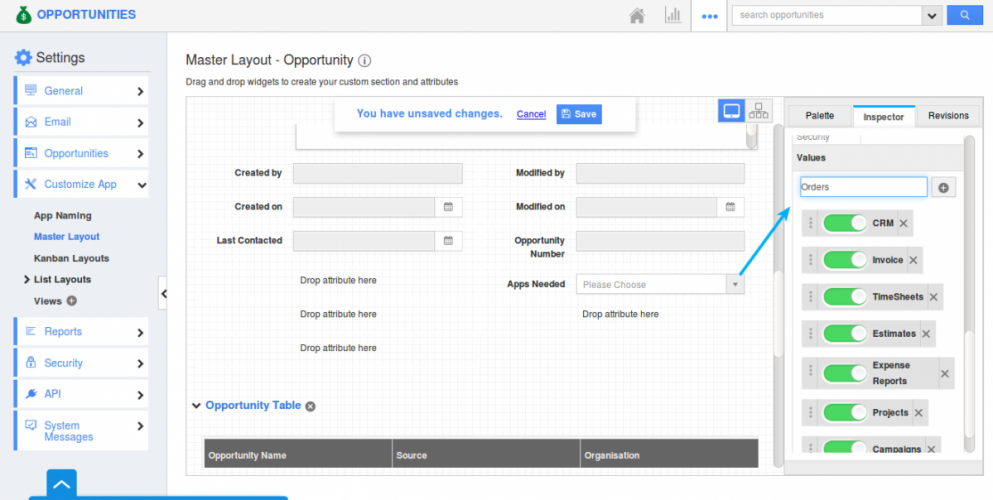
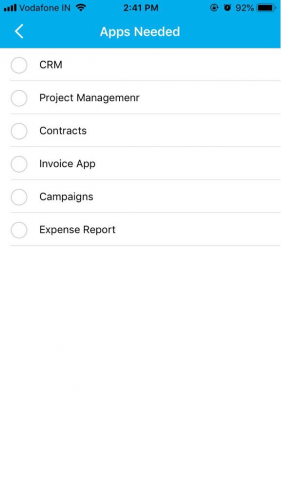
Now, in the mobile app, go to the Opportunities App where you can see the multi select drop down field “Apps Needed”. Click on the “+” icon.
You will be displayed with the various options, where you can select the required multiple options.
- Search Objects using the Created On and Modified On dates – In this release, we have enhanced the “Advanced Search” feature in all the CRM Apps. Similar to the Contacts App, you can now search for all the other CRM objects (Leads, Opportunities, Customers) using their “Created On” and “Modified On” dates. There are two options using which you can search for the objects,
- Date Range – Exact date can be specified.
- Last – Can search for contacts within specific duration like Hours, Days, Weeks, Months and Years.
For instance: Consider the Leads App. To search for the leads using the Created On and Modified On dates, click on the Search icon found in the Leads.

Fill in the required created on and modified on dates, and click on Search found at the top right corner.
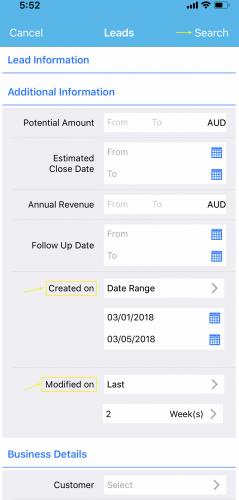
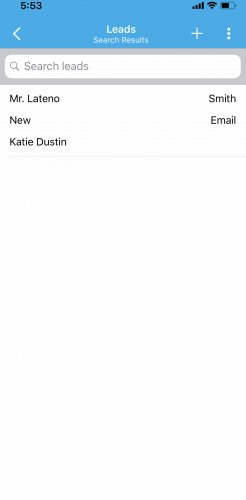
The Result will be displayed as,
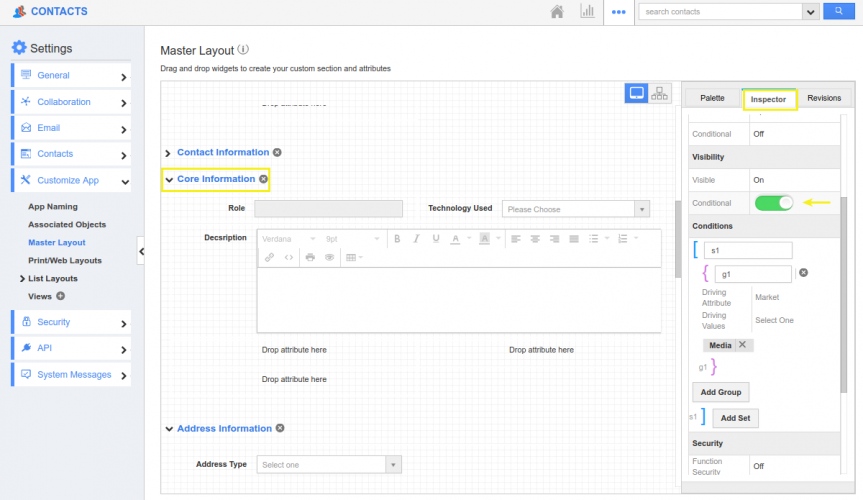
- Conditional Visibility Dependency – This feature of visibility dependency gives you the ability to show or hide a particular section based on the condition set. You can provide a condition to be satisfied to make the section visible on the creation page. That is, you can customize it in the Master Layout of the web and it gets reflected back in your iOS device, once updated.
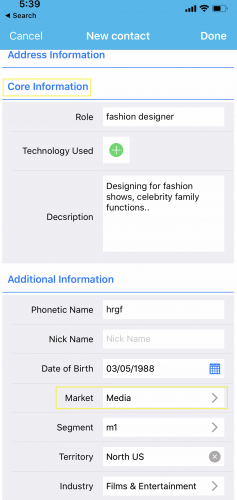
For instance: In web, consider the Contacts App. Go to More -> Settings -> Customize App -> Master layout. Create a custom section (Core Information) with the required fields. Click on the created section. Scroll down to the Visibility section under the Inspector tab. Slide the toggle ON for the Conditional option and set the required criteria (here, Market = Media). Click on Save.
Now, when creating a contact from your iOS mobile, if the Market equals Media, then the Core Information section will be made visible.
Latest Blogs

Role Of CRM In Travel And Tourism Industry
Travel and tourism have been a significant part of everyone’s life since the ancient period. When we skim through the pages of history, It should be noted that humans were initially nomads before they became settled in one place. They...
Read more →
WHAT IS CRM TECHNOLOGY?
Introduction CRM is a technology that helps manage the entire customer information and interactions in order to build and maintain superior customer relationships. The CRM solution replaces spreadsheets and other different applications, which makes it easy for the businesses to...
Read more →
Everything you need to know about the Annual Maintenance Contract!
1. What is an Annual Maintenance Contract? 2. Benefits of Maintenance Contracts 3. How can Apptivo CRM help you manage maintenance agreements and vendors? 4. Summary Think about getting the confidence that the machinery is well-maintained and performing optimally, without...
Read more →
