Hello Everyone! Apptivo Android App Version 6.0.5 brings in a huge list of new features and enhancements which were rolled out on August 01, 2018. Here is an abstract of what we have for you within our latest version of our Apptivo Android App:
Apptivo Android App Updates – V6.0.5
- Supported Functional Attributes
- Multi Select Dropdown
- Hashtag Functionality
- Security Actions
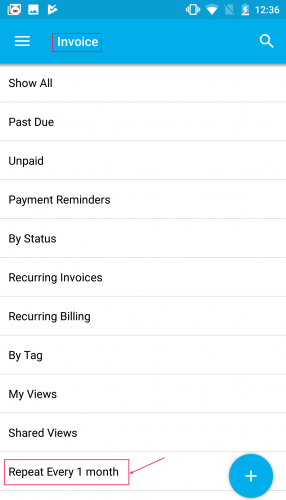
- Timesheet Conversion
- Project Generation
- Invoice Creation
- Pricing Feature in the Work Orders App
- Number Maximum Range
- View Unresponded Objects
- Highlighting Activities
- Filtering News Feed with Date
- Case Duplication
- Counter Attribute in Opportunities App
- Discount Line Level in both Estimates & Invoices App
- Probability Override in Opportunities App
- Loss Reason in the Opportunities App
- Tax Code Creation
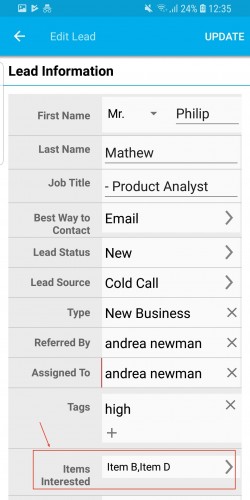
- Custom Conversion in the Leads App
- Custom Views in Estimates & Invoices App
- Reminder Notification for (Task, Event, Follow-ups)
- Email Signature
Download our latest version of Apptivo Android App.
Now let’s dig deeper into the abstract of each feature.
Supported Functional Attributes (Numeric, Date, String)
A noteworthy feature in this Android update is the support of function formulas. For this, we have added the “Function” attribute, which includes three types of formulas – String, Numeric, and Date. (Note: To make use of the functional attributes in your Android device, you are required to configure it from your web settings, which w get reflected in in your Android devices)
For instance: Consider the Leads App and select String Formula. With this, you can now concatenate two or more string fields (here, we are concatenating Last Name + Job Title).
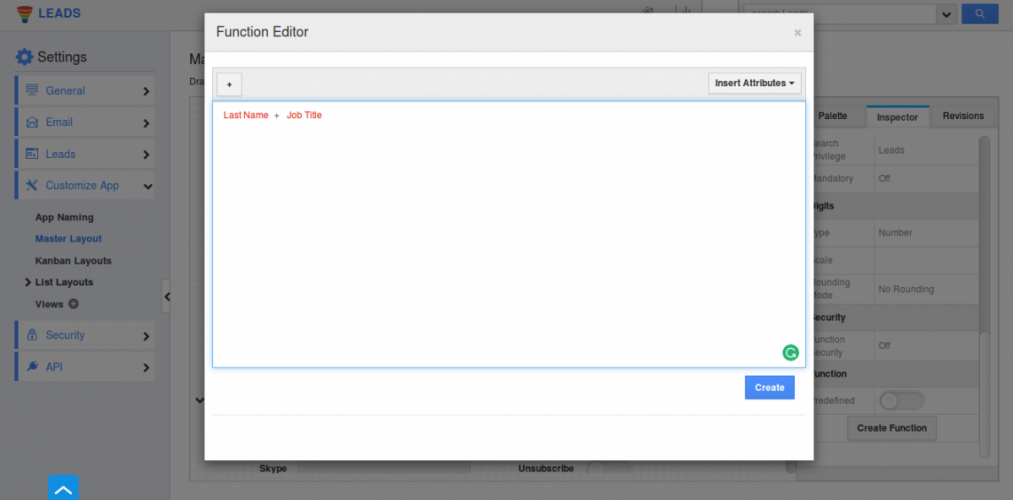
|
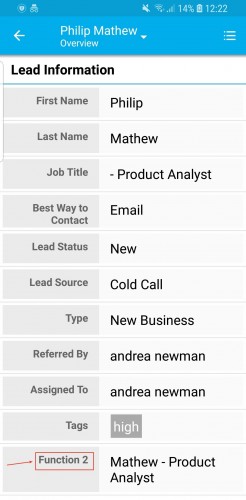
Now in your Android mobile device, on creating a new lead, you can view the created function concatenated automatically.
|
Multi Select Dropdown
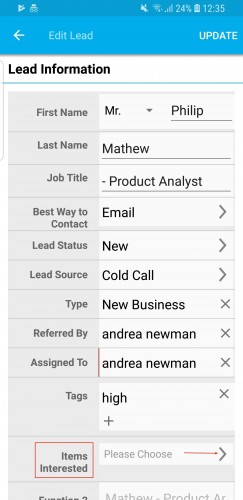
We have added the Multi-Select drop down to all the apps in Apptivo Android App. This drop-down allows you to make multiple selections from the list given. (Note: Before using the multi-select drop down in your Android mobile, you need to configure it from the web version)
Once configured successfully in the required app, you can view the multi-select dropdown in your Android device as shown in the below image. Click on the list drop-down.
|
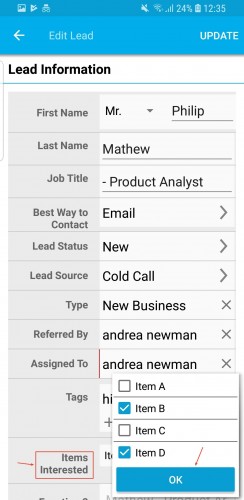
On clicking, you will be displayed with the values where you can select the appropriate values. And click OK.
|
The selected values will now be added to the lead record. This is how the multi-select values should be configured.
|
Hashtag Functionality
In this update, we have included the new Hashtag functionality in the Invoices, Estimates, and Work Orders App. This feature of hashtag allows you to associate emails with the respective record. (Note: The configuration of Hashtag should be done from the web version)
Kindly check our online documentation on How to Enable Hashtag in Apptivo for a complete list of steps. For instance: Consider the Invoices App. On successful configuration, the emails which you compose for an object from its application will generate an automated hashtag in the “Subject” field, this represents the association of a particular object.

|
Security Actions
With this feature of Security Privileges, you can define access to specific actions for deputed employees alone, by enabling/disabling that specific action for all users or giving that particular actions’ privilege specific for those required employees alone. (Note: All configurations should be done in the web version only)
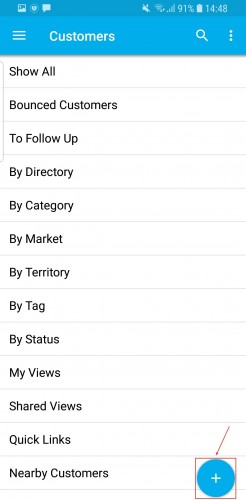
For instance: Consider the action to Create customers in Customers App. Kindly check our online documentation on How to Customize Security Actions in Customers App for a complete list of steps. On successful configuration, the users who have been given the privilege to create new customers can view the Create “+” icon as shown in the below image:
|
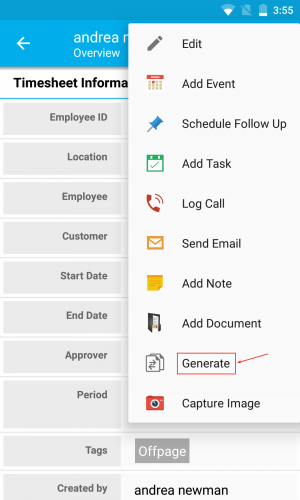
Timesheet Conversion
A cool update in this release is the feature of conversion in the Timesheets App. This conversion feature gives you the ability to convert all your timesheets to Invoices effectively, without the need of creating an invoice from scratch. Billing is made easier, by instantly generating invoices for the timesheets.
To generate an invoice, click on the More icon found at the top-right corner and click Generate from the listed options.
|
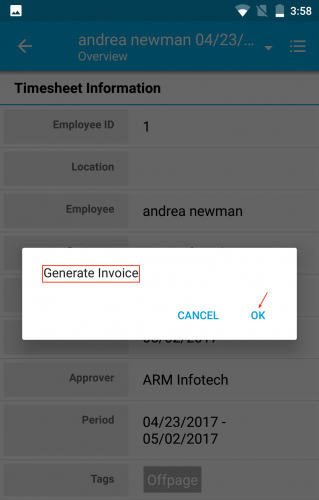
Generate Invoice popup will be displayed as shown in the below image. Click Ok.
|
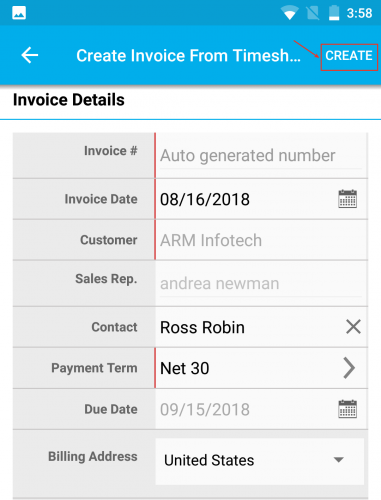
You will be redirected to the Create Invoice From Timesheet page, where the details of timesheet will be auto-populated. Click on Create to generate invoices.
|
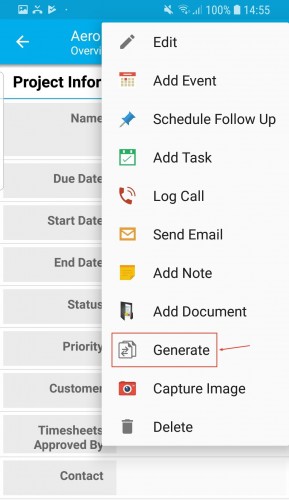
Project Generation
With this release, you can generate Invoices and Timesheets for a Project right from your Android App. To do so, click on the More icon found in the top-right corner of the respective project record.
|
|
In the list that drops down, click on Generate.
|
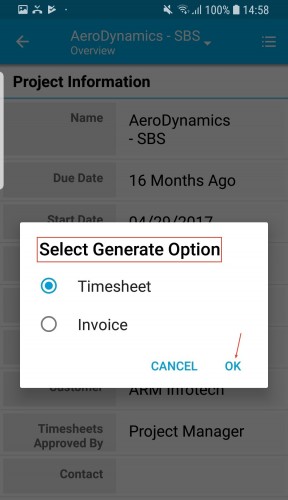
The Select Generate Option popup will be displayed, where choose the required option. For instance: Select Timesheet and click Ok.
|
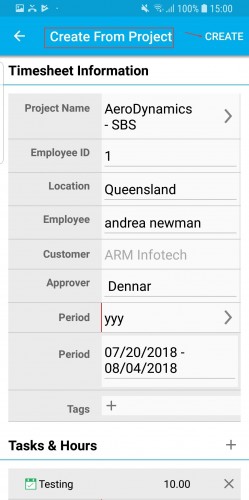
In the Create From Project page, the project information will be populated. You can also edit it and once done, click on Create.
|
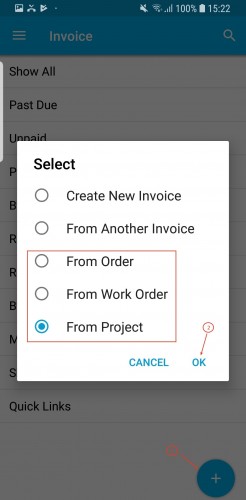
Invoice Creation
In this release, we have enhanced the Invoice Creation. Besides creating invoices newly or from another invoice, we have enabled creating invoices from Orders, Work Orders, and Project. Go to Invoices App and click on the “+” icon found at the bottom right corner of the screen, as shown in the image. You can view the above-mentioned options, for instance, select From Project. And click Ok.
|
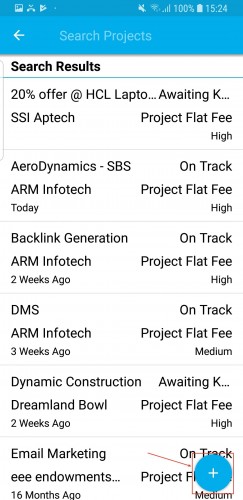
Now, the list of all projects from the Projects App will be listed, where you can select the required project. Also, projects can be created at run-time (newly) by clicking on the “+” icon found at the bottom right corner.
|
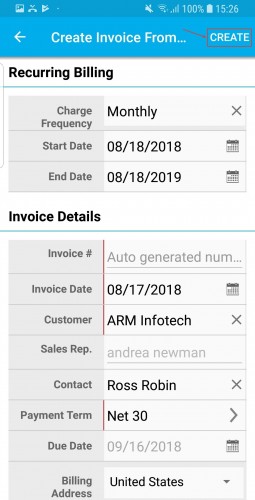
On selecting the appropriate project, Create Invoice From Project will be displayed. Click on Create.
|
Pricing Feature in the Work Orders App
Besides having the Price List associated with the customer category, we have now included this feature as an individual field, which can be incorporated in two ways:
- Header level – Apply price lists for your Work Orders at the header.
- Line level – Apply price lists for your Work Orders, individually for each item, at the line level.
(Note: The position of Pricing should be configured from the web version)
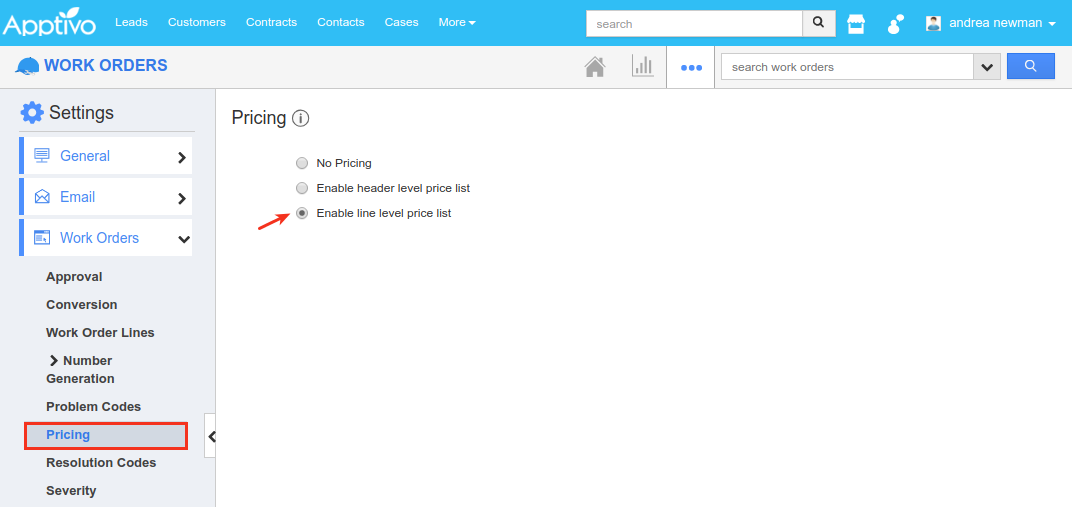
Go to Work Orders App Settings -> Work Orders -> Pricing and select the position where you would want to associate the Price Lists, as shown in the below image: (here, we have selected Line Level Price List)
|
After configuration, in your Android device, when you move on to Work Orders creation page, you can view the “Pricing” field in “Products/Items Sold” section.
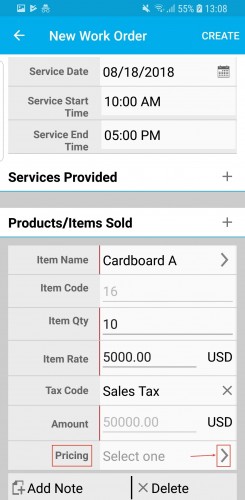
|
Clicking on the side drop-down arrow in the Pricing field, all the Price Lists from the Pricing App will be listed from where you can select the required one.
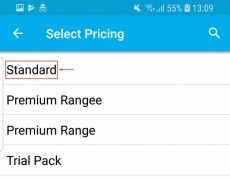
|
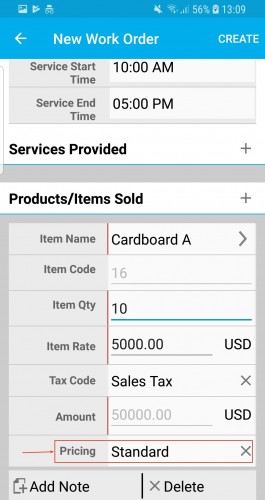
And that will be added in the Pricing field, as shown in the below image:
|
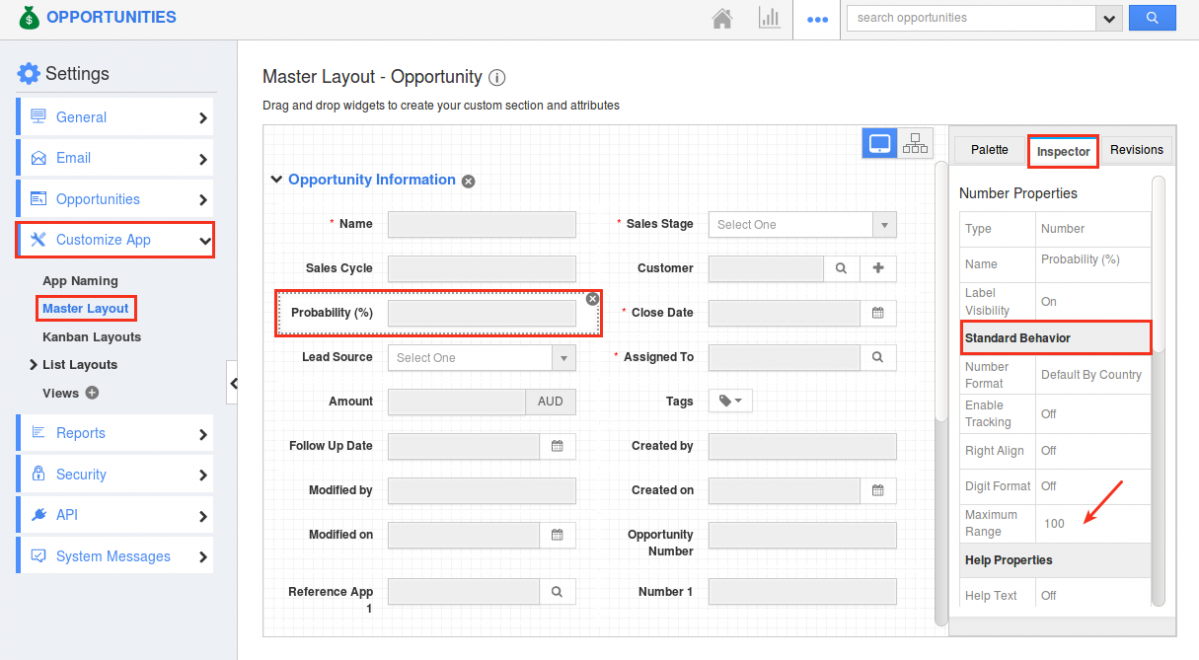
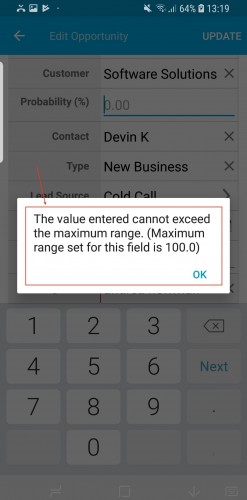
Number Maximum Range
The Maximum Range field in the Number attribute is where you can set and define the maximum number range that can be entered in that number field. This Maximum Range for numbers should be configured in the web version, which will get reflected in your Android Apptivo App.
For instance: Consider the Opportunities App. In a lot of cases, the Probability value cannot be greater than 100. To do so, go to Opportunities App Settings -> Customize App -> Master Layout -> click on the Probability field -> enter the Maximum Range as 100 under the Standard Behavior section of the Inspector tab. Save the changes.
|
Now in your Android device, on entering a value greater than 100 in the Probability field, you will be notified with an Error pop up as shown in the below image:
|
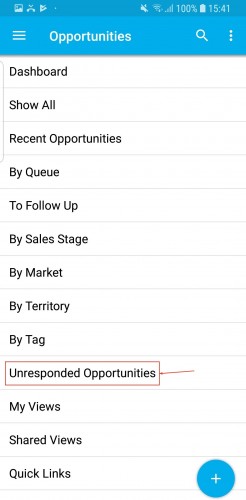
View Unresponded Objects
We have implemented the feature of Unresponded Objects, which gives you the ability to filter and view the object records (Leads, Contacts, Customers, and Opportunities) who have not responded back.
For instance: Click on the Opportunities App -> Unresponded Opportunities.
|
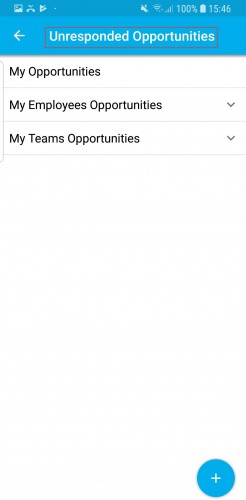
The Unresponded Opportunities page will be displayed where you can select to view your unresponded opportunities, your employees’ unresponded opportunities or your teams’ unresponded opportunities, where, by clicking on you can view the list of unresponded opportunities.
|
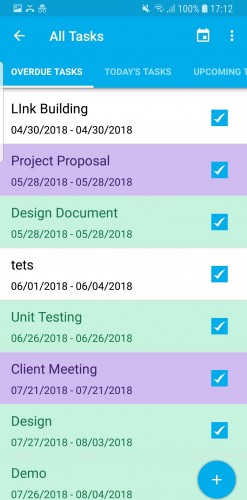
Highlighting Activities
One of the significant and cool updates is the feature of Highlighting Activities in your Android device. This highlighting feature allows you to easily track the activities based on the highlighting condition set. (Note: You need to configure the highlighting rules from the web version which will get reflected instantly in your Android app)
For instance: Consider the Tasks. Kindly check our online documentation on How to Highlight Tasks in Apptivo for a complete list of steps. On successful configuration of the highlighting condition, the tasks will be highlighted whenever the highlighting criteria is met. You can have a view of the tasks being highlighted in your Android device, as shown in the below image:
|
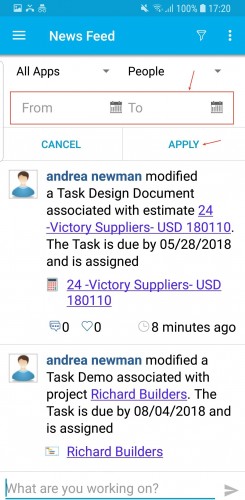
Filtering News Feed with Date
As you all know, the News Feed in Apptivo provides you with information of all activities performed by your employees. In this update, we have enhanced the News Feed functionality. This enhancement now gives you the ability to filter and view the Newsfeed based on specified date ranges.
To filter and view the newsfeed with dates, click on the Filter icon found at the top right corner, as shown in the below image:
|
|
You can now provide the “From” and “To” date and click on “Apply” button which displays you the Newsfeed of those particular days.
|
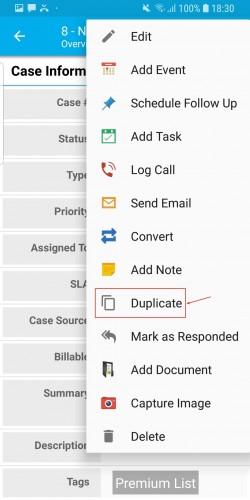
Case Duplication
In addition to the various actions that can be performed in a Case, we have now the added the ability to duplicate cases to create new ones and edit the particulars if needed. For this, click on the More icon found at the top right corner.
|
|
From the list that appears, click on Duplicate.
|
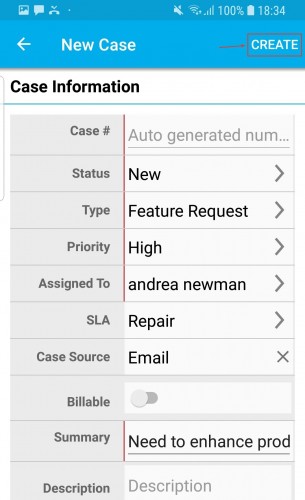
New Case creation page will be displayed, populating the details of the existing case. You can also add or remove information accordingly and once complete click on Create.
|
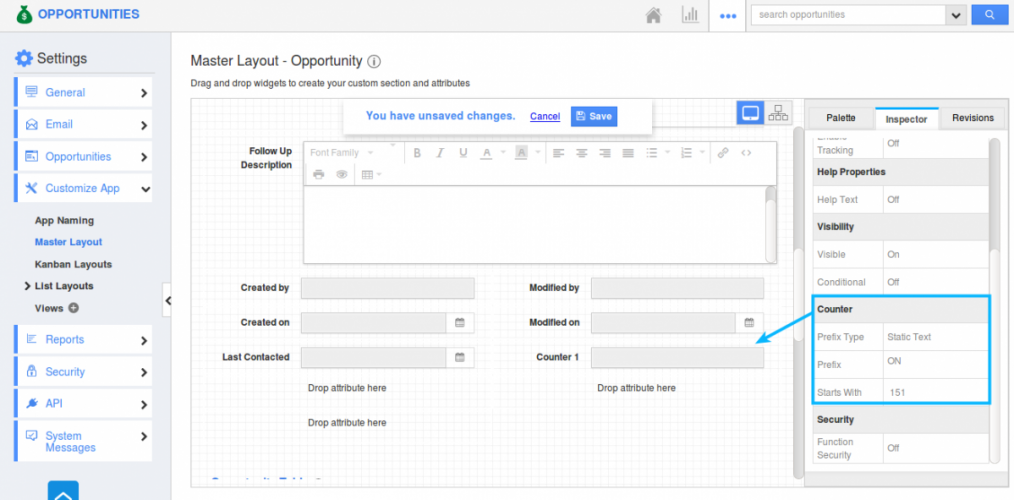
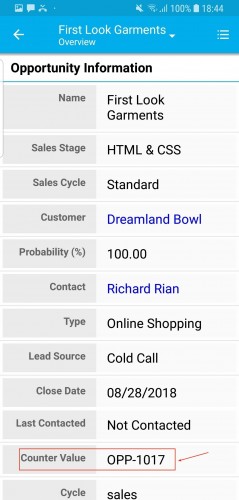
Counter Attribute in Opportunities App
One of the notable features released in this deployment, is the feature of Counter Attribute in Opportunities App, that gives you the ability to create opportunities with custom unique numbers. The created opportunities can be easily identified and retrieved anytime, using this counter attribute. (Note: All configurations should be done in the web version)
|
Once you have configured the Counter Attribute, you can view the configured counter attribute in your Android App, for all the Opportunities as shown in the below image:
|
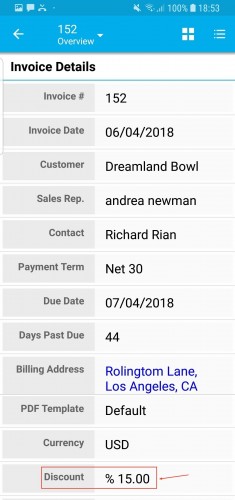
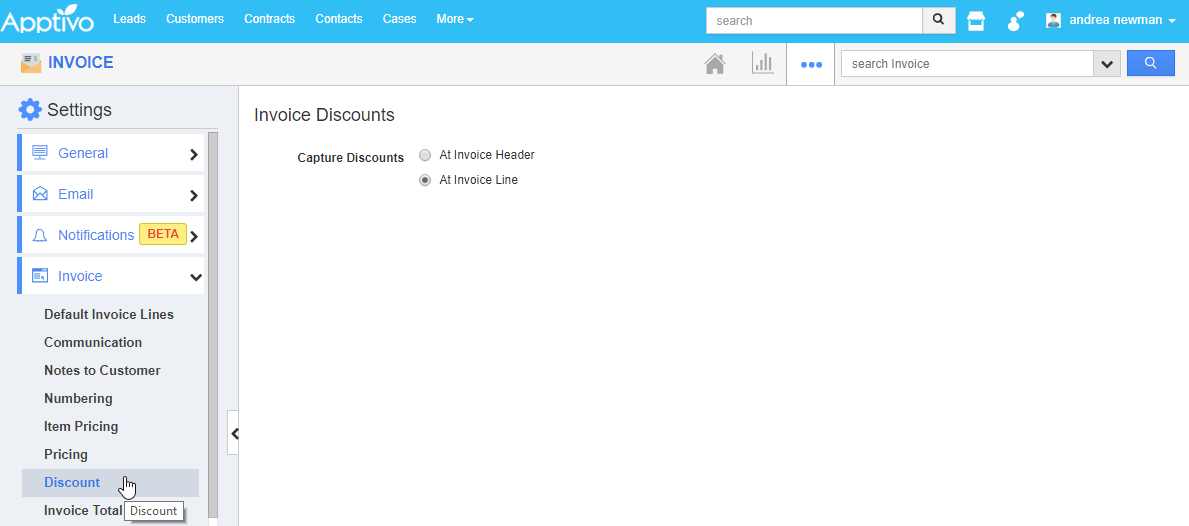
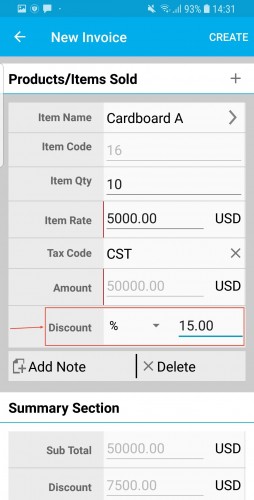
Discount Line Level in both Estimates & Invoices App
In this release, we have added the Discount field newly to the Line Level in both the Estimates and Invoices App. In this field, you can give offers/discounts individually for the products/items to your customers while creating estimates or invoices. To make it more user-friendly, we have also provided you the ability to configure the position of the Discount Field.
- Header Level
- Line Level
(Note: All configurations should be done in the web version which will be reflected instantly in your iOS device)
For instance: Consider the Invoices App. To configure the position, go to Invoices App Settings > Invoices > Discount > and select the position where you would want to capture your discounts, as shown in the below image: (here, we have selected Header Level discount)

|
Now based on the configuration you have done, when creating invoices from your iOS device, you can view the discount field located at the header level:
|
Similarly, by selecting the Discount to be captured at the Invoices Line Level:
|
When creating invoices from your Android device, you can view the discount field located at the invoices line level, as shown in the image below:
|
Probability Override in Opportunities App
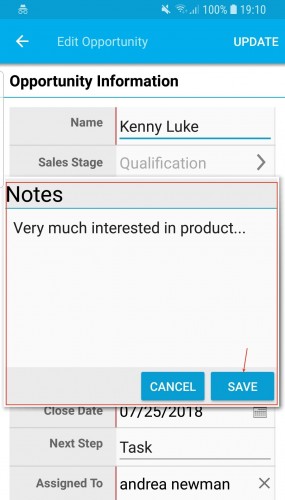
As we all know, each Sales stage in the Opportunities App, will be having a Probability value, which will be considered as the opportunities probability, when set to that sales stage. In this release, we have now enhanced the Probability Override feature. With this upgrade, on changing the probability value (increasing/decreasing) of an opportunity, you can now enter your reasons in a popup and it will be automatically collected as a Note in the Notes tab, which can be used for future references.
On changing the probability value of an opportunity from your Android App, you will be displayed with the Notes popup as shown. Enter the note and click Save.
|
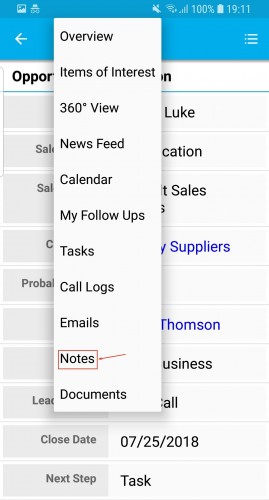
On clicking Save, a note will automatically be created. To view the note created, click on Overview dropdown > Notes.
|
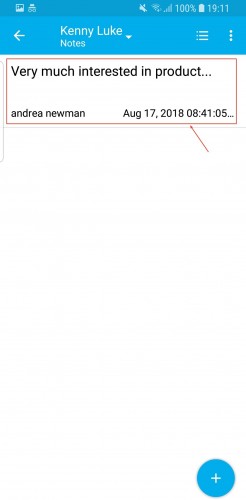
The created note will be listed as shown in the below image:
|
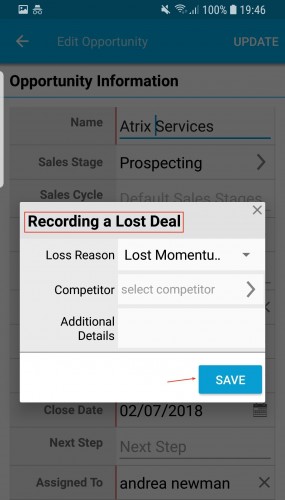
Loss Reason in the Opportunities App
We, in this release, have added a new feature to the Opportunities App. You can now record the reason for not closing the deal (reasons for losing an opportunity), right from your Android device. Apptivo provides you with some default loss reasons, besides which, you can also create your own loss reasons according to your business requirements. (Note: The loss reasons should be created in the web version, which will get reflected in your mobile app)
To create a new loss reason, go to the Opportunities App Settings > Opportunities > Loss Reasons and click on the “Create” button present.

|
After creating loss reasons, now, when an opportunity moves to the “Closed Lost” sales stage, the “Recording a Lost deal” pop up appears in your Android device, where you can select your loss reason from the drop down and record it for reference. Click on Save button.
|
Tax Code Creation
This latest update of the Apptivo Android App includes some additions to taxes in the Invoices, Estimates, and Work Orders App. You can now create your own tax codes on the go right from your Android devices, and use them in your invoices, estimates and work orders.
Consider the Invoices App. To create invoices for the services offered and products sold, click on the “+” icon found in the Invoice Creation page.
|
|
In the Products/Items Sold section, click on the side drop down arrow respective to the Tax Code field, as shown in the image below:
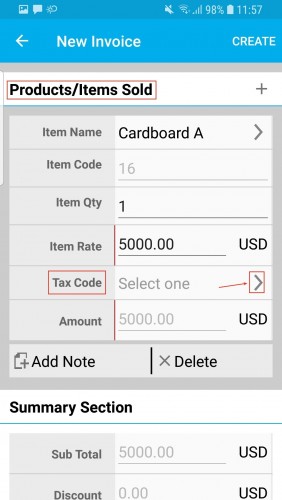
|
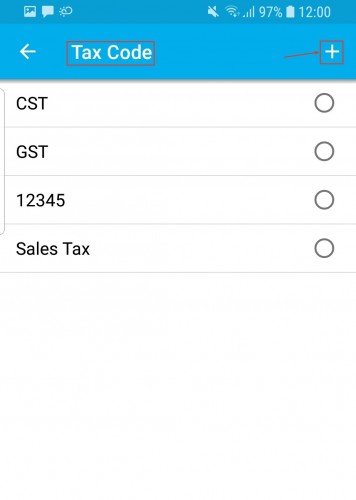
The Tax Code page will be displayed with the list of taxes already created in the web version. Click on the “+” icon found at the top-right corner to create taxes newly.
|
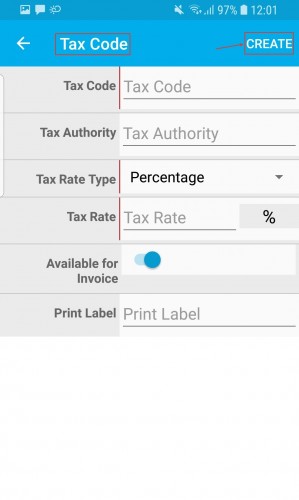
Now, enter the tax code details and click Create.
|
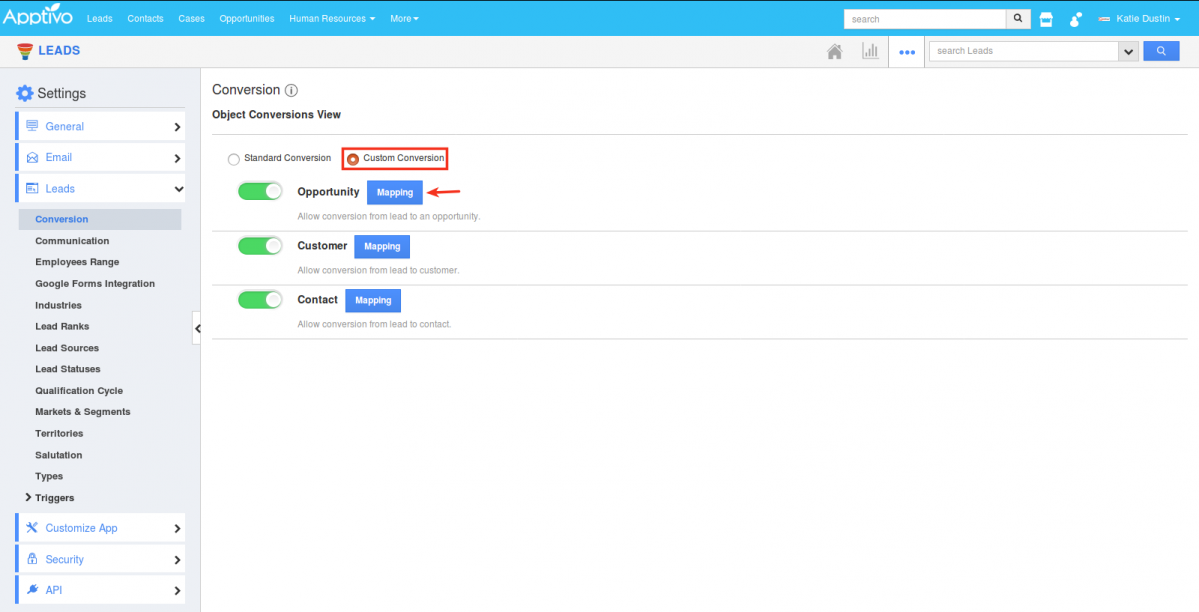
Custom Conversion in the Leads App
In this update, we have enhanced the conversion feature in the Leads App. This update will now give you the ability to map the attributes of the source app (Leads App) with the destination app, according to your business requirements. Note: The custom conversion should be configured from the web version. Go to Settings > Leads > Conversion > Custom Conversion.
|
On clicking Mapping, you can now select and map the fields as per your requirement, based on which the conversion will be carried.

|
Click on Convert option in your Android device, from the Leads Overview page.
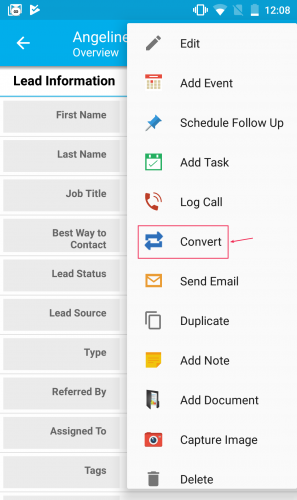
|
A Select popup will open up, that displays the following options – Customer, Contact, and Opportunity.
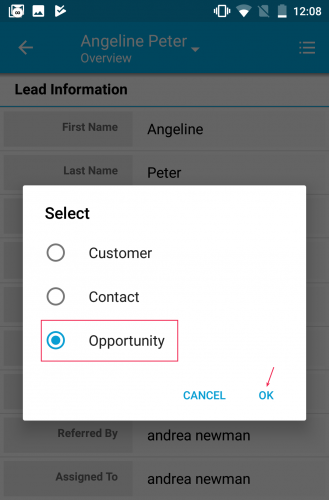
|
Based on the mapping of the fields, when you convert a lead to an opportunity from your Android device, the values will get populated accordingly.
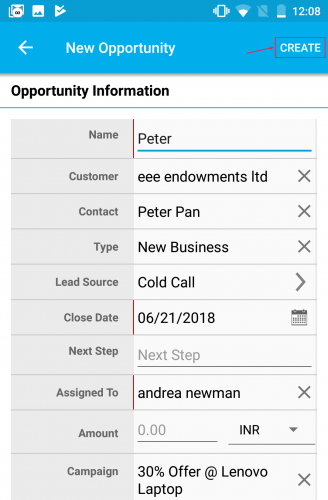
|
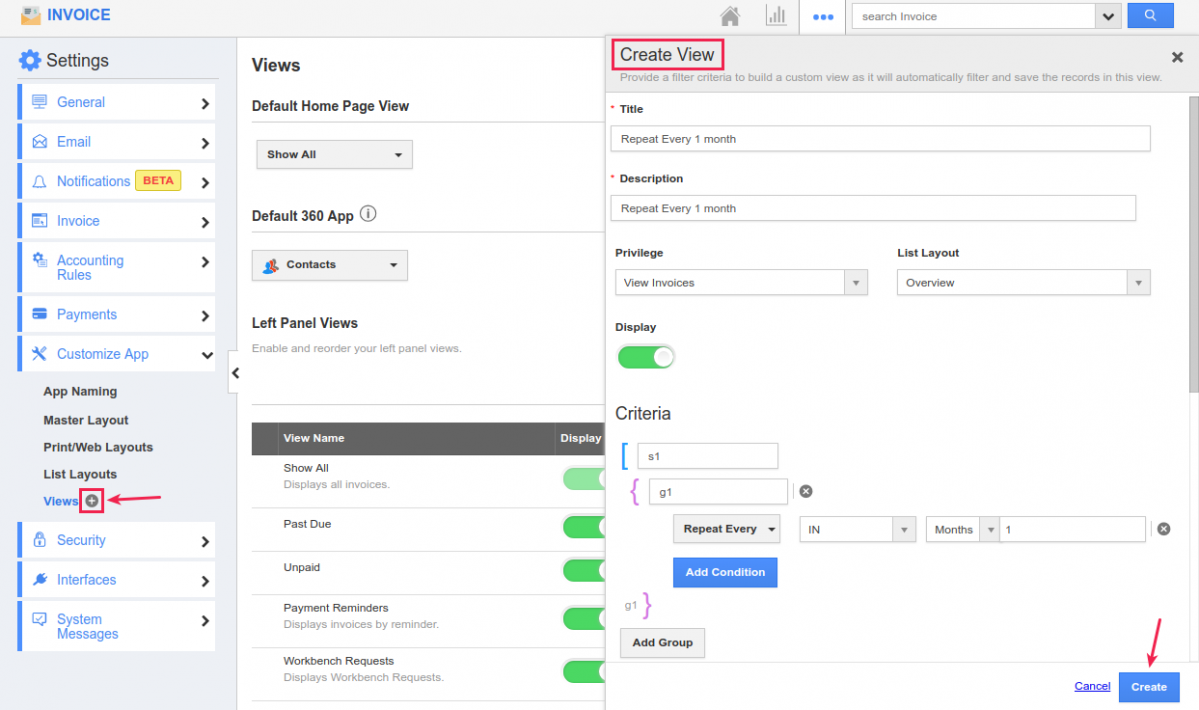
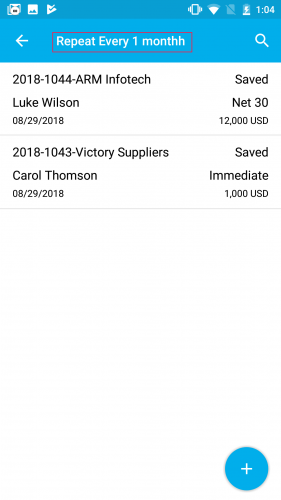
Custom Views in Estimates & Invoices App
The custom view feature isn’t a new thing in Apptivo. As like in the CRM Apps, this feature has now found its’ way to the Estimates and Invoices App. This allows you to display the estimates and invoices that satisfy the criteria you’ve configured for that view. (Note: Configuration of the custom views should be done in the web version of the Estimates & Invoices App)
Consider the Invoices App. Go to Settings > Customize App > and click the “+” icon next to the Views option. Enter the required details and click Create.
|
To view the custom view created in the web version, click the Invoices App. You can view the custom view created as shown in the image:
|
Clicking on the custom view, the invoices matching that specified criteria will be displayed.
|
Apptivo Android App Updates – V6.0.4.1
Reminder Notification for (Tasks, Events, & Follow ups)
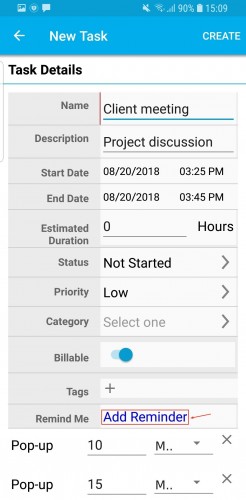
Reminders are a great way to effectively keep track and remind you of all your activities to be accomplished. We are glad to inform you that, we have now successfully implemented the Reminder Functionality in the Apptivo Android App. Reminders can be set for the following three types of activities – Tasks, Events, and Follow-Ups.
Besides the reminder pop up functionality, we have provided customizable Notification Refresh. Based on the duration set, a refresh will occur in the background. (Note: By default, duration will be set to 5 minutes. So every 5 minutes refresh occurs displaying reminder popup if any)
To receive notifications, you are required to Enable the Notifications toggle from the Apptivo App Settings.
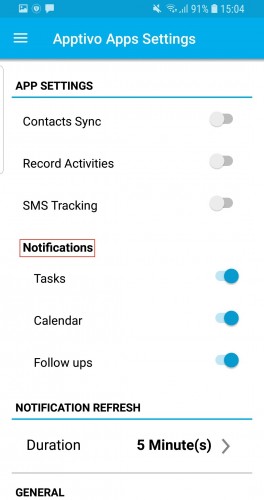
|
Now, create or update an activity with appropriate reminders (Task, Event, or Follow up) on the web or mobile version.
|
Based on the Reminder set for your activity, you will get a notification pop up as shown in the below image, on your mobile device.
|
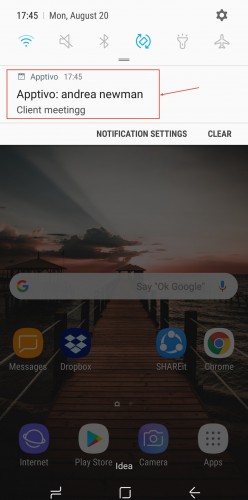
Email Signature
One significant release in this update is the addition of the Email Signatures to emails. An email signature will be inserted automatically to every email you send out from your Android Apptivo App. (Note: You need to configure the email signature from the web version)
Go to Employees App Settings > Email > Email Signature Template. Create your own required email signature and save the changes.
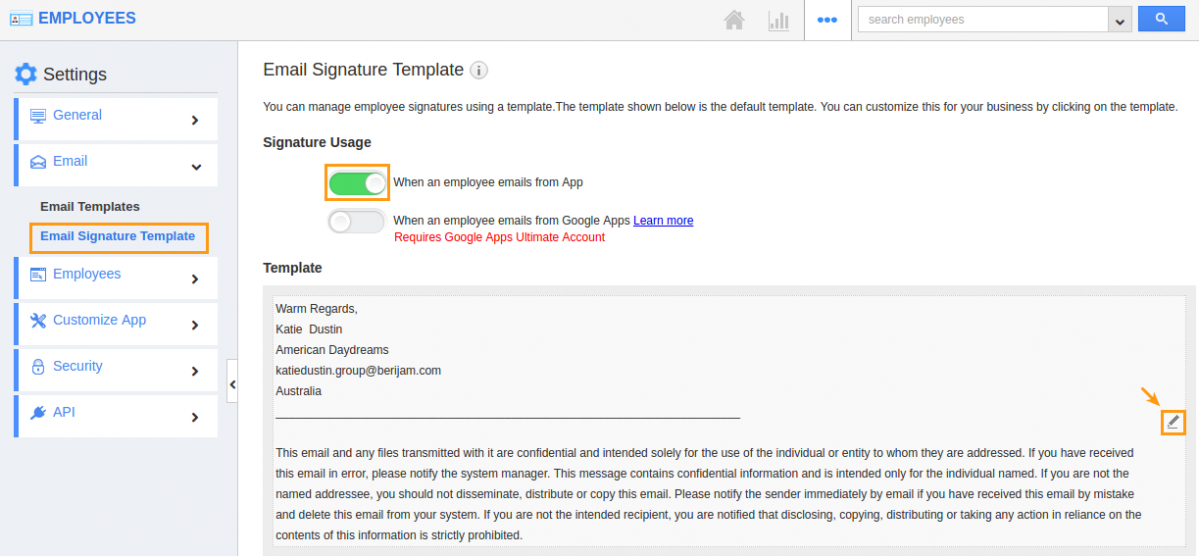
|
You can view the configured email signature in every email you send out as shown in the image below:

|
Download our latest version of Apptivo Android App.
We would love to hear your suggestions on the new features rolled out. Give us a try, check every feature which is released, and please don’t hesitate to reach out to us at support@apptivo.com, if you have any words or suggestions or feature requests on your behalf. We really appreciate your feedback!
Latest Blogs

Role Of CRM In Travel And Tourism Industry
Travel and tourism have been a significant part of everyone’s life since the ancient period. When we skim through the pages of history, It should be noted that humans were initially nomads before they became settled in one place. They...
Read more →
WHAT IS CRM TECHNOLOGY?
Introduction CRM is a technology that helps manage the entire customer information and interactions in order to build and maintain superior customer relationships. The CRM solution replaces spreadsheets and other different applications, which makes it easy for the businesses to...
Read more →
Everything you need to know about the Annual Maintenance Contract!
1. What is an Annual Maintenance Contract? 2. Benefits of Maintenance Contracts 3. How can Apptivo CRM help you manage maintenance agreements and vendors? 4. Summary Think about getting the confidence that the machinery is well-maintained and performing optimally, without...
Read more →
