We, at Apptivo, are happy to announce that a huge list of feature enhancements and new releases has been deployed in the last release on June 02, 2018. Walk through the below list to know more about the features:
Download our latest version of Windows CRM App.
Apptivo Windows CRM App Updates – V6.2.6.0
- Reminder Notifications
- Locate Nearby Customers
- Sectional State Visibility
- Pin to Start
- Field Level Access on Advanced Search
- Work Log Creation
- Unresponded Objects
- Probability Override Notes
- Number Maximum Range
- Email Template Attachments
- Custom Conversion
- Email Signature
- Security Privileges
- Opportunity Dashboards
Reminder Notifications
Reminders alerts you of the upcoming appointments in your mobile devices, without letting you forget your business! We are glad to inform you that, we have now successfully implemented the Reminder Functionality in the Windows CRM App. Reminders can be set for the following three types of activities – Tasks, Events, and Follow-Ups.
For instance: Create an Event with appropriate reminders.
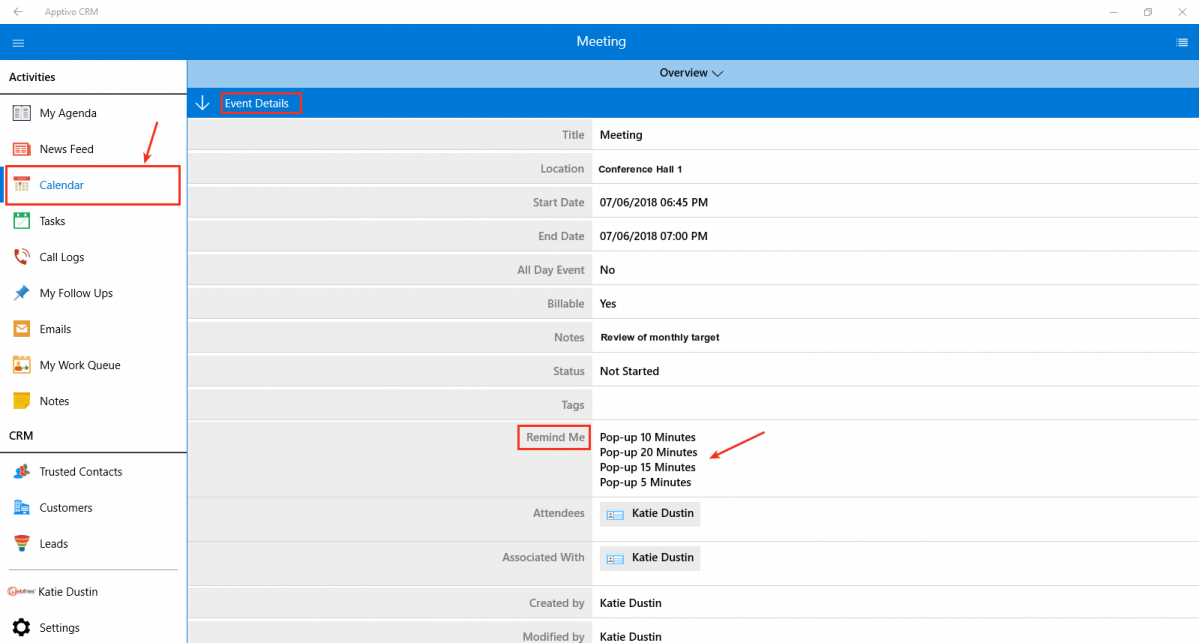
|
Based on the reminder set, you will now receive the reminder notifications as shown in the below image:
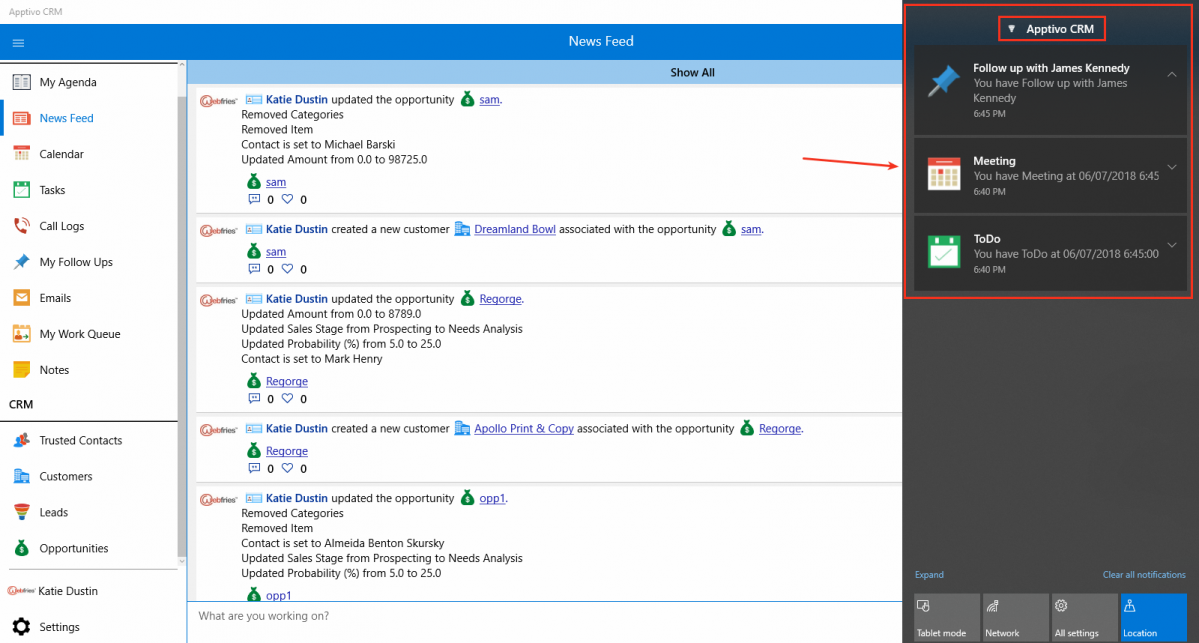
|
To receive activities notifications as intended, ensure that the Notifications for Apptivo CRM App is enabled from your Windows Settings.
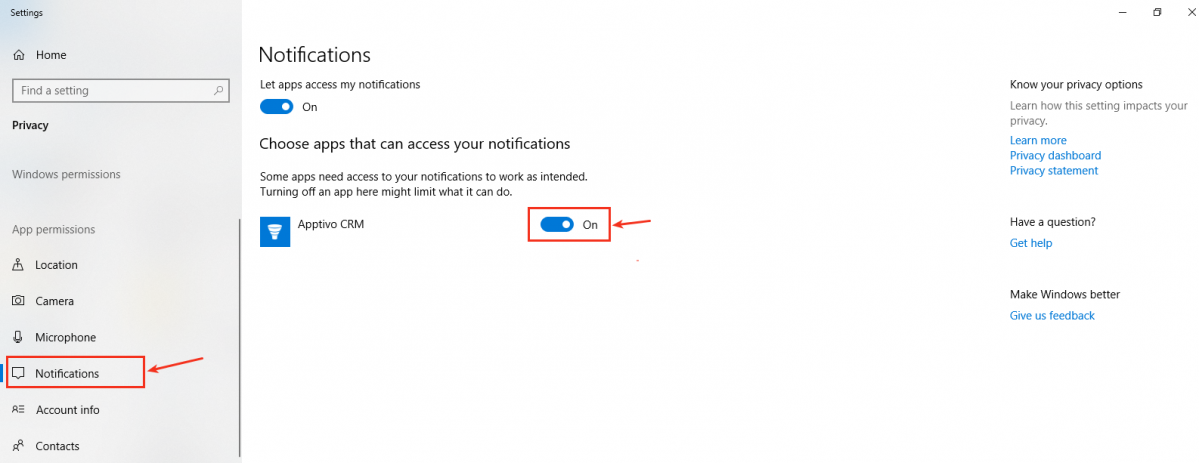
|
Locate Nearby Customers
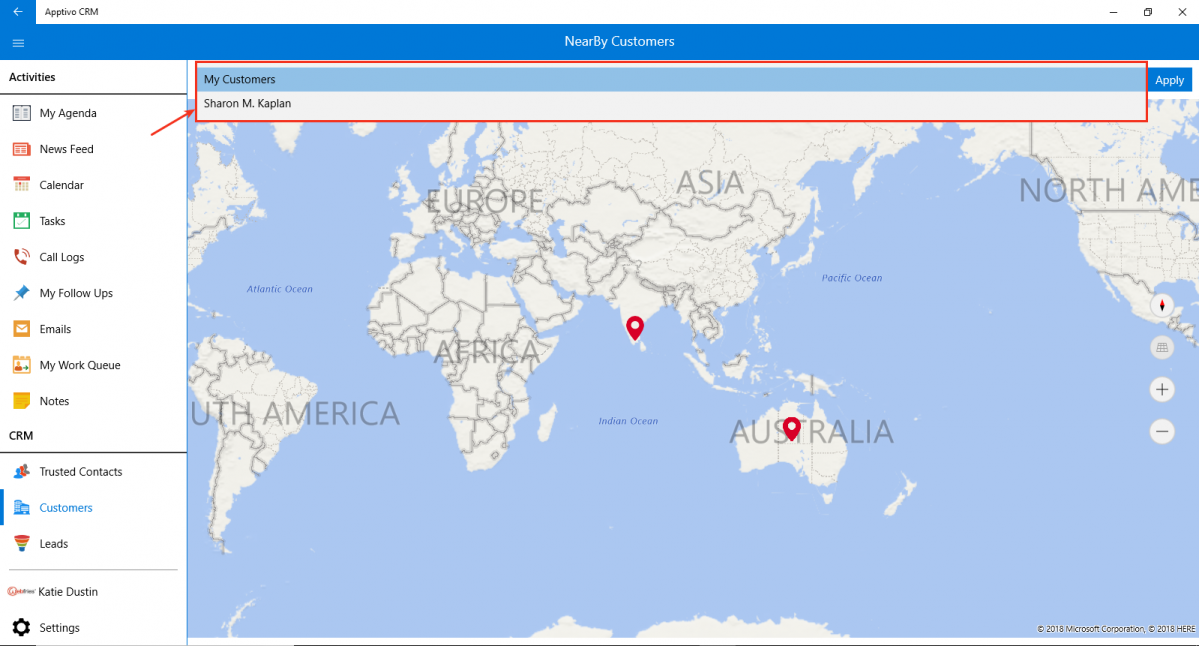
Similar to the Android & iOS CRM Apps, we have now implemented the feature of Locate NearBy Customers in the Windows CRM App also. With this feature, you can locate your nearby customers and also view customers with your Sales Reps. To do so, go to Customers -> click on NearBy Customers.
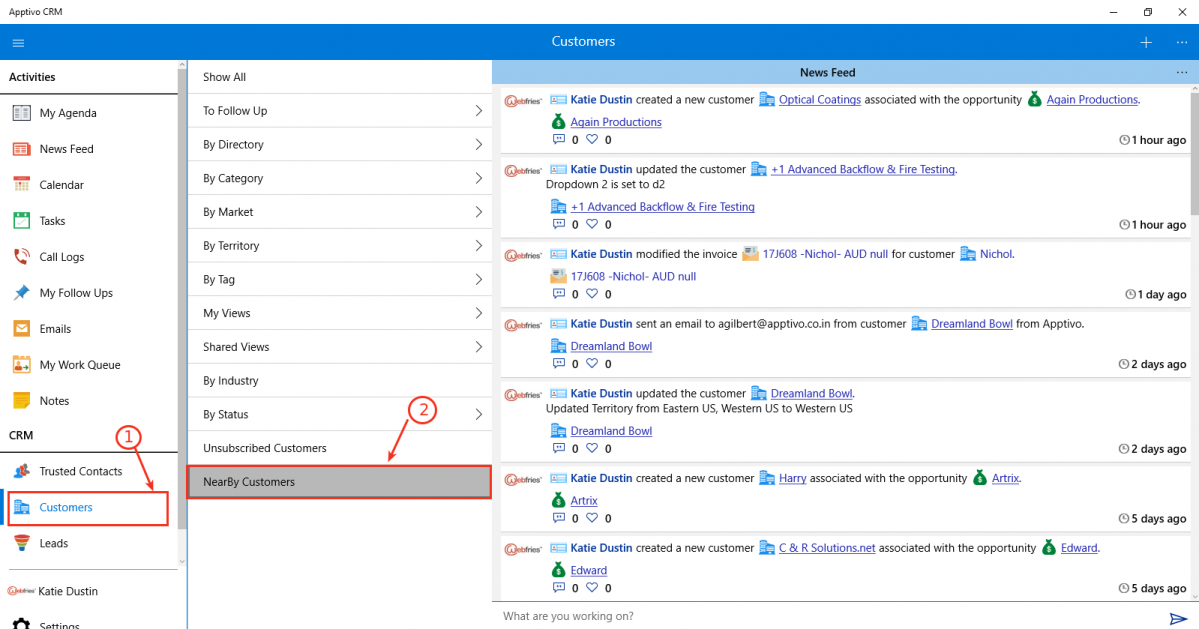
|
On clicking, you will be asked permission to access your location. Click Yes.
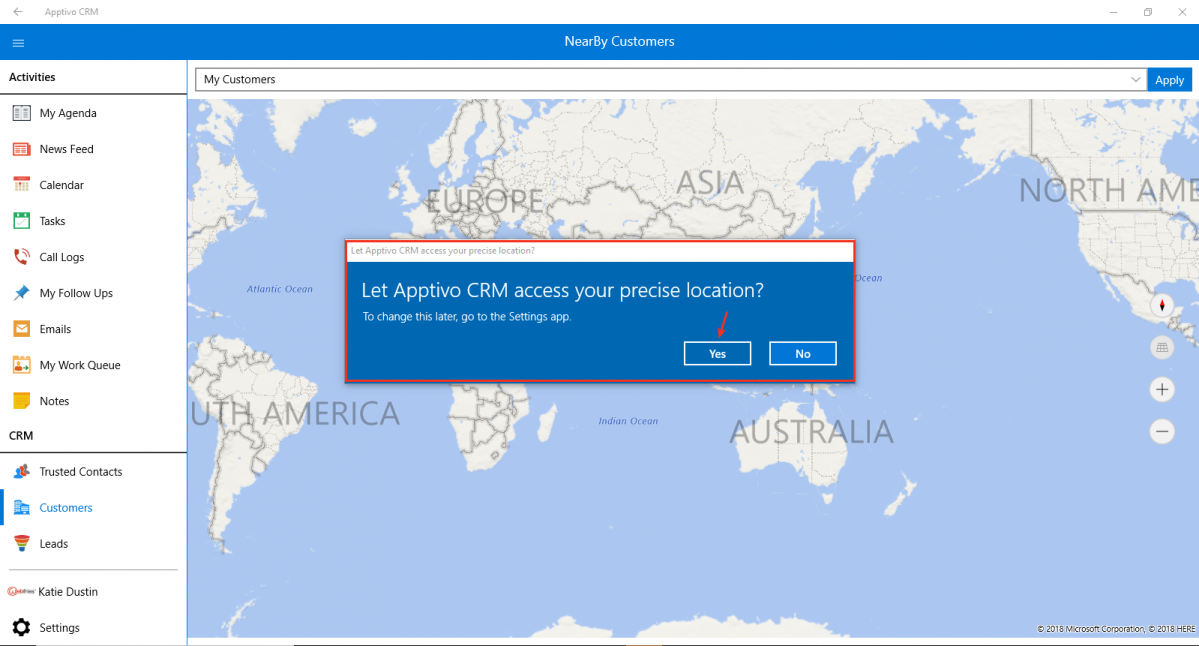
|
You will now be opened with the map, where you can find your location and all your nearby customers. For instance: click on a customer (say, Mark)
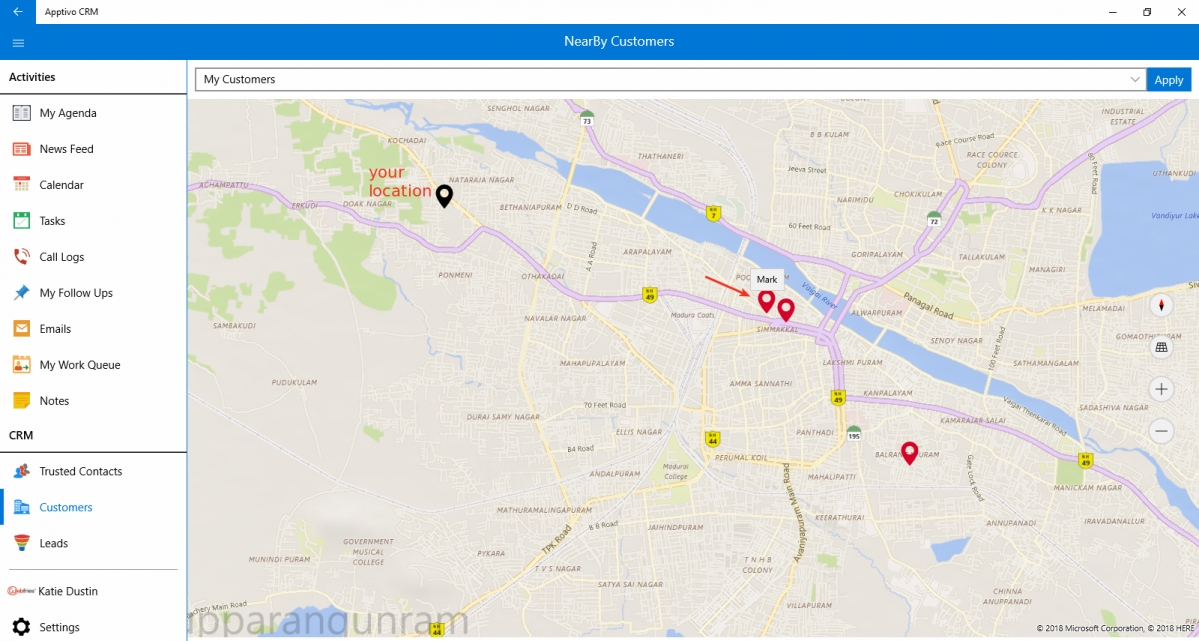
|
You will be displayed with a popup as shown, with the Distance (from your location to your customers’) and their Address. Clicking on Show Details will redirect you to the overview page of that customer.
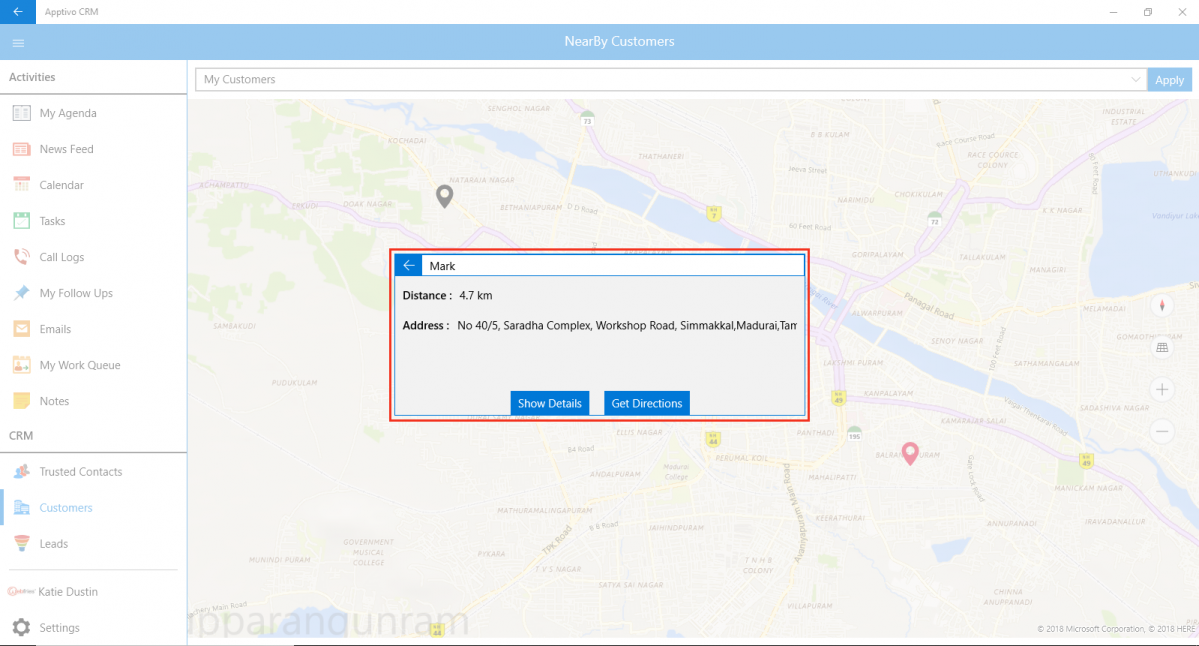
|
And clicking on Get Directions button, you can view the directions to reach your customer in the map.
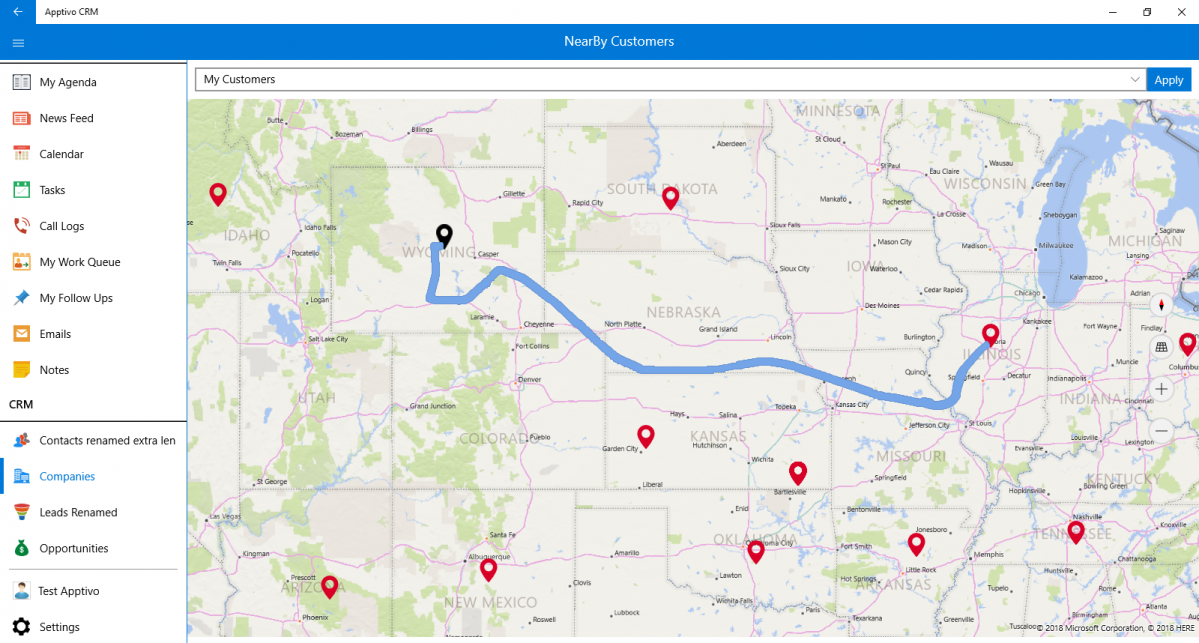
|
You also have the option to view your customers (My Customers) and the customers of your sales reps. To do so, click on the drop down found at the top of the page. Click Apply.
|
Sectional State Dependency
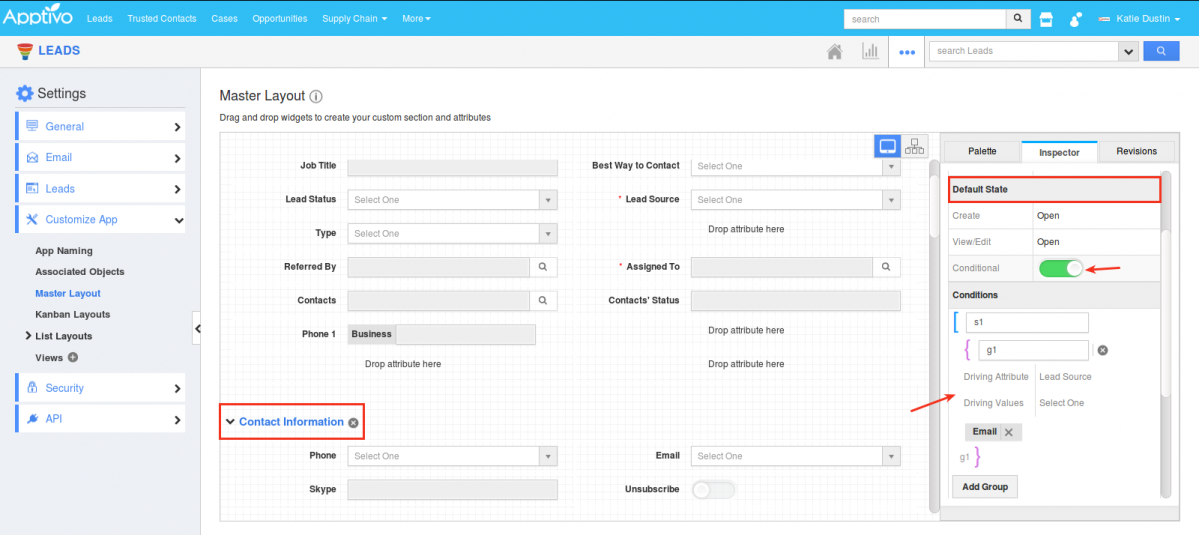
With Sectional State Dependency you can now open or close a particular section based on the condition you have defined. Based on this condition, the section can be opened or closed in the creation page. This feature is available in all the CRM Apps. (Note: You need to configure this setting from the Web version which will be reflected instantly in the Windows CRM App)
For instance: In web version, go to the Leads App Settings -> Customize App -> Master Layout. Click on Contact Information section -> enable the Conditional toggle ON under the Default State section and define the condition as “Lead Source = Email”. This depicts that, when Lead Source is set to Email, the section Contact Information will be opened.
|
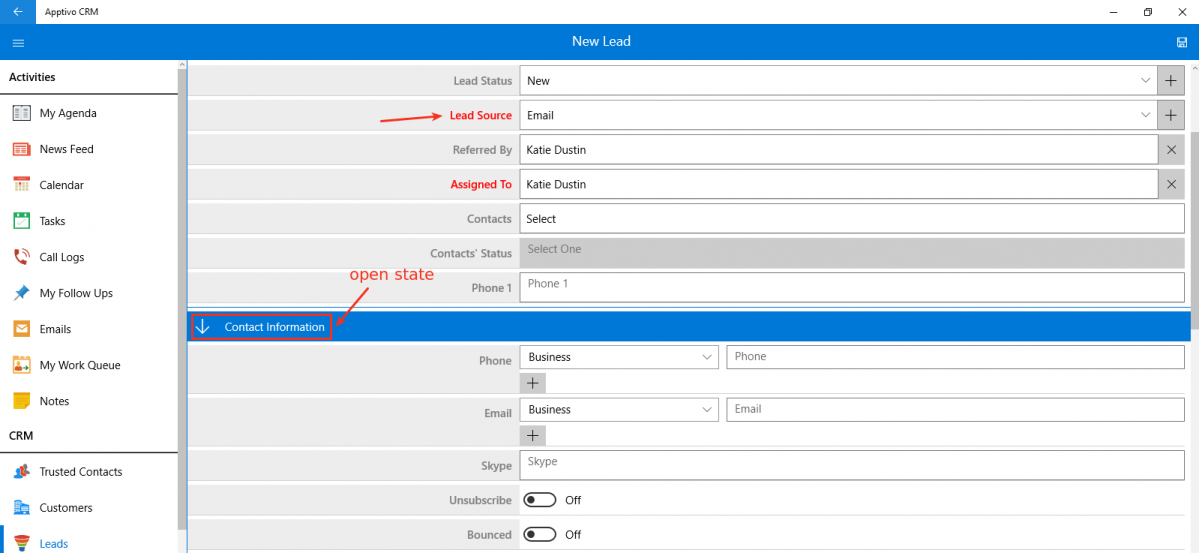
And now in your Windows mobile/desktop, on selecting Lead Source as Email, you can view the Contact Information section (in Open State) as shown in the image below:
|
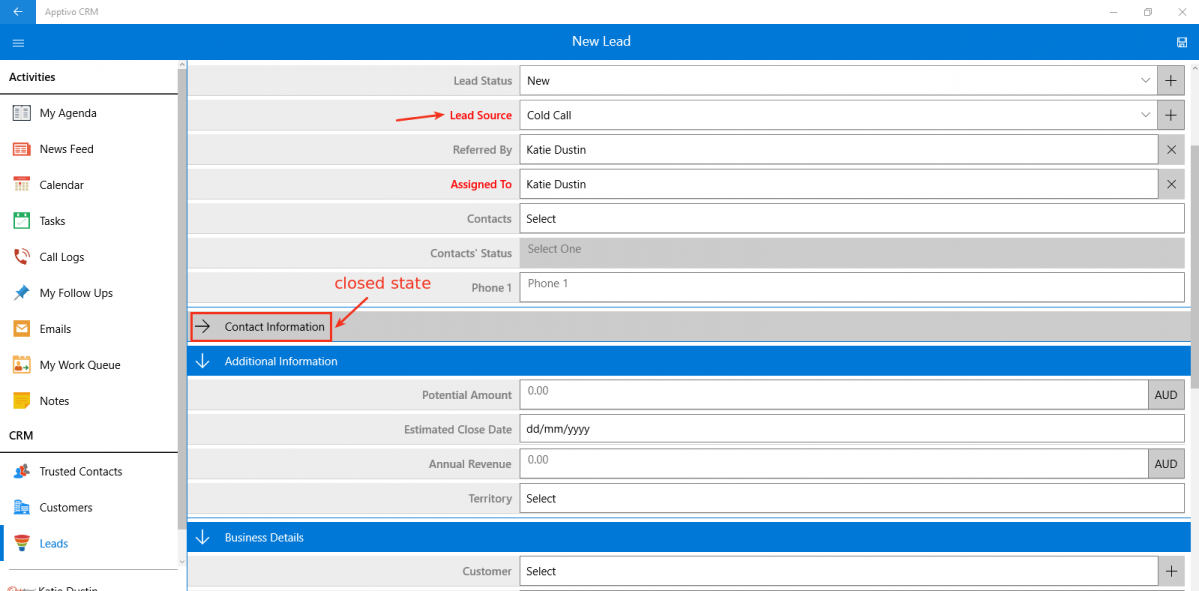
When Lead Source is set to something else other than Email, the section will be closed:
|
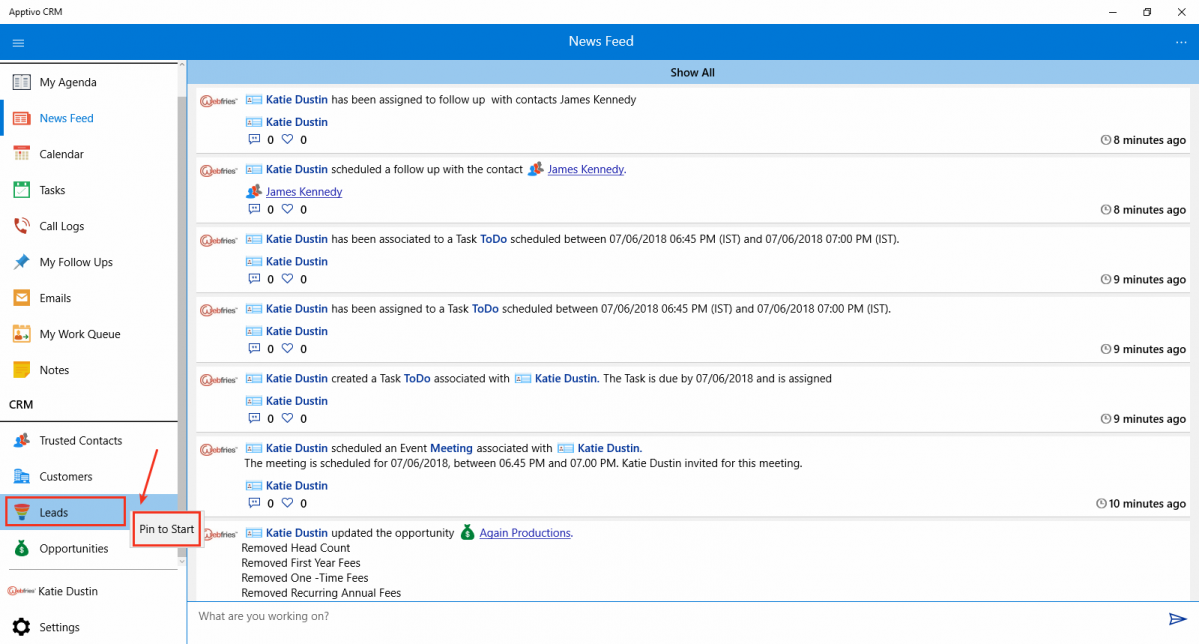
Pin to Start Menu
In this release, we have enabled the Pin to Start Menu feature in the Windows CRM App. This feature will now give you the ability to Pin the apps and activities you use most often to the Start menu for easy navigation.
For instance:Right-click the Leads App and click on Pin to Start button displayed.
|
In the confirmation popup that gets displayed as shown in the image below, click on Yes.

|
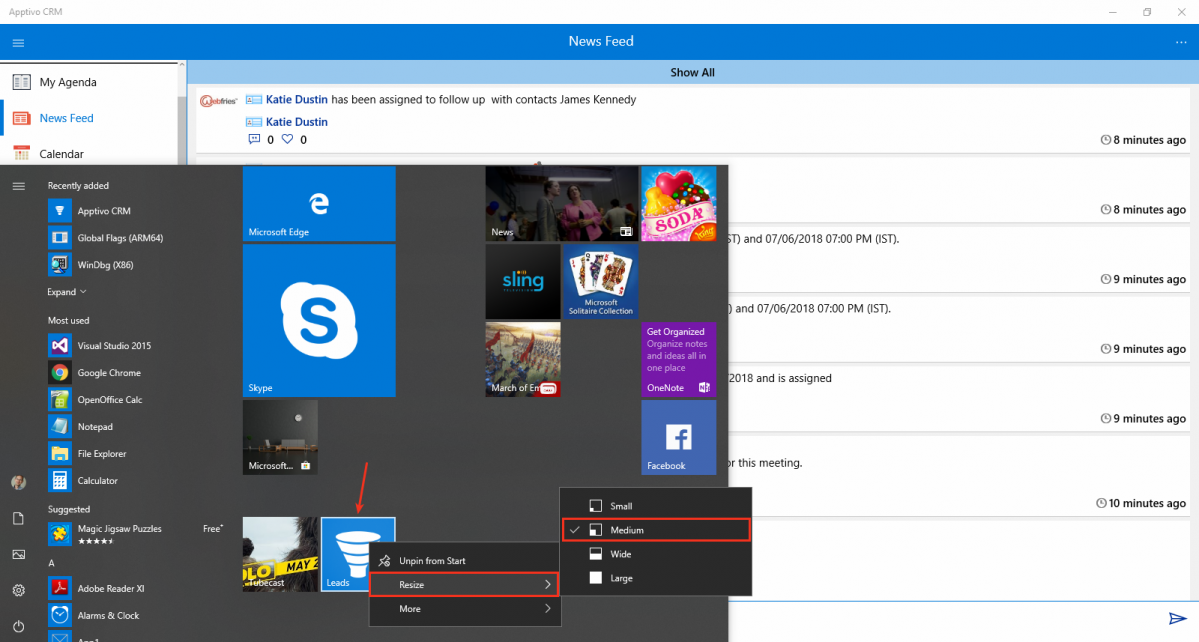
On doing so, the Leads App will be instantly added to your Start menu. If you are logged in, by clicking on the App icon, it will take you to Leads App. Also, the app icon can be resized according to your requirements. Right-click the icon -> Resize.
|
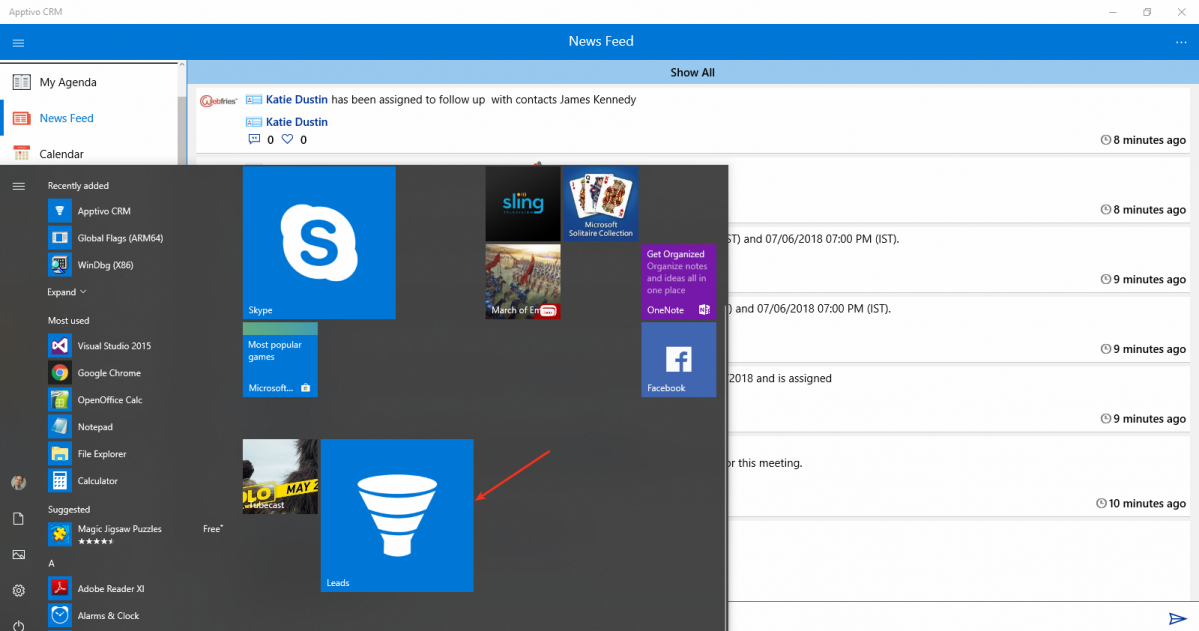
Based on the size selected, the app will be displayed in your Start menu as shown below:
|
Field Level Access on Advanced Search
The fields in the Advanced Search can be given different levels of access which gets reflected when you make an advanced search. With this feature, you can give the following three types of access at the entity levels for both the standard and custom fields. (Note: All these customizations should be done in your web version which will get reflected)
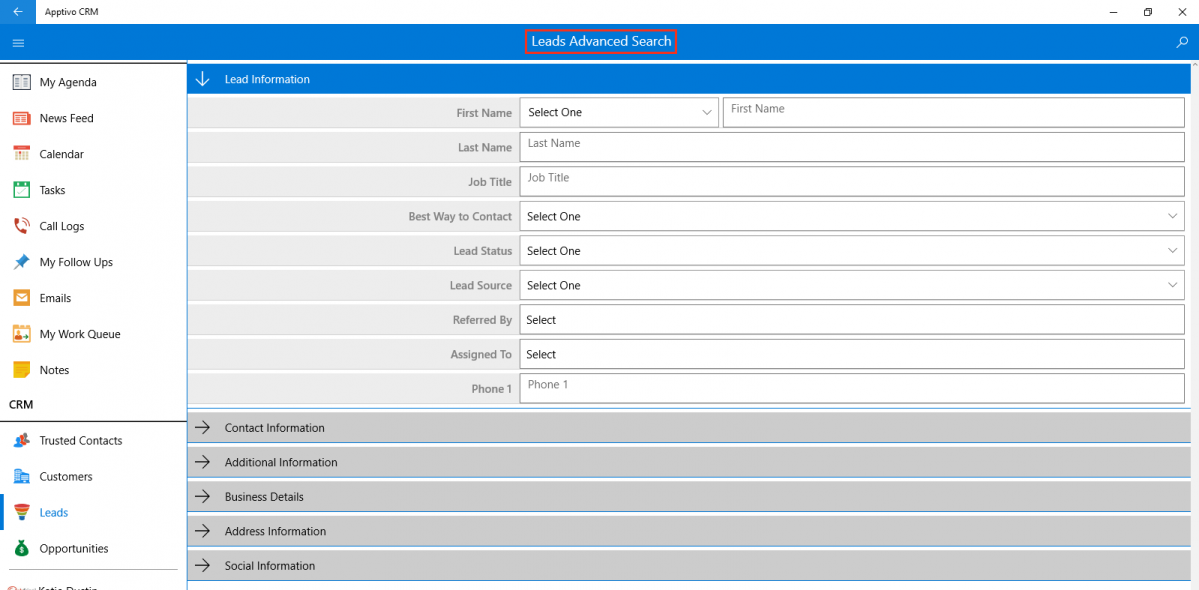
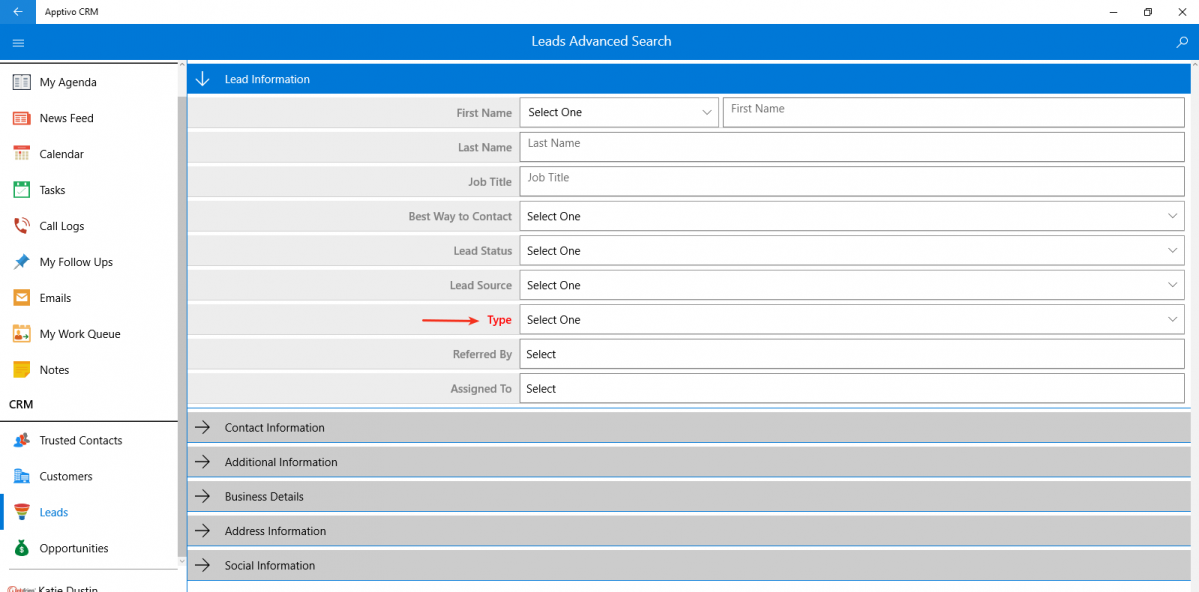
- Field Level Security – With this feature of Field Level Security, you can customize and restrict a field in the Advanced Search of your employees’ account, by giving appropriate privileges. Go to Leads App Settings (web version) -> Customize App -> Master Layout. Click on Type field and give the required privilege in Search Privilege dropdown under Search section from the Inspectors tab.
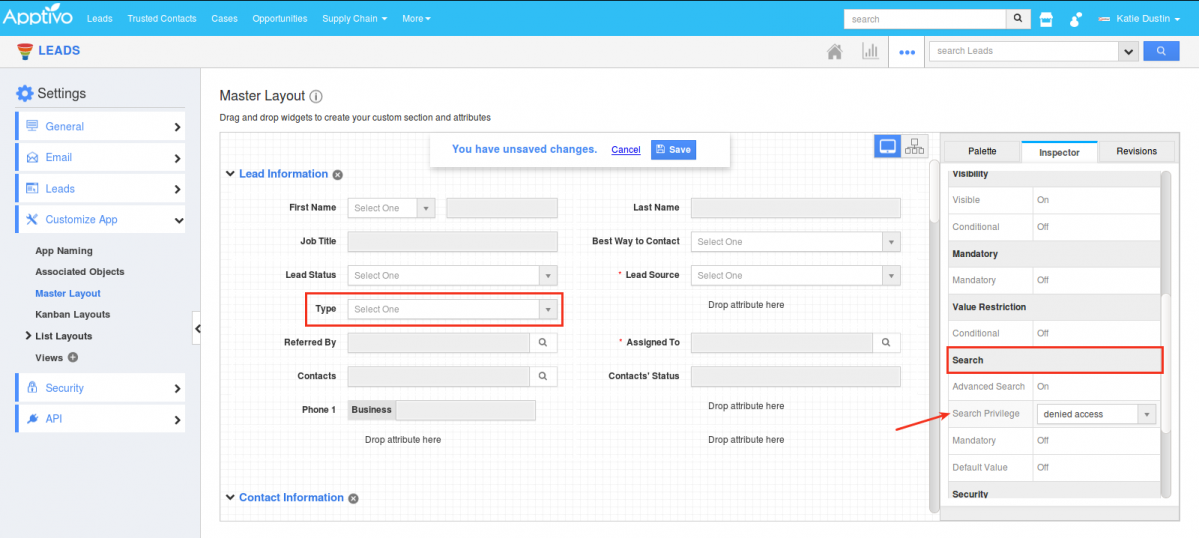
As a result, in the Leads Advanced Search the field Type will not be visible in your employee login.
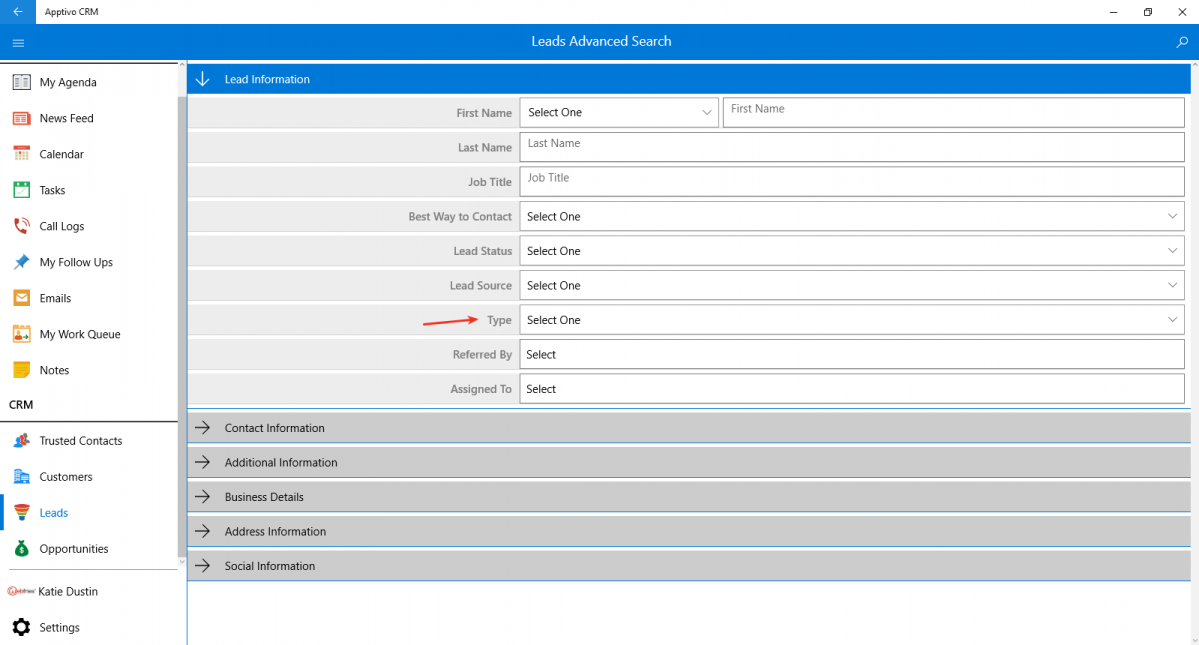
- Field Level Visibility – With this feature of Field Level Visibility, you can customize a field to be made visible in the Advanced Search. Go to Leads App Settings (web version) -> Customize App -> Master Layout. Click on Type field and enable the Advanced Search toggle ON under Search section from the Inspectors tab.
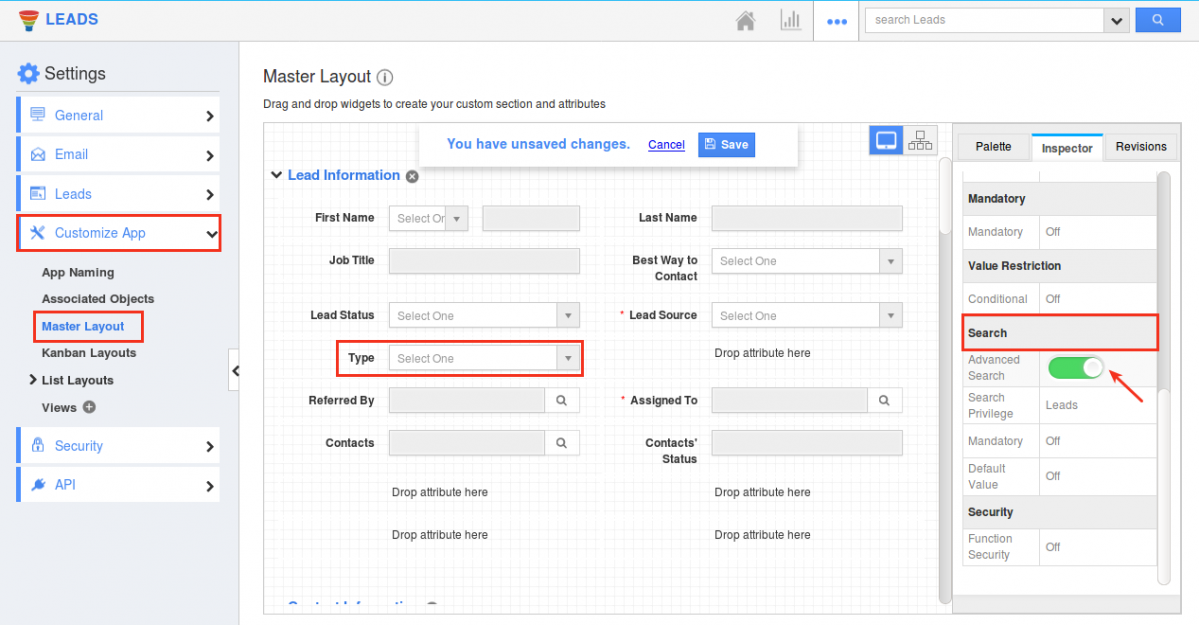
As a result, in the Leads Advanced Search the field Type will now be made visible. That is, you can search for the lead records using this field.
- Field Level Mandatory – With this feature of Field Level Mandatory, you can customize a field to be made mandatory in the Advanced Search. Go to Leads App Settings (web version) -> Customize App -> Master Layout. Click on Type field and enable the Mandatory toggle ON under Search section from the Inspectors tab.
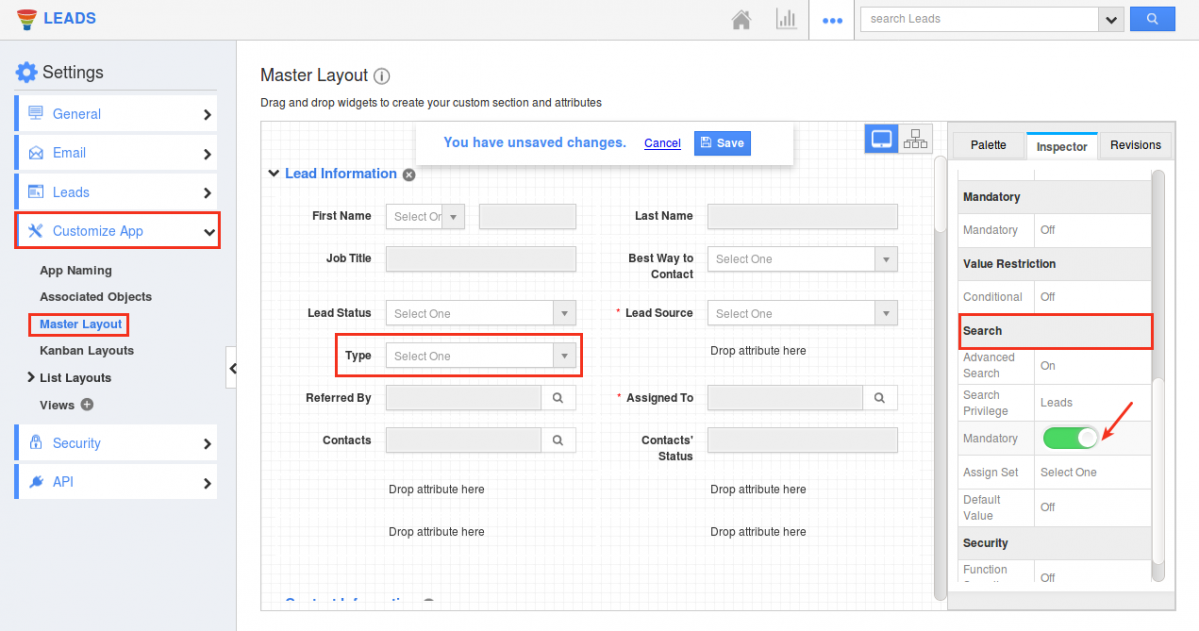
As a result, in the Leads Advanced Search the field Type will now be a mandatory one.
Work Log Creation
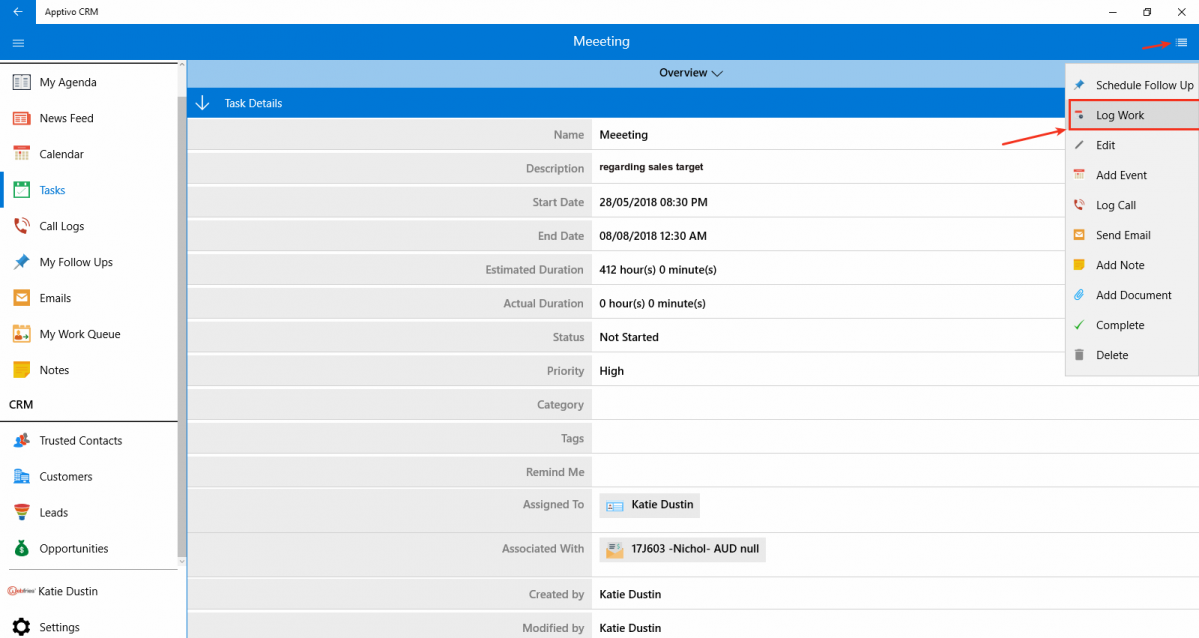
We have added the feature of Work Log to the following activities – Tasks, Call Log, Events. With this, you can track the time taken by your employees to complete a certain activity. For instance: Create a task or open an existing task and click on Log Work from the More dropdown.
|
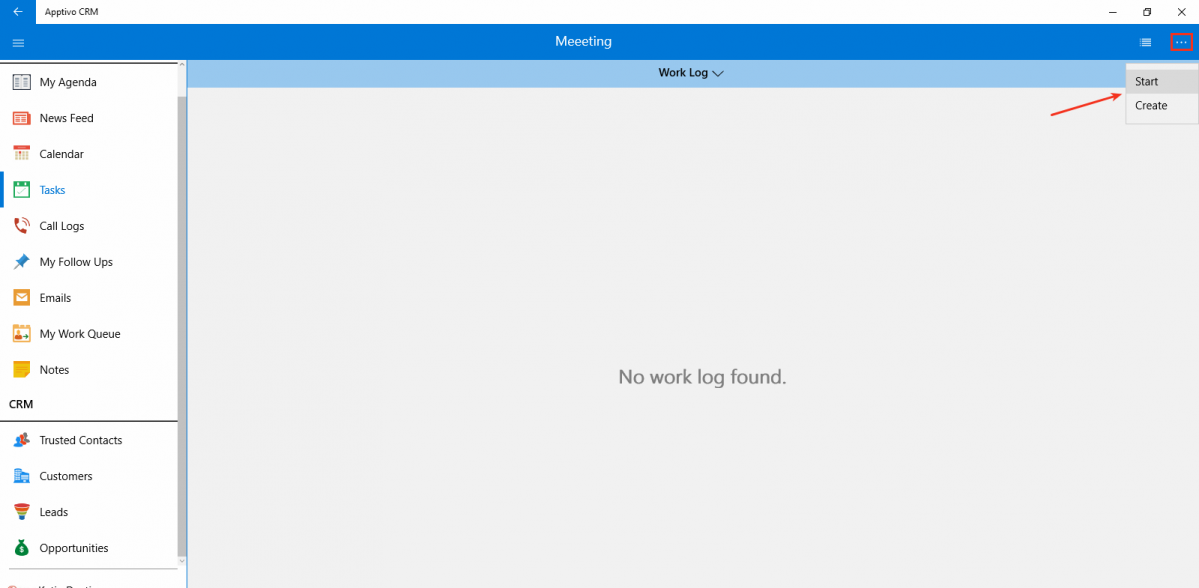
You will be redirected to the Work Log page with existing work logs. To create click on More (…) icon. Now, there are two ways in which a work can be logged.
|
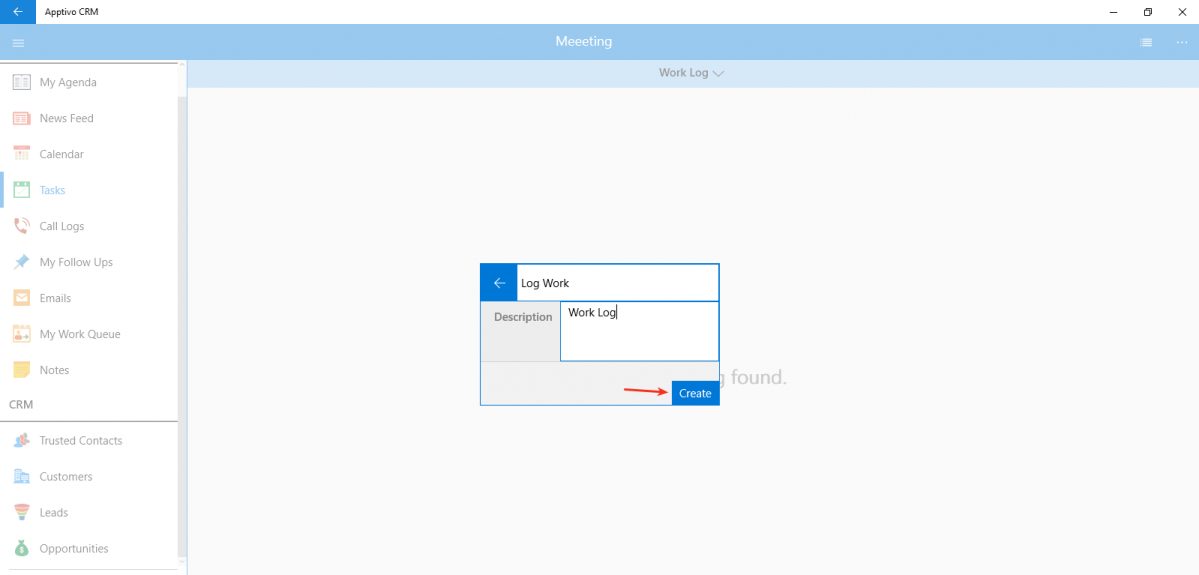
Click on Start to create a work log with automatic time starter. Enter the Description and click Create.
|
Now, a work log will be created as shown below, where the timer gets started and you can Pause or Stop the work log manually, anytime you desire.
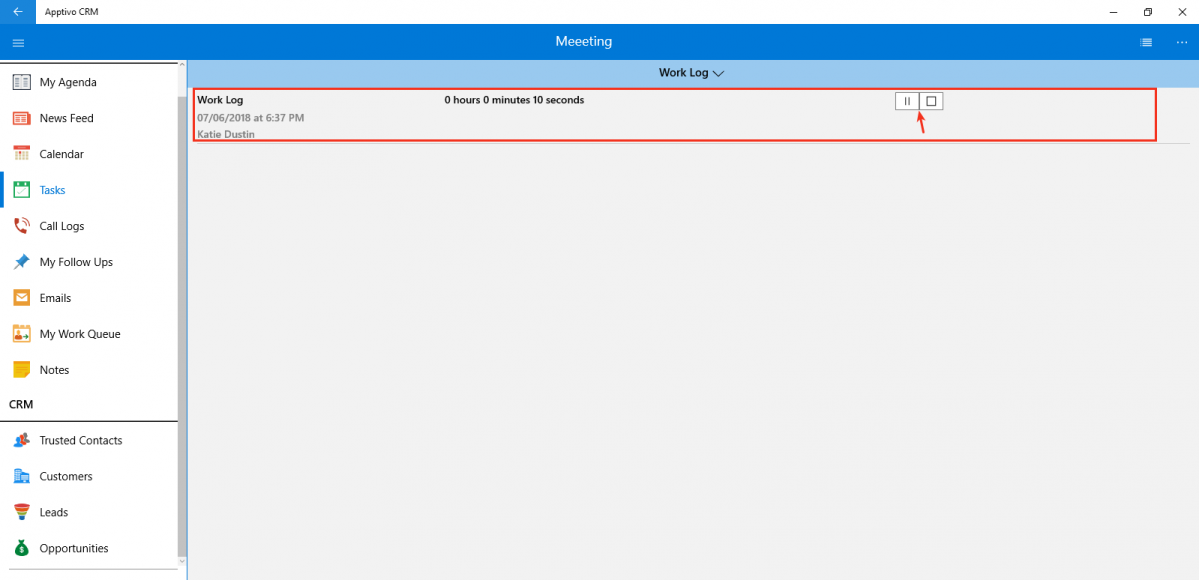
|
Whereas, clicking on the Create option creates a work log with a predetermined time. In the Create Work Log popup enter the Description, Start Date, and Duration.
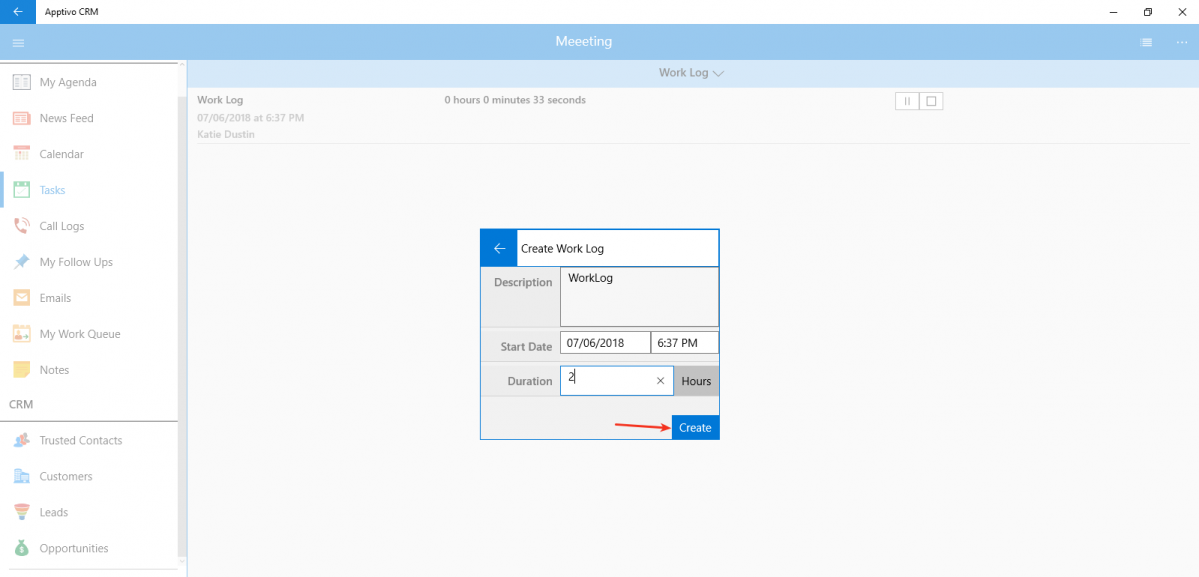
|
Unresponded Objects
We have implemented the feature of Unresponded Objects, which gives you the ability to filter and view the object records (Leads, Contacts, Customers, and Opportunities) who have not responded back.
For instance: Click on the Opportunities App -> Unresponded Opportunities. A popup will be displayed where you can select to view your unresponded opportunities, your employees’ unresponded opportunities or your teams’ unresponded opportunities.
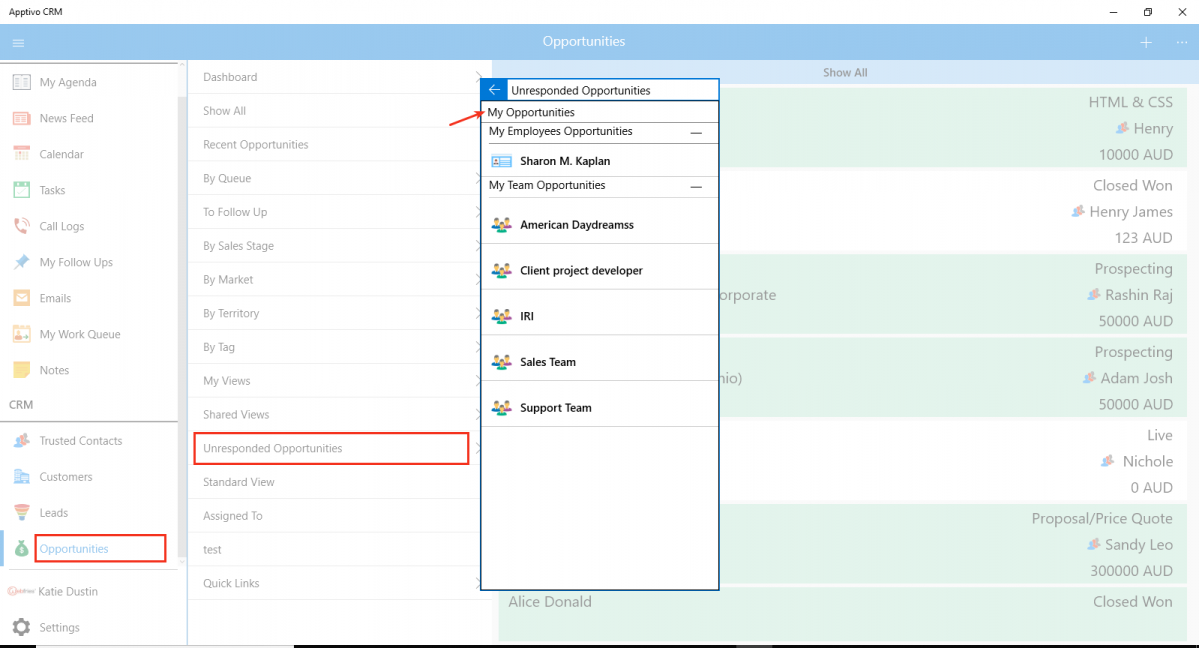
|
The unresponded opportunities will now be displayed as shown in the image below:
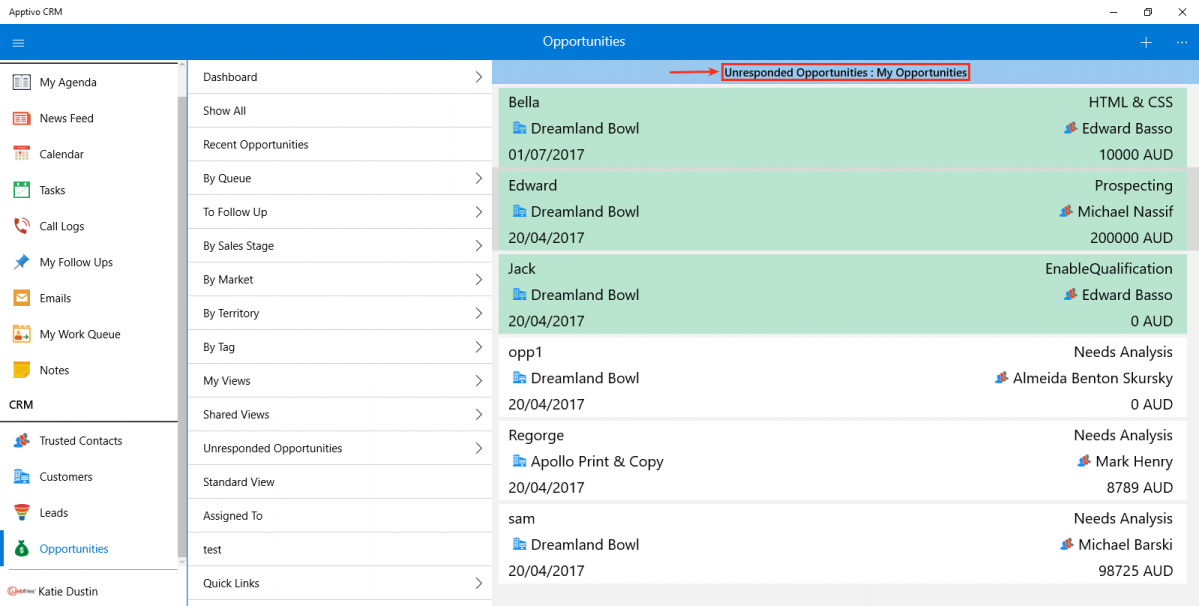
|
Probability Override Notes
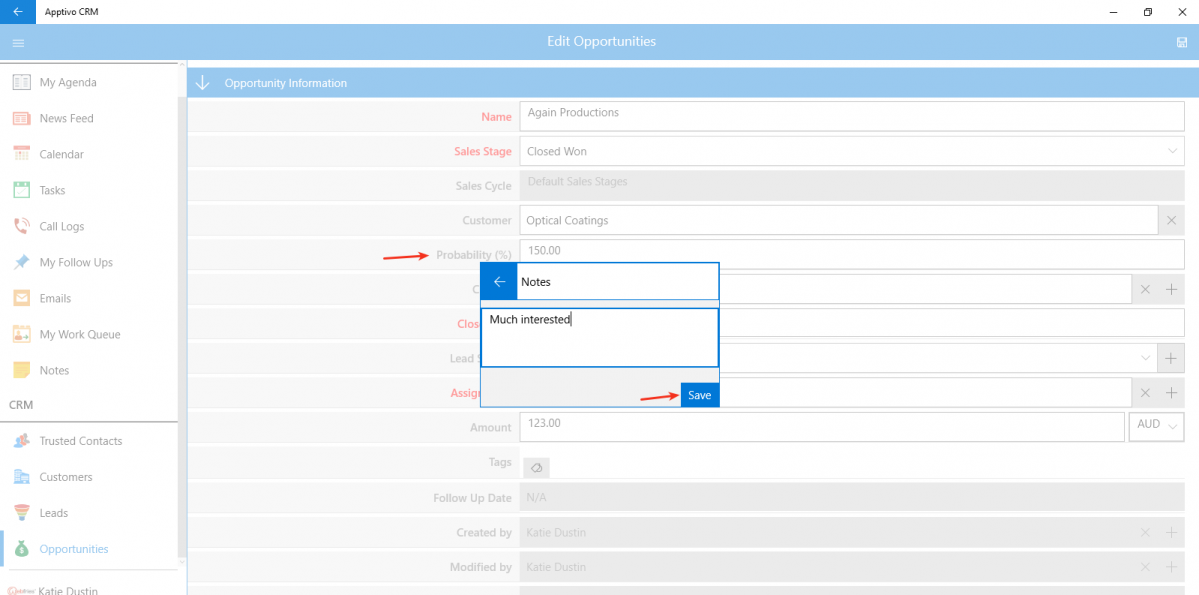
As we all know, each Sales stage will be having a Probability value, which will be considered as the opportunities probability, when set to that sales stage. In this release, we have now enhanced the Probability Override feature. With this upgrade, on changing the probability value (increasing/decreasing) of an opportunity, you can now enter your reasons in a popup and it will be automatically collected as a Note in the Notes tab, which can be used for future references.
On changing the probability value of an opportunity from your Windows device, you will be displayed with a popup as shown. Enter the note and click Save.
|
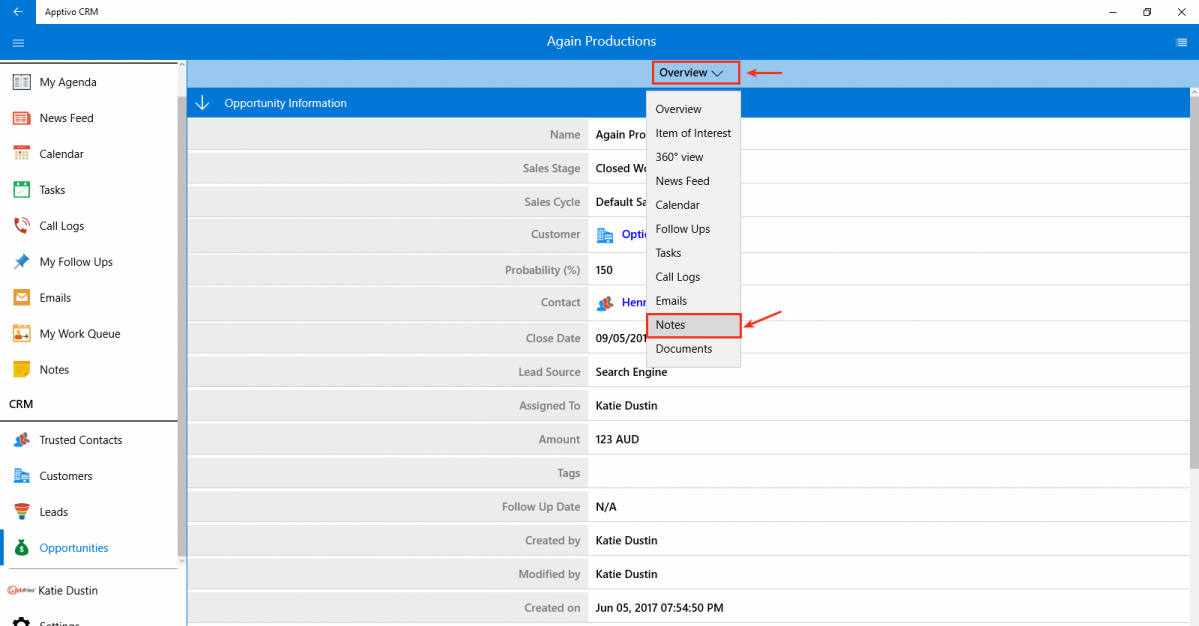
On clicking Save, a note will automatically be created. To view the note created, click on Overview dropdown -> Notes.
|
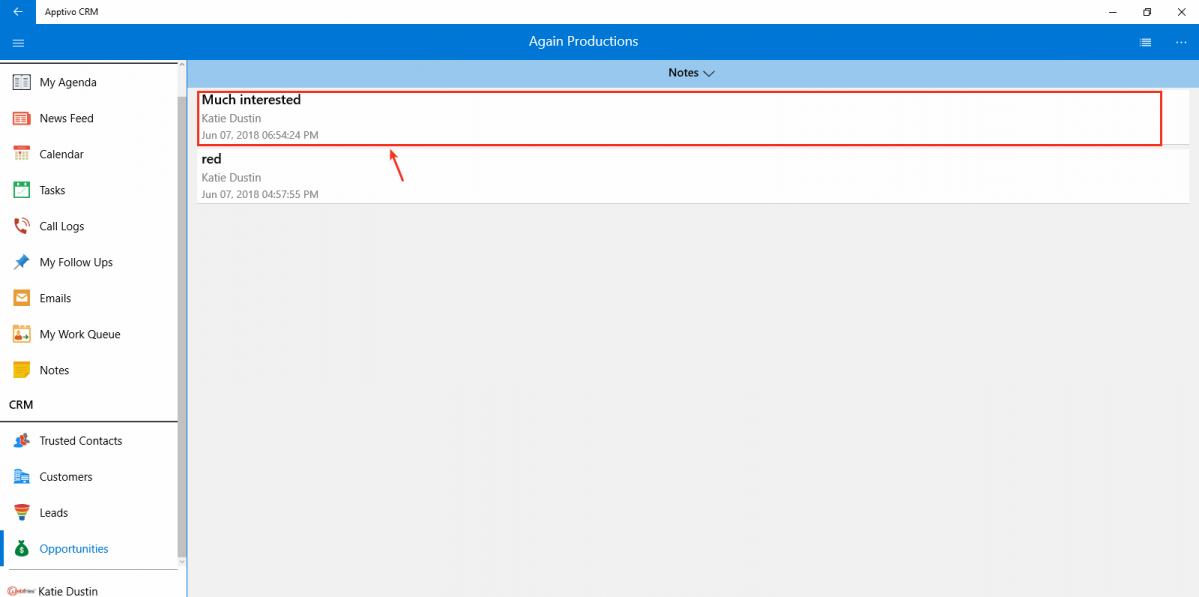
The created note will be listed as shown in the below image:
|
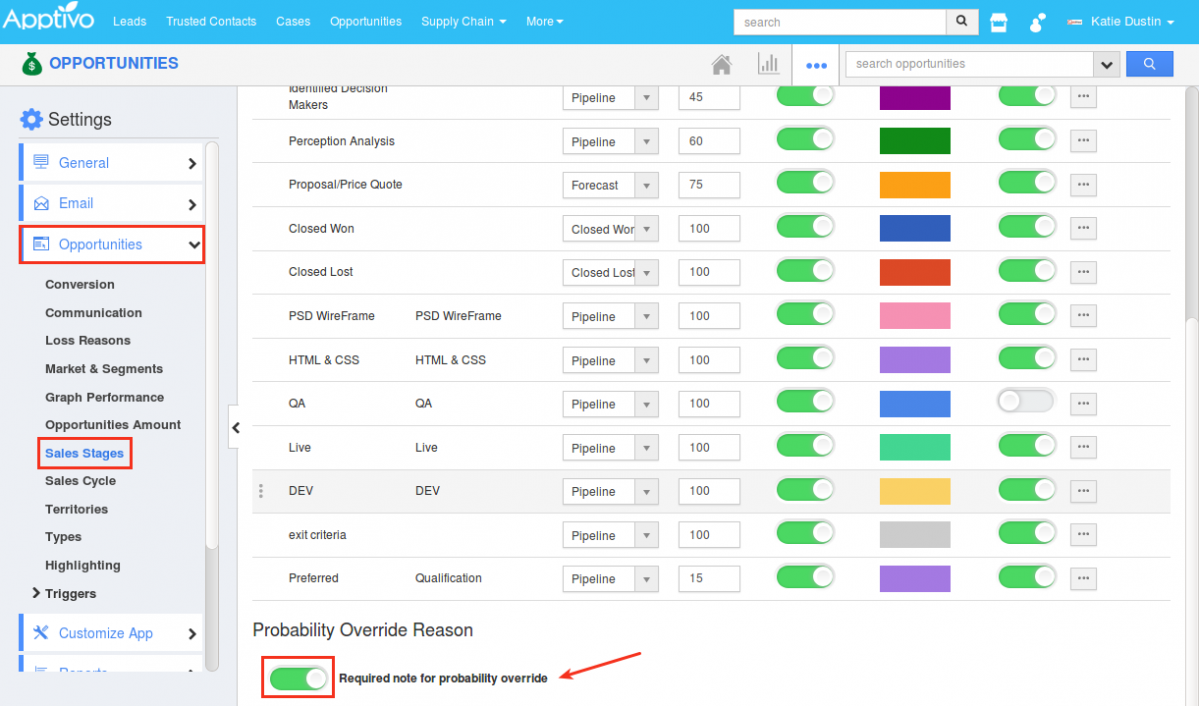
Note: In order to record notes during probability override, you need to customize the Settings from the web version. Go to Opportunities App Settings -> Opportunities -> Sales Stages -> enable the toggle ON for Required note for probability override as shown in the image below:
|
Number Maximum Range
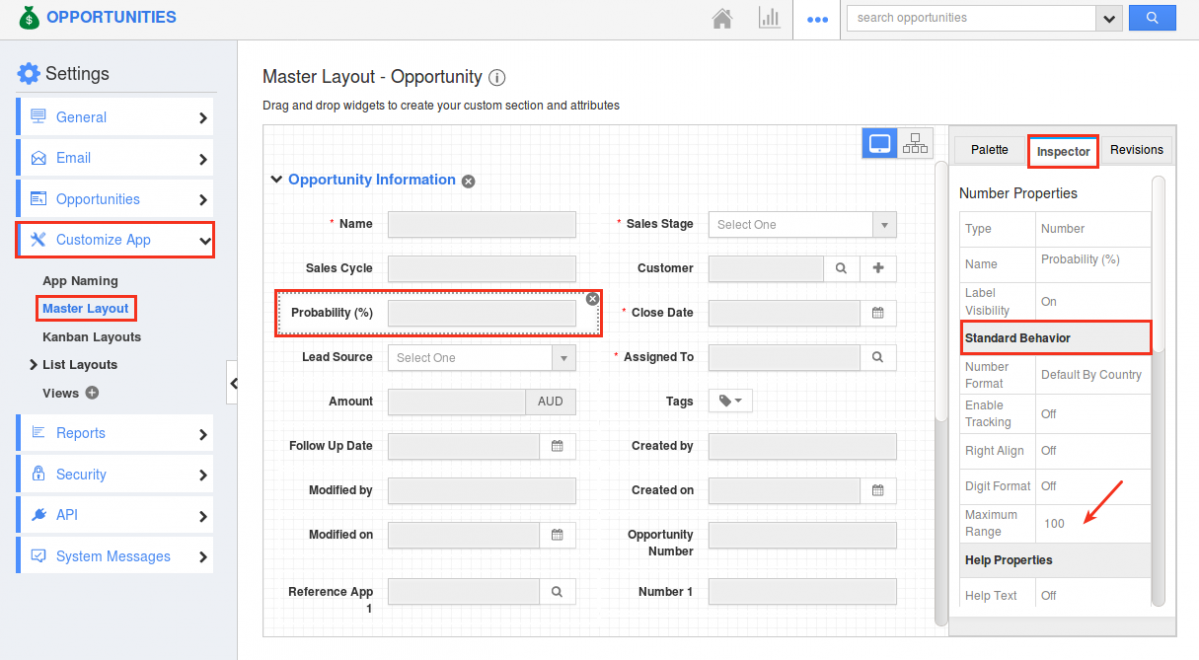
The Maximum Range field in the Number attribute is where you can set and define the maximum number range that can be entered in that number field. This Maximum Range for numbers should be configured in the web version, which will get reflected in your windows CRM App.
For instance: Consider the Opportunities App. In a lot of cases, the Probability value cannot be greater than 100. To do so, go to Opportunities App Settings -> Customize App -> Master Layout -> click on the Probability field -> enter the Maximum Range as 100 under the Standard Behavior section of the Inspector tab. Save the changes.
|
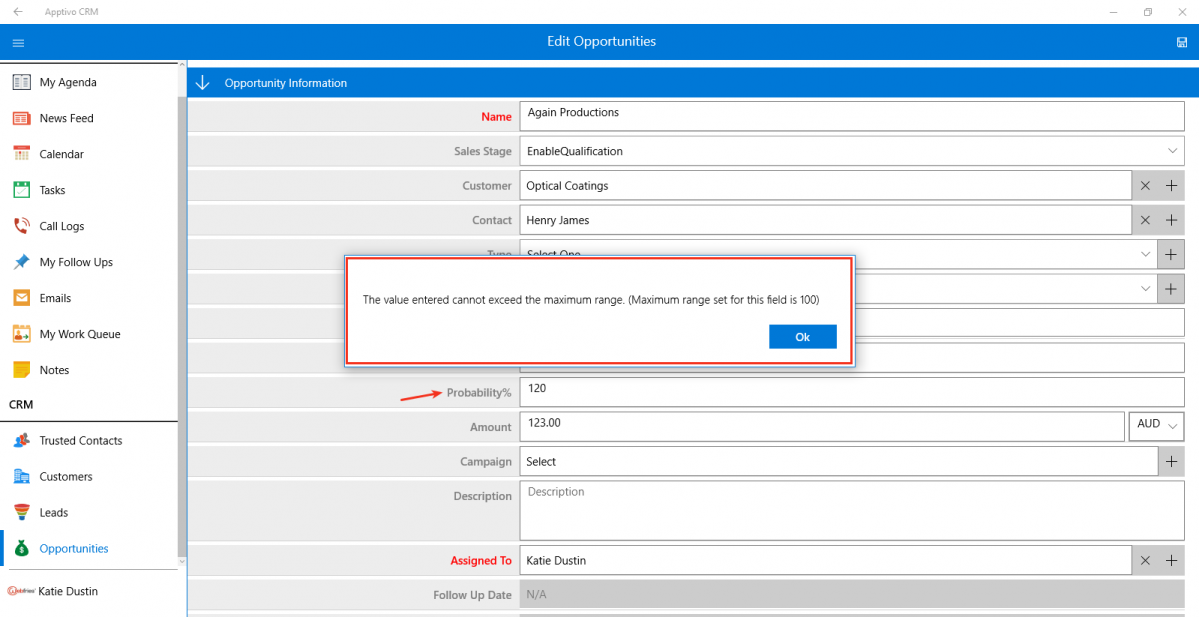
Now in your Android device, on entering a value greater than 100 in the Probability field, you will be notified with an Error pop up as shown in the below image:
|
Email Template Attachments
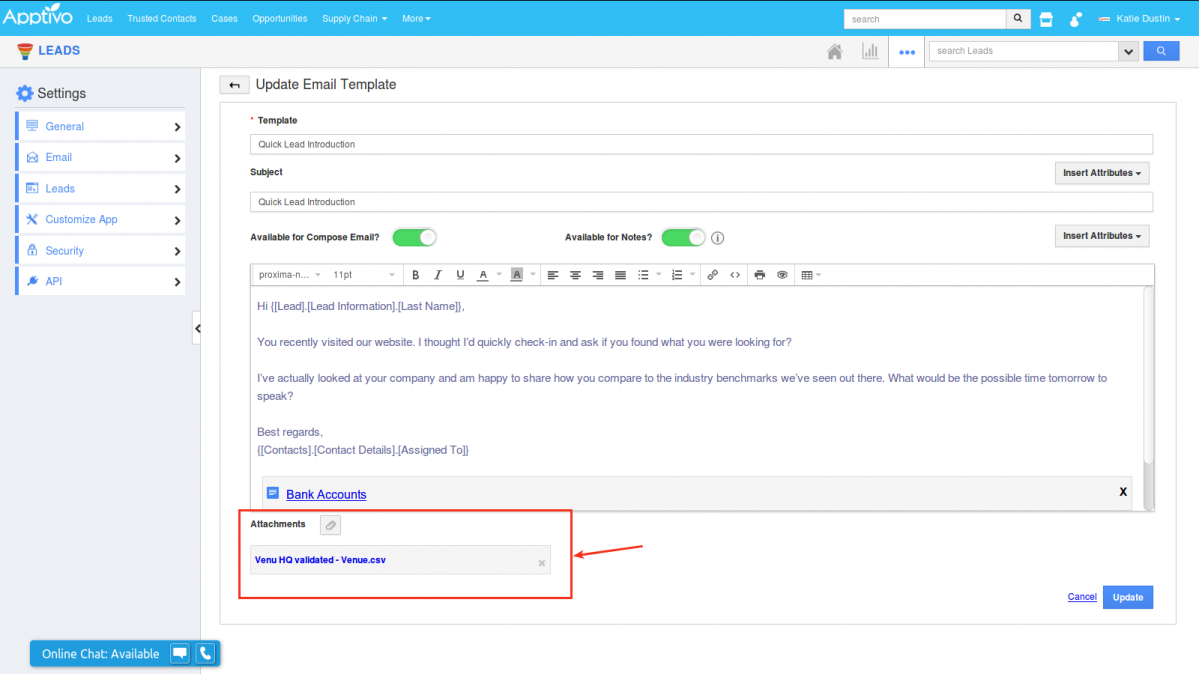
We have enhanced the email templates to support the Attachments feature. Create email templates with attachments from the web version and on selecting that template when sending emails to your CRM objects (Leads, Customers, Contacts, Opportunities), the attachment will automatically be added. For instance: Consider the Leads App. In web go to Settings -> Email -> Email Templates -> create or select an existing template -> add an attachment.
|
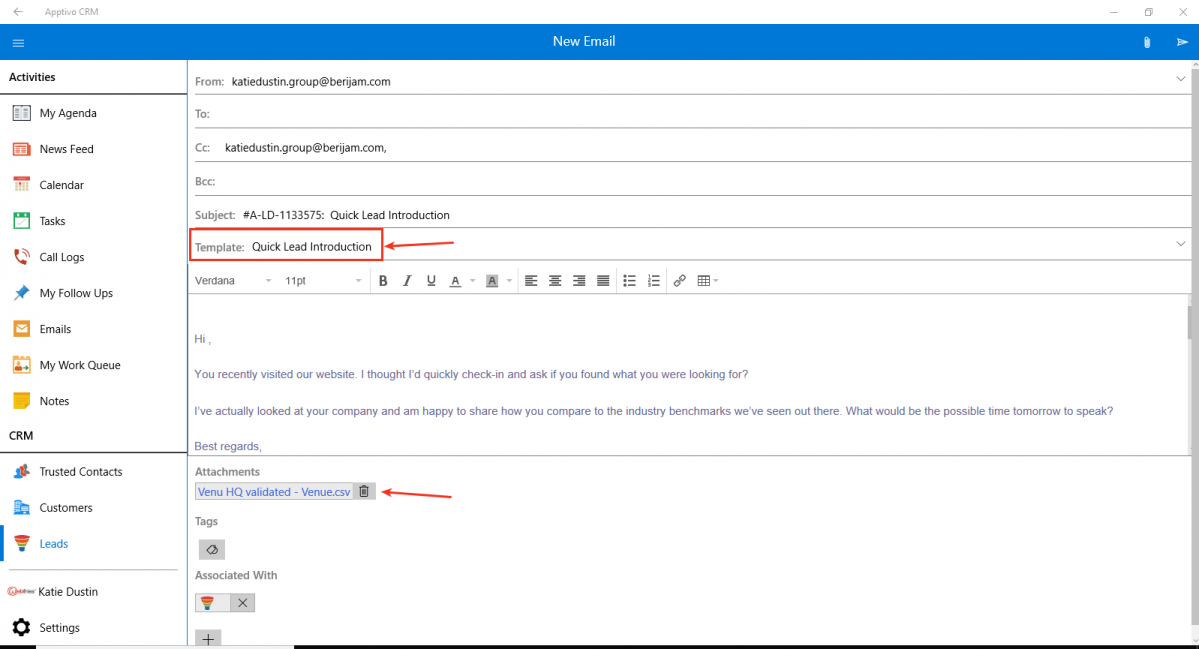
Now when you compose a new email from your Windows device, on selecting the above-configured email template, you can view the attachment being added automatically.
|
Custom Conversion
Besides the standard conversion method in the Leads App, that maps the fields automatically during conversion, this feature enhancement gives you the ability to map the attributes of the source app with the destination app, as per your necessity. This conversion setting should be configured from the web version. Go to Settings -> Leads -> Conversion -> Custom Conversion.
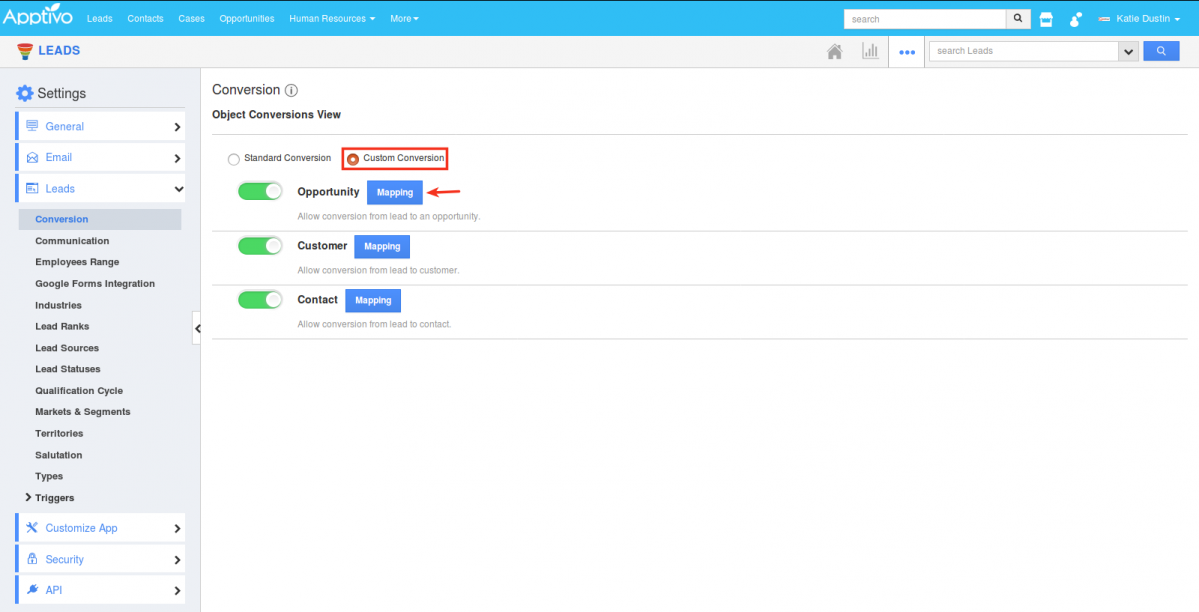
|
This will now let you select and map the fields accordingly, based on which the conversion will be done.

|
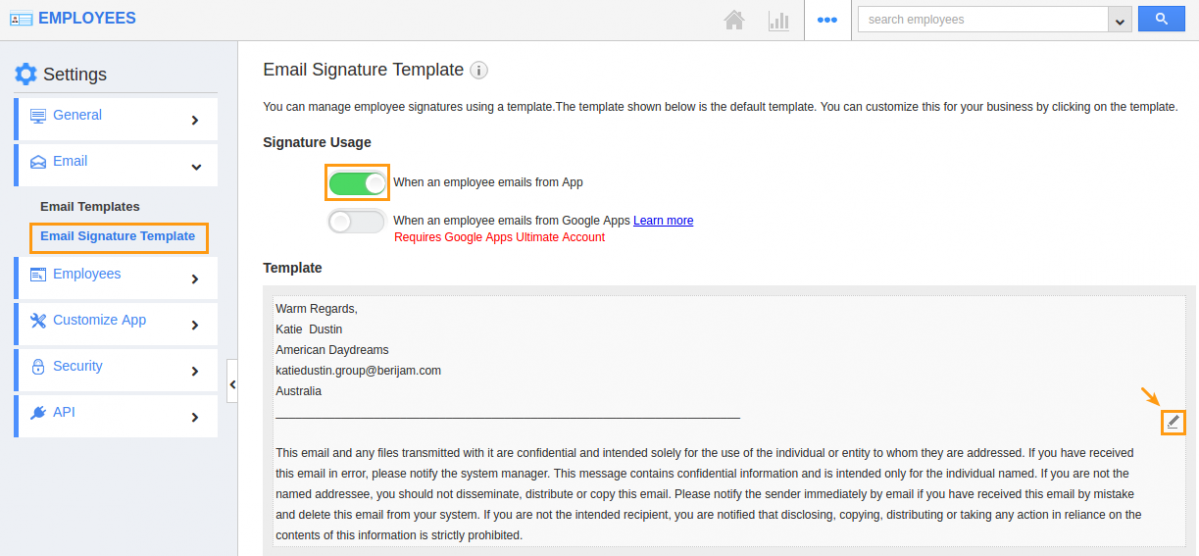
Email Signature
One significant release in this update is the addition of the Email Signatures to emails. An email signature will be inserted automatically to every email you send out from your Windows CRM App. (Note: You need to configure the email signature from the web version)
Go to Employees App Settings -> Email -> Email Signature Template. Create your own required email signature and save the changes.
|
You can view the configured email signature in every email you send out as shown in the image below:
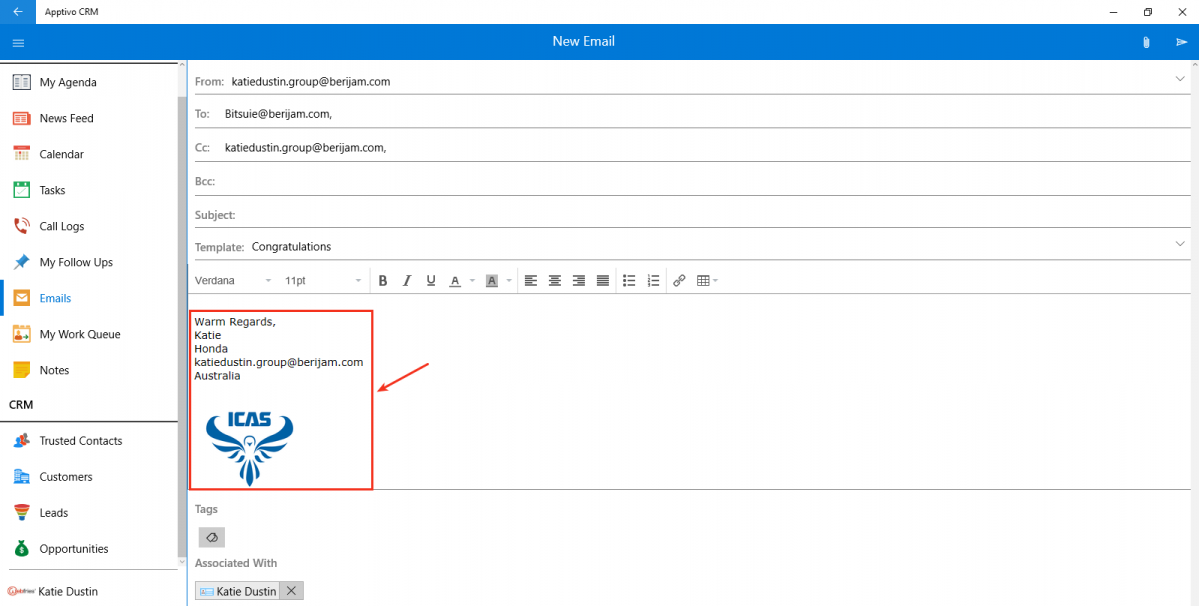
|
Security Privileges
With this feature of Security Privileges, you can define access to specific actions for deputed employees alone, by enabling/disabling that action for those employees. To do so, go to Opportunities App Settings (in web) -> Security -> Actions -> set the Privilege as Access Denied for the Create option.

|
As a result, your employees cannot create opportunities as they cannot view the Create icon in their Opportunities App.
|
|
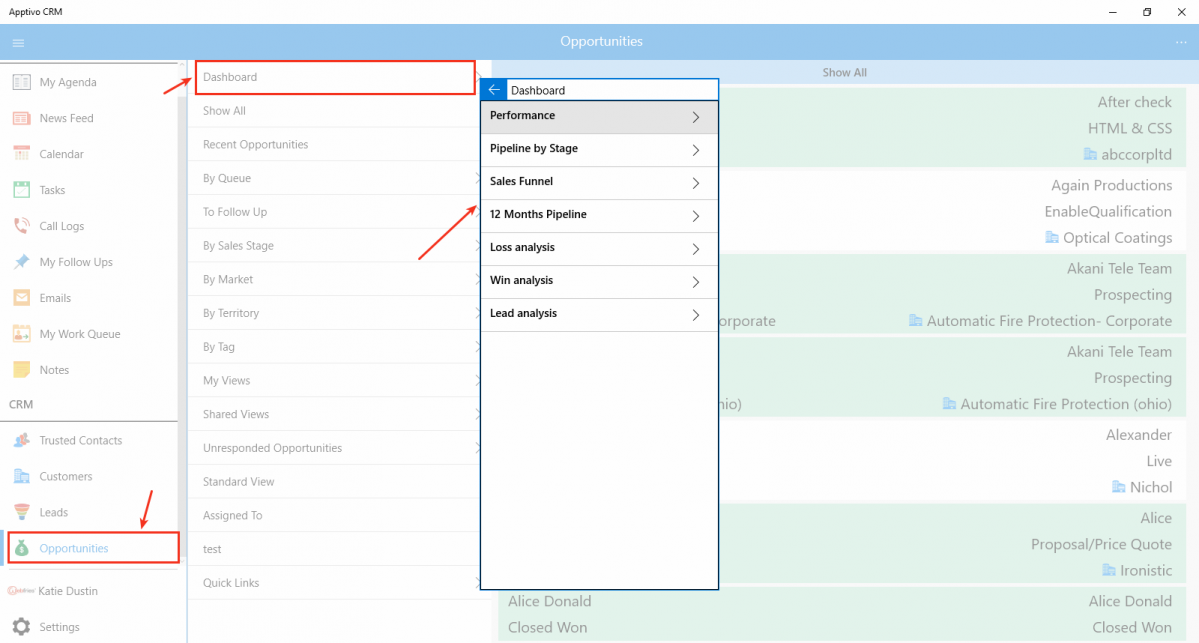
Opportunity Dashboards
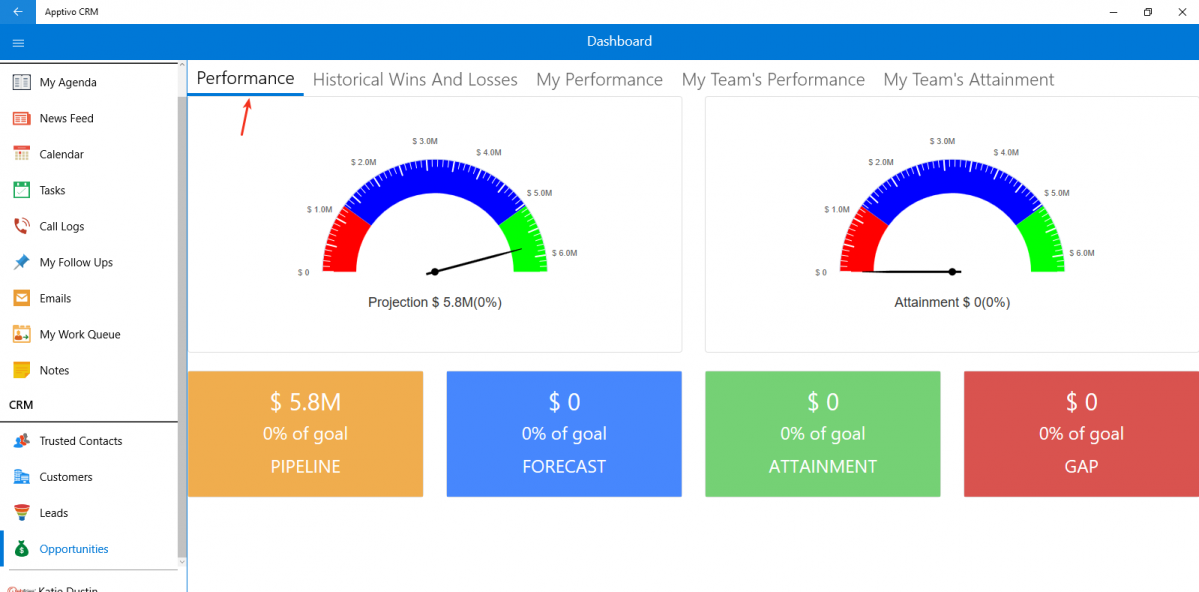
In this version upgrade of Windows CRM App, we have newly added a bunch of dashboards to the Opportunities App. This gives you the ability to view the organization’s performance giving you a graphical analysis.
|
- Performance Dashboard – Performance dashboard displays your overall sales performance along with the percentages of Pipeline, Forecast, Attainment, and Gap. Besides the Performance, you can also view the Historical Wins and Losses, Your Performance, your Team’s Performance and your Team’s Attainment.
- Pipeline by Stage – Pipeline by stage lists all your deals as per the sales stages.

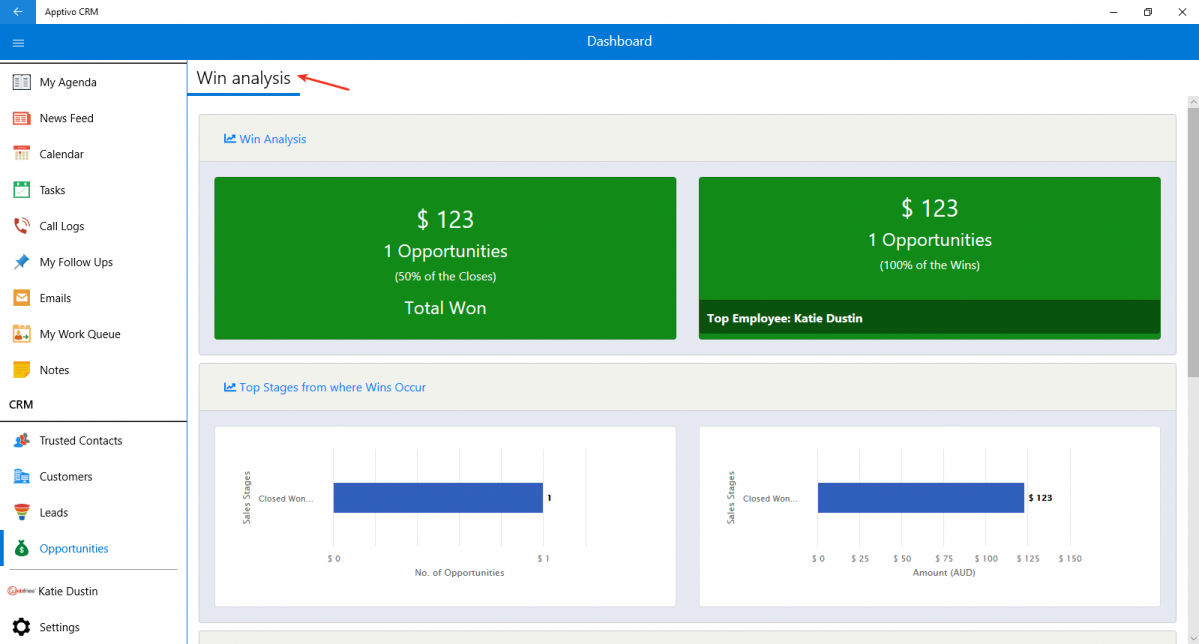
- Win Analysis – Win Analysis provides a detailed analysis of all the opportunities that are won.
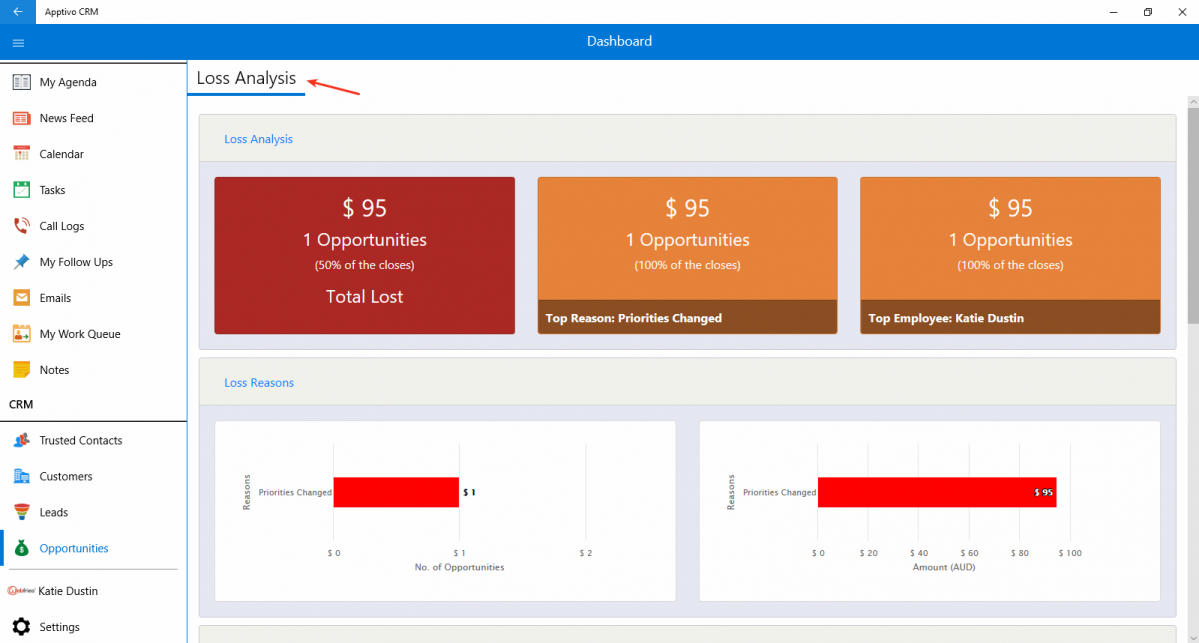
- Loss Analysis – Loss Analysis provides you with a detailed analysis of all the opportunities that are lost.
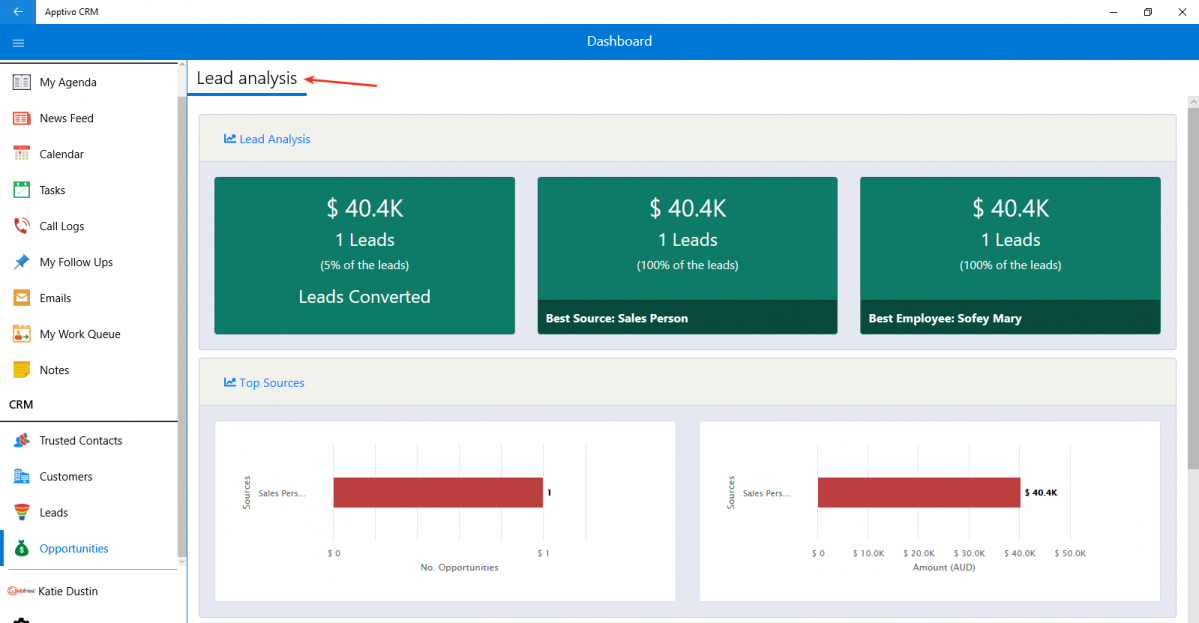
- Lead Analysis – Lead Analysis displays opportunities from various leads and its sources.
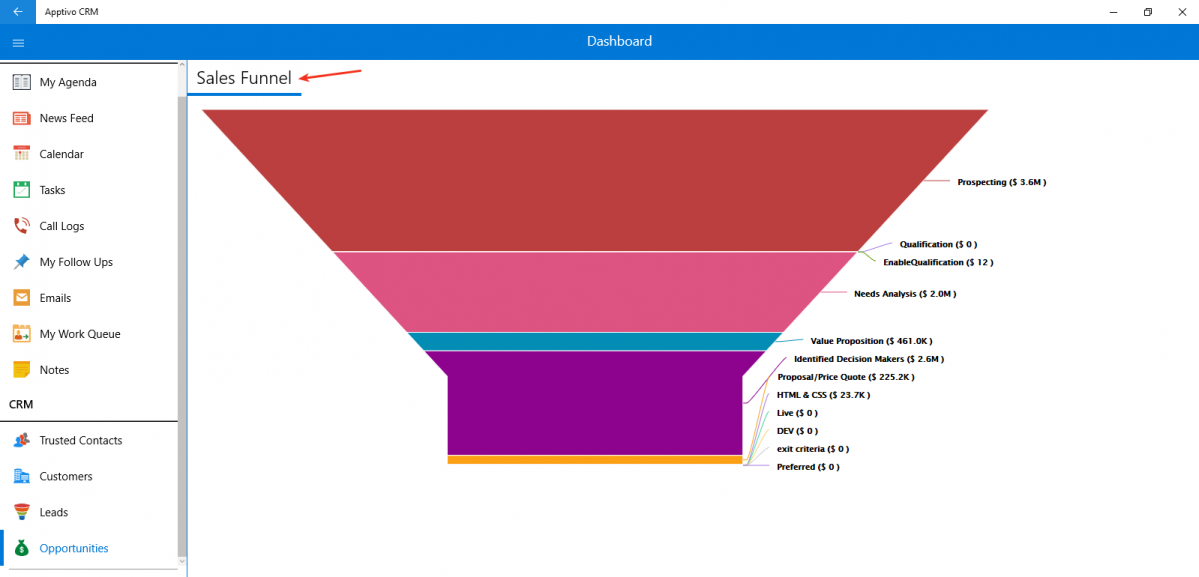
- Sales Funnel – Sales Funnel displays the revenue funnel of your company based on your sales stages.
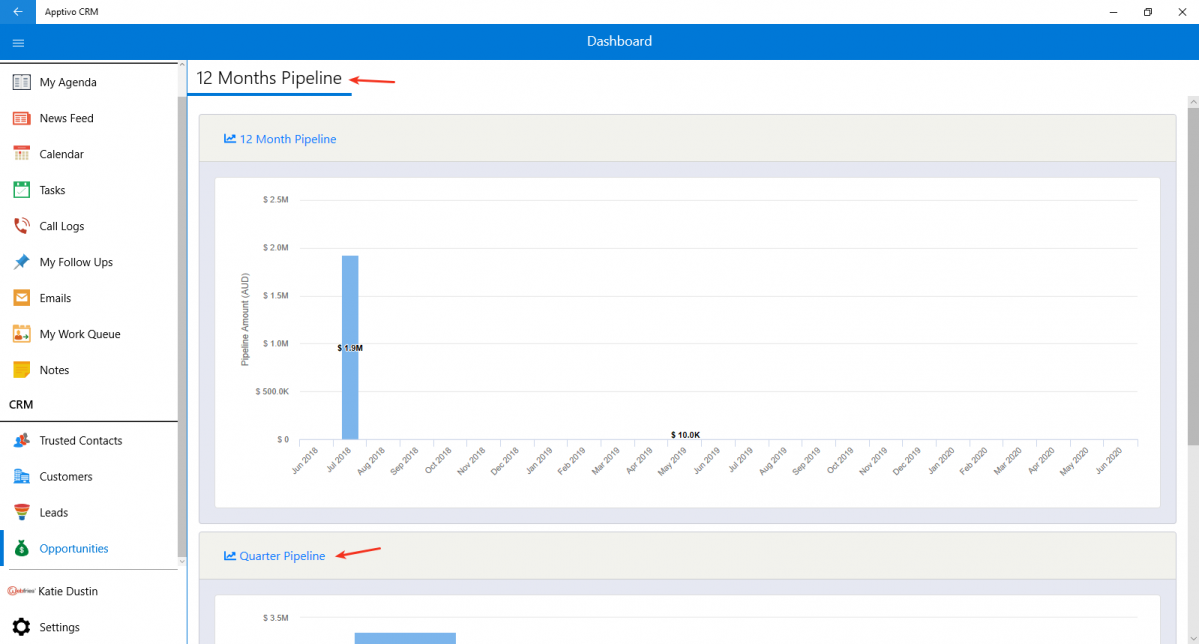
- 12 Months Pipeline – The 12 Months Pipeline delivers opportunities based on the next 12 months. You can also view the pipeline on quarterly basis.
Download our latest version of Windows CRM App.
Try out these latest features and feel free to contact our support engineers anytime at support@apptivo.com, if you have any comments or suggestions.
Latest Blogs

Role Of CRM In Travel And Tourism Industry
Travel and tourism have been a significant part of everyone’s life since the ancient period. When we skim through the pages of history, It should be noted that humans were initially nomads before they became settled in one place. They...
Read more →
WHAT IS CRM TECHNOLOGY?
Introduction CRM is a technology that helps manage the entire customer information and interactions in order to build and maintain superior customer relationships. The CRM solution replaces spreadsheets and other different applications, which makes it easy for the businesses to...
Read more →
Everything you need to know about the Annual Maintenance Contract!
1. What is an Annual Maintenance Contract? 2. Benefits of Maintenance Contracts 3. How can Apptivo CRM help you manage maintenance agreements and vendors? 4. Summary Think about getting the confidence that the machinery is well-maintained and performing optimally, without...
Read more →
