We are happy to announce the feature updates and release of new features in Apptivo, which were deployed on March 17, 2018. Become more acquainted with the most recent features and keep yourself refreshed on what’s new in Apptivo. The following are the list of features which were released on, in the last deployment:
- Contacts Print Layout
- Allocation in My Team’s Quota
- Sales Stage Activity for Imported Records
- Assignment Rules in Customers App
- Out of SLA and Within SLA included in Cases tracking by Assignee Report
- Configurable Features under Items section
- Inner Table section support in Master Layout
- Inner Table section for Products/item Line in Print/Web layout
- Inner Table section for Custom table in Print/Web layout
- Custom field support in Inner table in Master layout
- Edit Option for selected BOM in side panel
- Work log Side panel for Project to Invoice conversion
- Custom View builder for Invoices App
- Estimates App support in Reference App attributes
- Archived Status in Estimates App
- Advanced MJML Template in Campaigns
- View the associated object values in Collaboration Reports
- Reference App & Reference App field Update Implementation
CRM
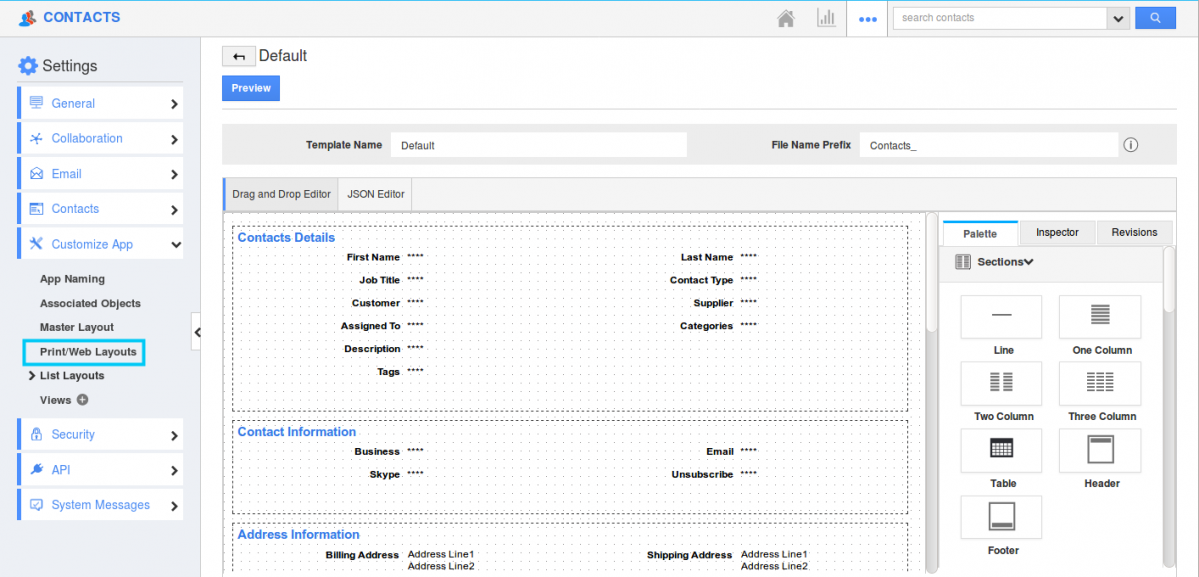
- Contacts Print Layout – We have a new update of “Print/Web layout” feature in the Contacts App by which you can create your own PDF template for your contacts. You can start either with a blank layout, default layout or copy from another layout. Print/Web layout option can be selected from Settings -> Customize App -> Print/Web layout. This feature is available only for Enterprise plan users. It will be soon available in all apps for all Apptivo plans in near future.
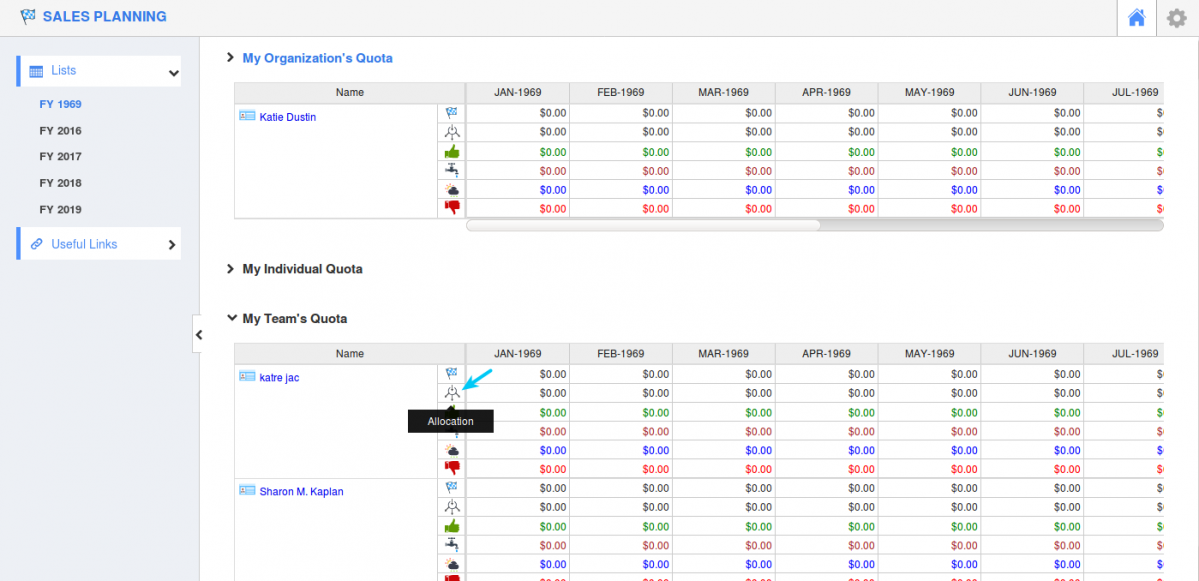
- Allocation in My Team’s Quota – Sales Planning App will lead you to set quota and view the appropriate allocations for individuals. It also displays the potential amount for respective seed stages. In this release, we have added the “Allocation” field under “My Team’s Quota” to view the allocation of your team.
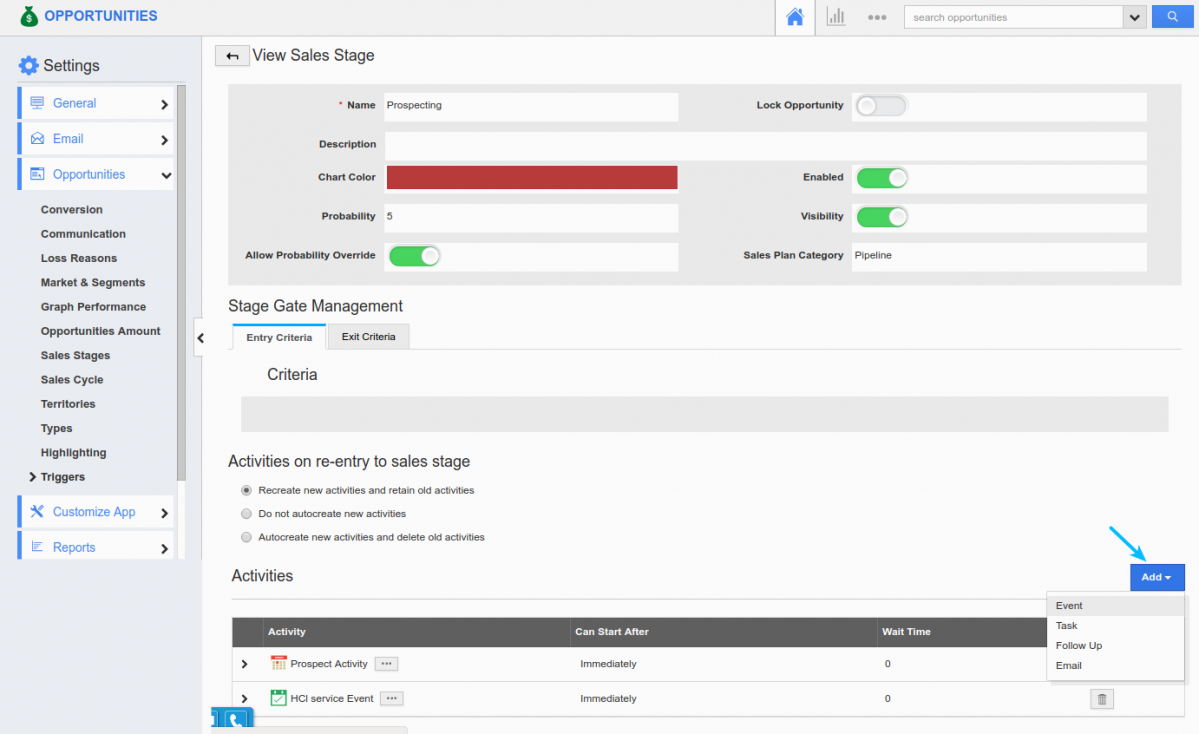
- Sales Stage Activity for Imported Records – In Opportunities App, when an activity is imported by UI and added for any sales stage created, the activity can be visible in both the Overview page under the “Sales Stage Activities” section and in Opportunity Calendar.
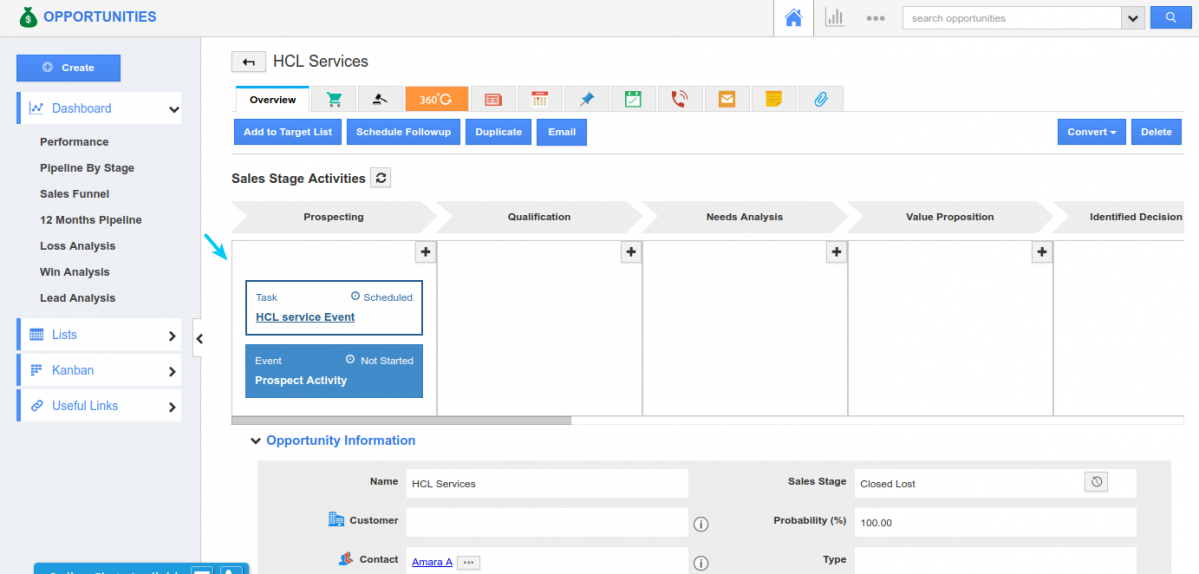
You can add your activity by moving on to Settings -> Opportunities -> Sales Stage. Select any sales stage. For instance: Prospecting. You can import activity using UI and then the activity added gets reflected in Overview page of all opportunities with that sales stage and will get associated with respective opportunity
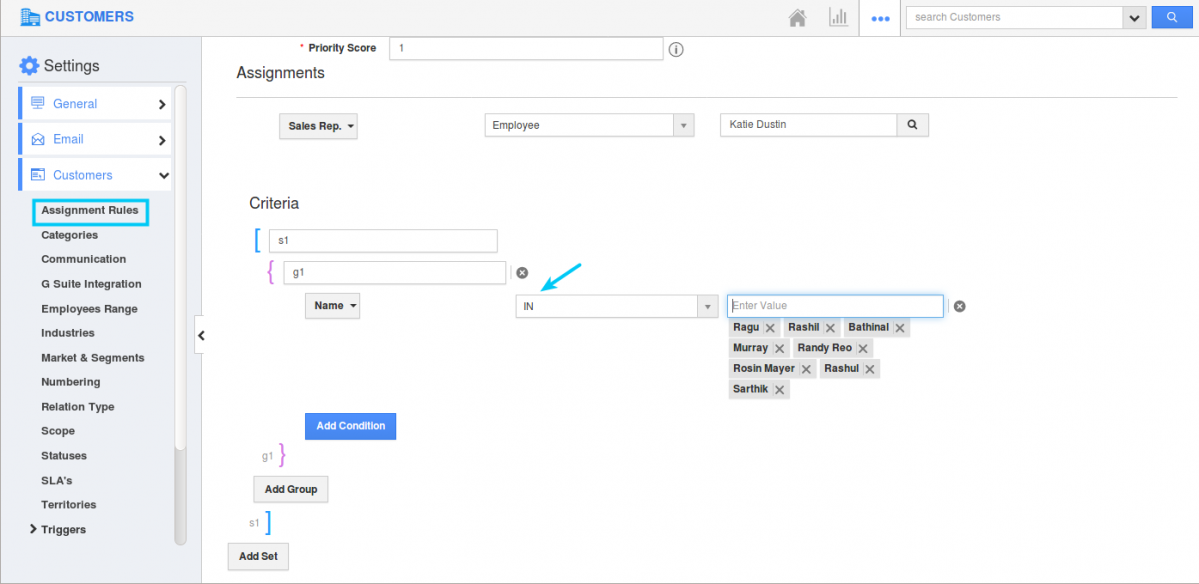
- Assignment Rules in Customers App – We all know that we can create our own Assignment rule in the Customers App by moving on to Settings -> Customers -> Assignment Rules. By default you can set a criteria by providing single value in a condition. And now we have enhanced it by providing more than one value to the criteria we set by giving IN operator. You can provide a value and press Enter to give another value. By this way, you can provide more values and satisfy the rule for any values provided over there.
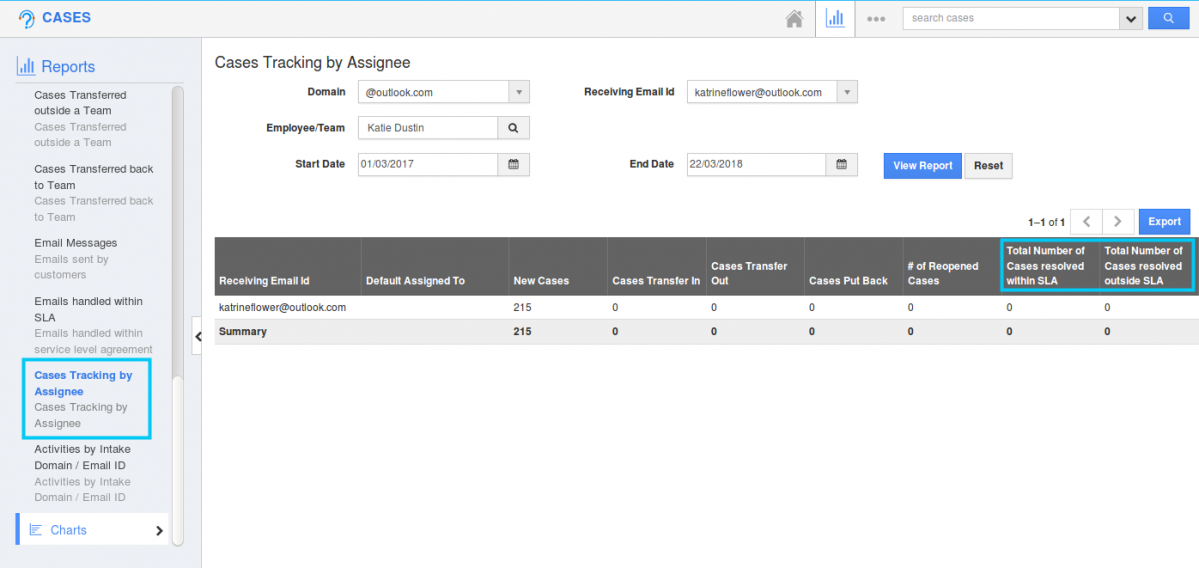
- Out of SLA and Within SLA included in Cases tracking by Assignee Report – In Cases App, we serve you with “Cases Tracking by Assignee” Report which helps you in showing the summary of cases collected through Emails. On clicking on “View Report” you can view the summary of the cases collected. In that summary, we have added 2 new columns which are “Total Number of Cases Resolved within SLA” and “Total Number of Cases Resolved outside SLA”. We used these two columns from the “Cases handled by Employee” reports.
|
|
|
|
|
Supply Chain
- Configurable Features under Items section – We have added a new option of “Configurable Features” under the Items section in the Items App. This feature allows you to Enable the “Suppliers” tab on Items page. You can either choose the Supplier to be present as a tab(next to E-commerce tab) or as section in Items overview page. You can enable it by moving to “More” ->”Settings” -> “Items” -> “Configurable Features”.
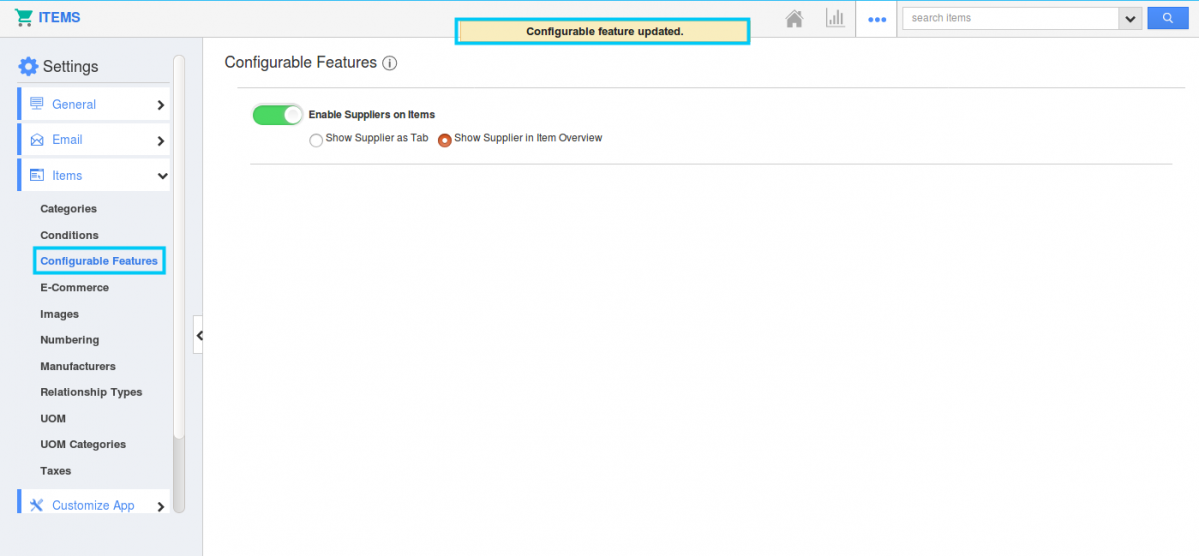
For instance: Here “Show Supplier in Item overview” is selected, the suppliers will be seen as below,

|
Financials
- Inner Table section support in Create/View page – In Estimates and Invoices, we have added an inner table section support for Products/items sold. Whenever you create a Estimate or an Invoice for an item with BOM, inner table section with its classes and choices will be displayed in the Overview page. These fields can’t be edited. The choices value gets added up in the Parent item line.
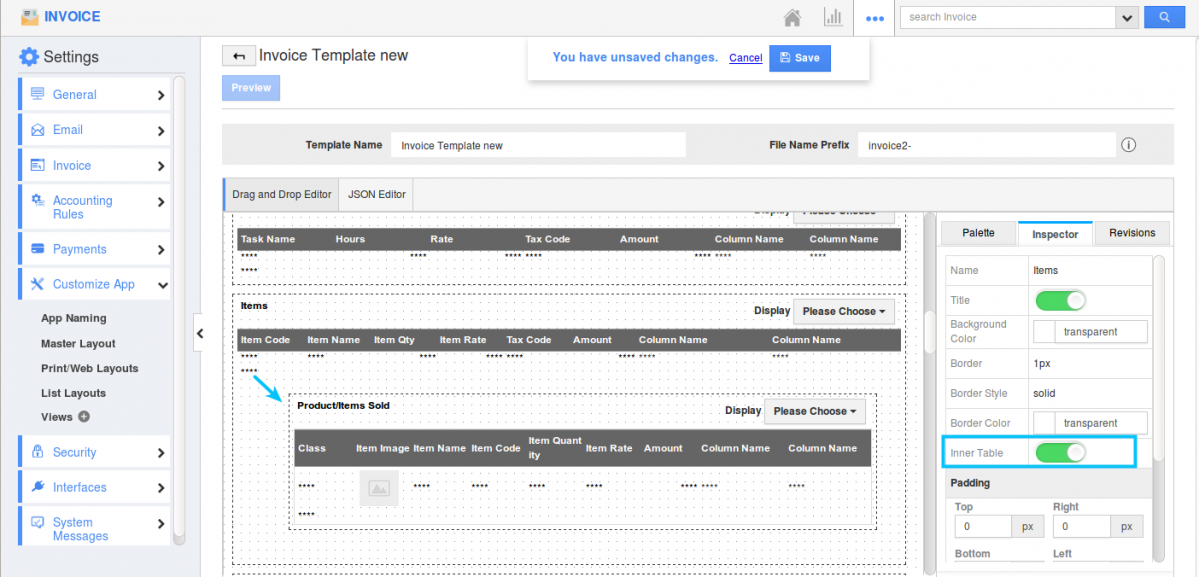
- Inner Table section for Products/Items Line in Print/Web layout – Similar to the inner table section in the Create/view page, you can add up inner table section for newly created PDF templates. Create your own PDF template from Settings -> Customize App -> Print/Web layout and click on “Create -> Start with the Default Layout”. Scroll down till Items section and enable the “Inner table” toggle. By enabling you can view the inner table which lists out the classes and choices selected for the Parent item.
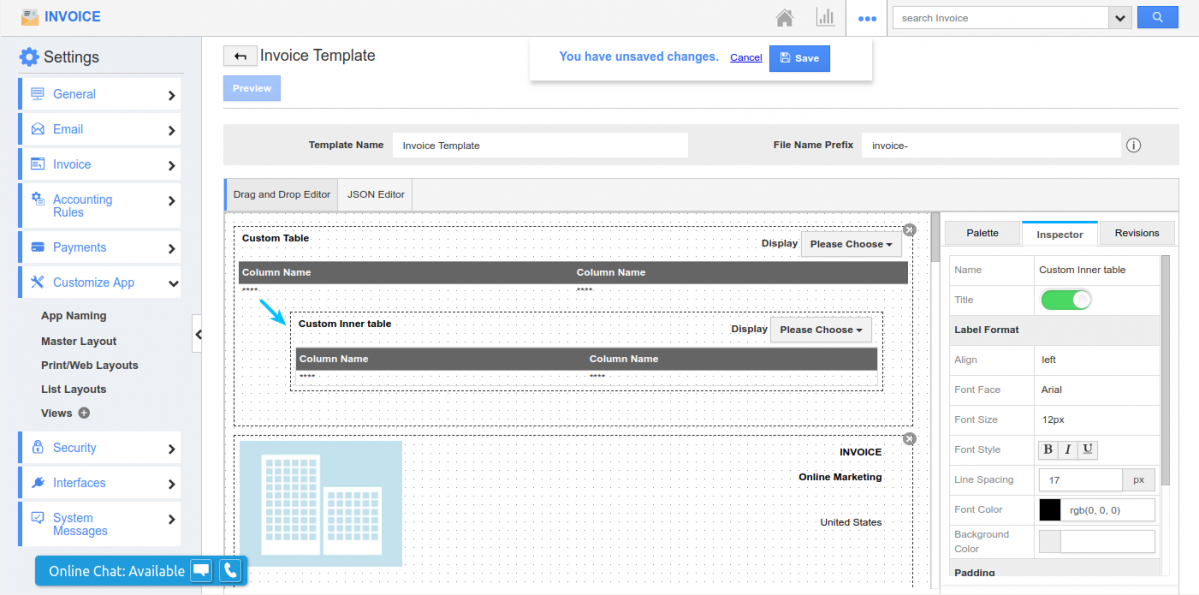
- Inner Table section for Custom table in Print/Web layout – When creating a new PDF template in Print/Web layout for Invoices or Estimates, you can add up your own custom table for your Template and now we have enhanced it by adding a inner table for that custom table. It can be done by moving on to “Print/Web Layout” and create a new template. Then drag and drop the table attribute and add up your columns required for the table. Click on the table name and you can view the Inspector tab opened. Enable the “Inner Table” toggle.
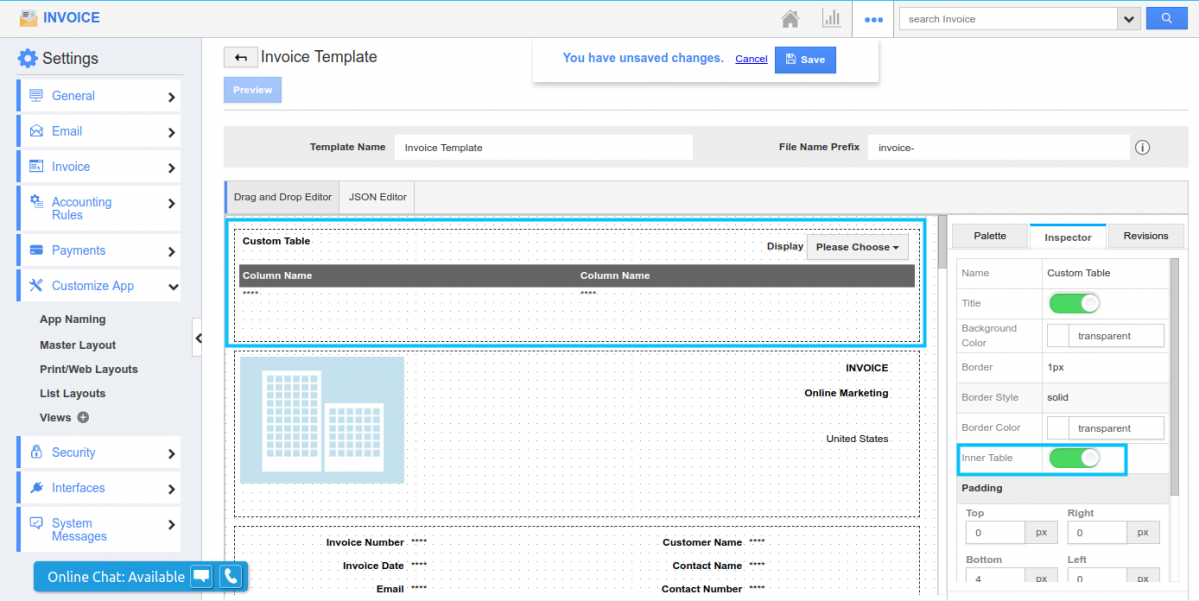
Then move on to “Palette” and you can drag and drop another table attribute which will be the inner table of the Parent table. Add up your columns there and it gets reflected in the PDF you send to customers.
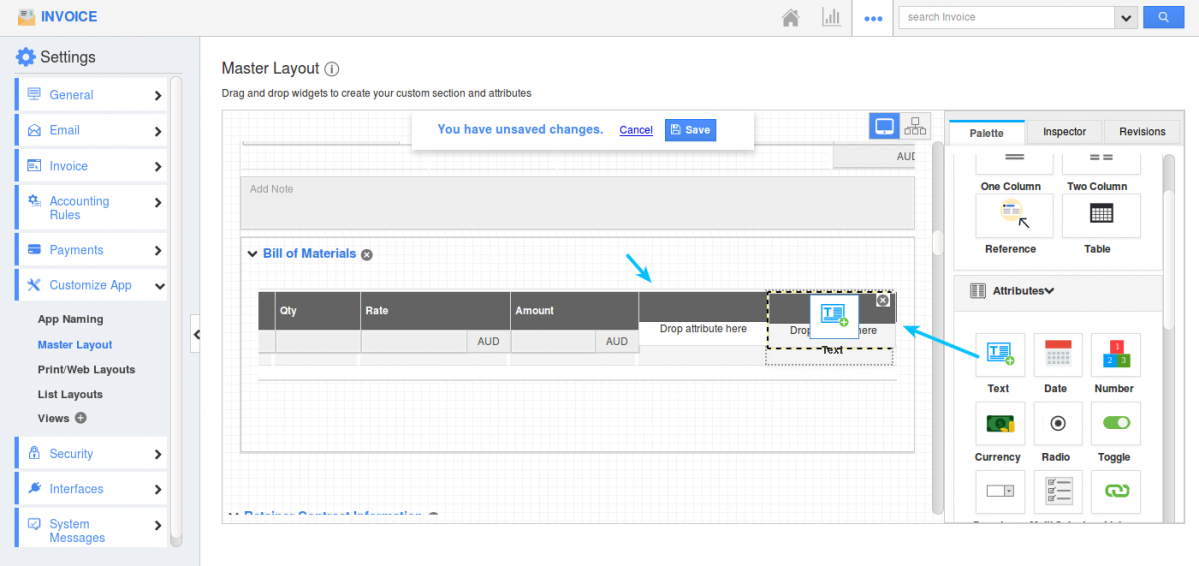
- Custom field support for Inner table in Master layout & Print/Web Layout – In Master layout of Estimates and Invoice, we are familiar with the Inner table section for your Products/Items. And now, you can add up your own custom fields in the inner table section. Creating your own custom table and adding more custom field is not possible. The same feature of adding up your custom fields in Inner table section is available for PDF templates too.
- Edit Option for selected BOM in side panel – In this release, we provided the option of editing the BOM material in Invoices and Estimates App. For instance, let’s take Invoices App and search and select for the item with BOM material. Once selected, you will be opened with a side panel where you can select your classes and choices and add it to the Parent item. The value gets summed up in “Amount” field. Now select side panel option from Actions which on instant will be opened. Here, you can edit the fields needed. Change the dimension, add or remove the classes and choices and tap on “Add” button.
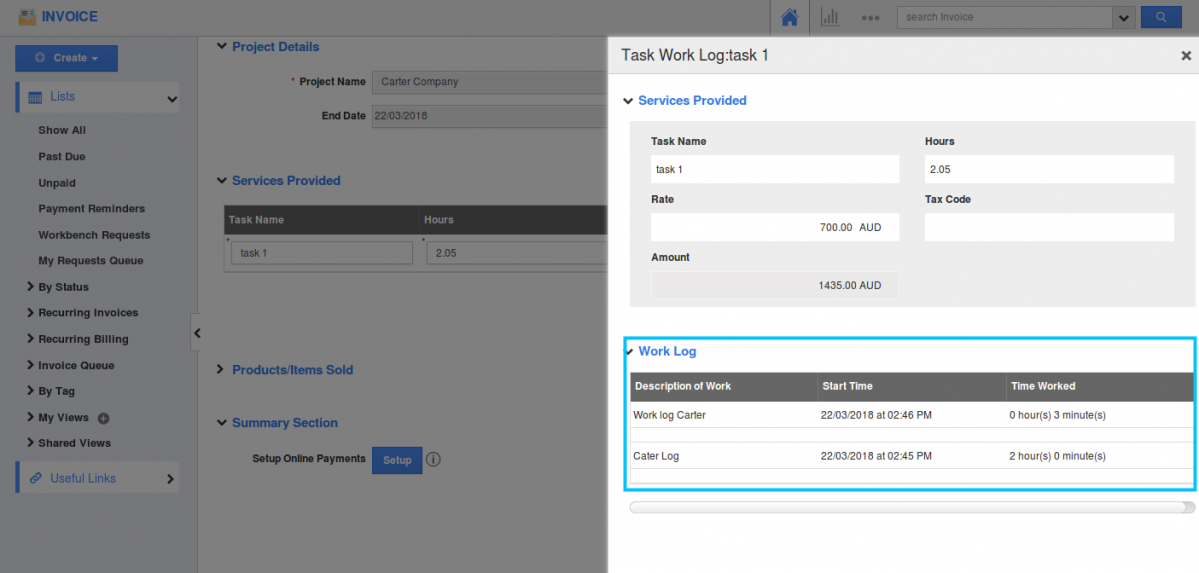
- Work log Side panel for Project to Invoice conversion – When creating a Invoice from a Project, you can view the Work log icon and on clicking it, you will be opened with the side panel where you can view the work log and task associated with the Project. It can be done by creating a project with billing method as Time and Expenses. A task will be created and you can initiate a work log for the task and complete the created task.
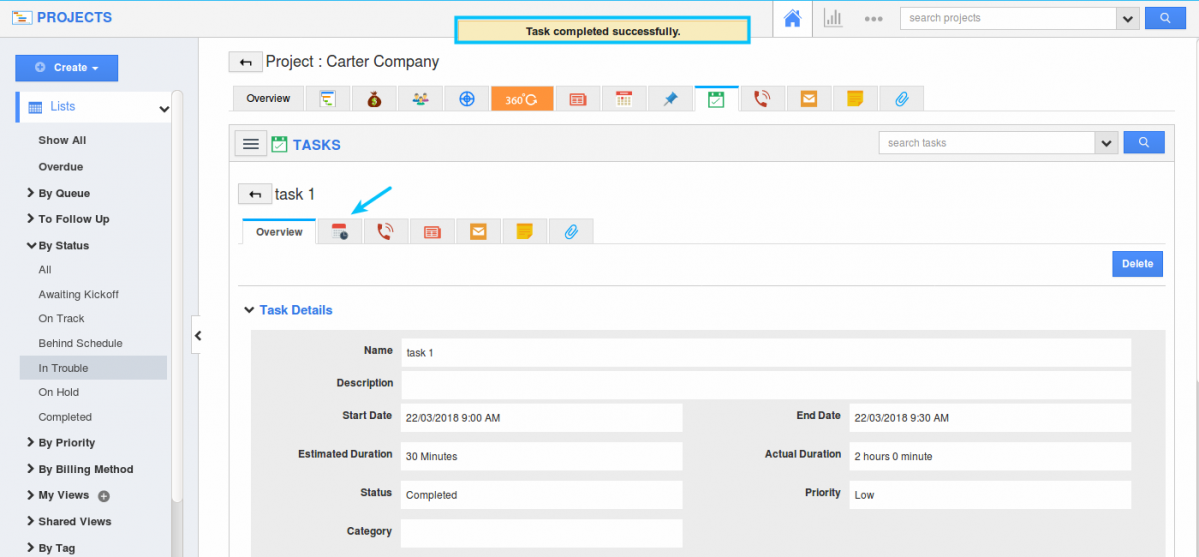
Now when creating an invoice for a project, select the created task to generate invoice. You will be opened with “Create Invoice from Project” and can view the Task from “Services Provided” section. “Work log” icon will be seen under Actions and on clicking, a side panel opens where you can check for the created tasks and its work log.
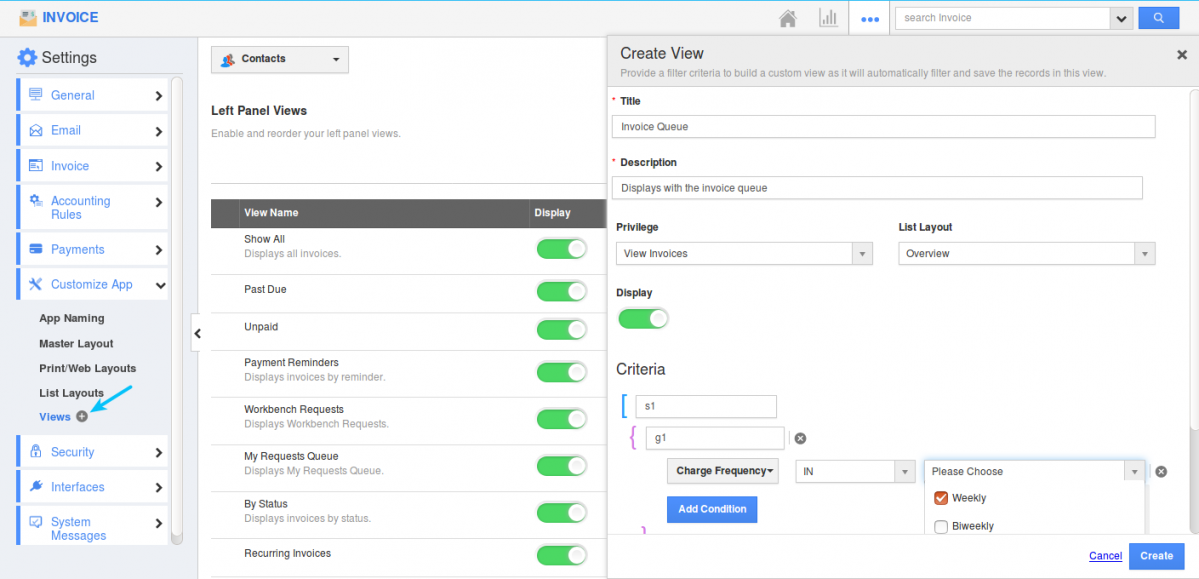
- Custom View builder for Invoices App – Custom views are like filtering option used for showing particular information based on certain criteria. Now, in this release we have implemented the feature of creating your own custom view in the Invoices App. Move on to Settings -> Customize Apps ->Views. Select “Create” to create a new view and provide with Title, description and criteria and create it. The view created will be listed out in Left navigation panel of the Invoice Home page.
- Estimates App support in Reference App attributes – We have enhanced the Reference App attribute in the Master layout of Invoices App. By Reference App, you can refer various object details. In that list, we have now added the Estimates App to get Estimate details for the particular Invoice created.
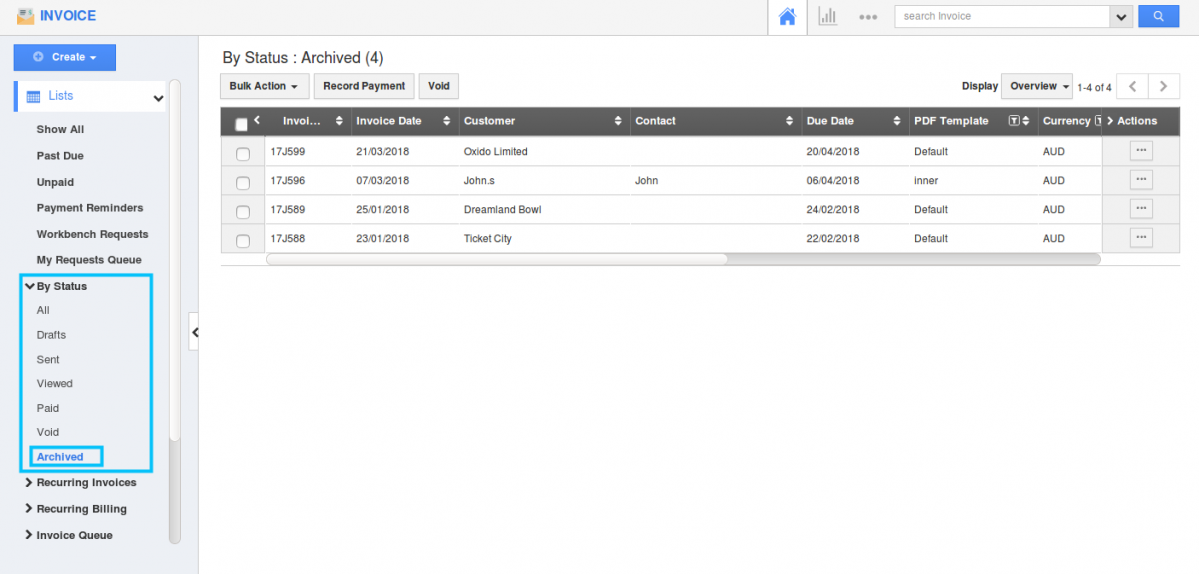
- Archived Status in Estimates App – We all know that the Estimates which are archived will not be available in Show All page of Estimates App. In order to view all your Archived Estimates, we in this release provided you with the new option called “Archived” under “By Status” from the left navigation panel. On clicking that status, you can view all the archived Estimates. You can get your Estimate in PDF format through Bulk action or by individually.

|
|
|
|

|
|
|

|
|
Marketing
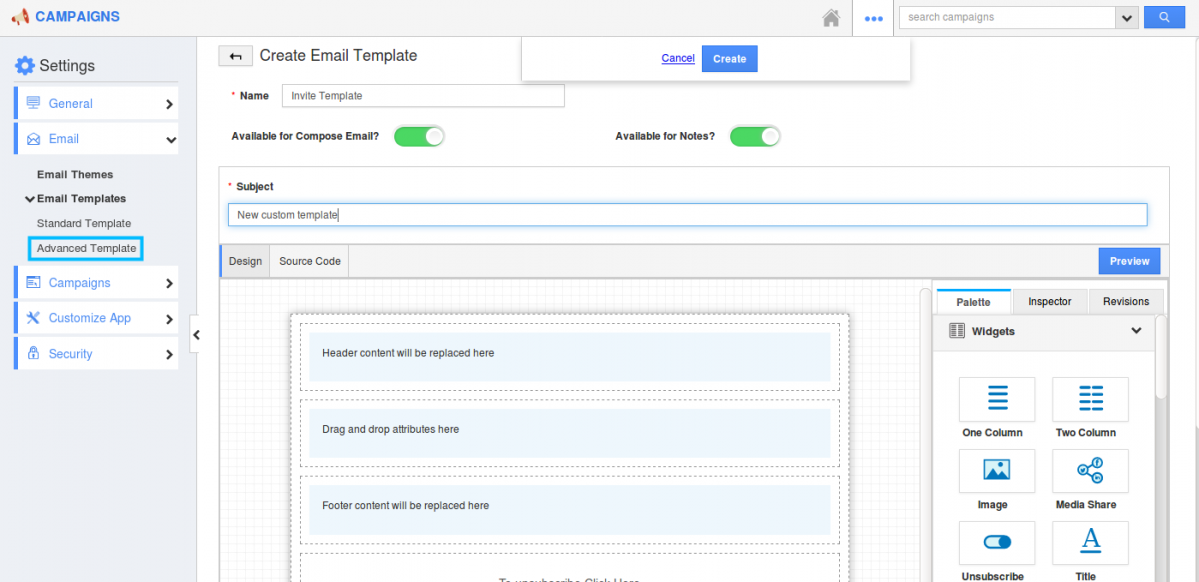
- Advanced MJML Template in Campaigns – We, in this release have deployed with a new option of creating customized Email templates in Campaigns App, for the benefit of our Customers. I.e Now you can create your own advanced customized email template by using MJML codes and design. Move on to Settings -> Email Templates -> Advanced Template (Customized Template). Select a theme and create your own advanced customized Email template providing with name and designs needed.
|
Collaboration
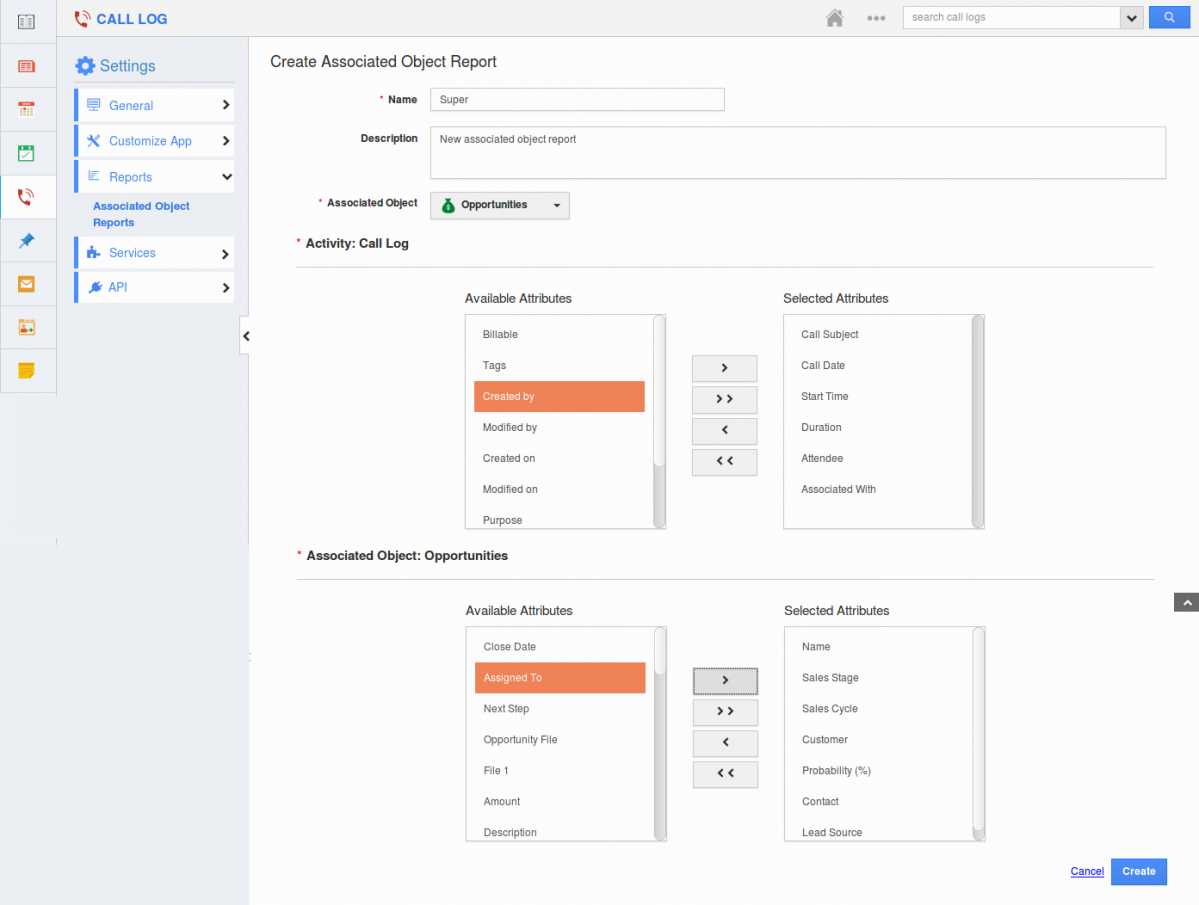
- View the associated object values in Collaboration Reports – It is now possible to view the Opportunities object values associated with your Call log as an associated object report. It can be done by moving on to Home page Call log and clicking on Settings -> Reports -> Associated Object Reports. Click on “Create” button to create new Associated object report. Provide with the details and select the attributes needed in Call log and in Opportunities to get displayed in the Report.
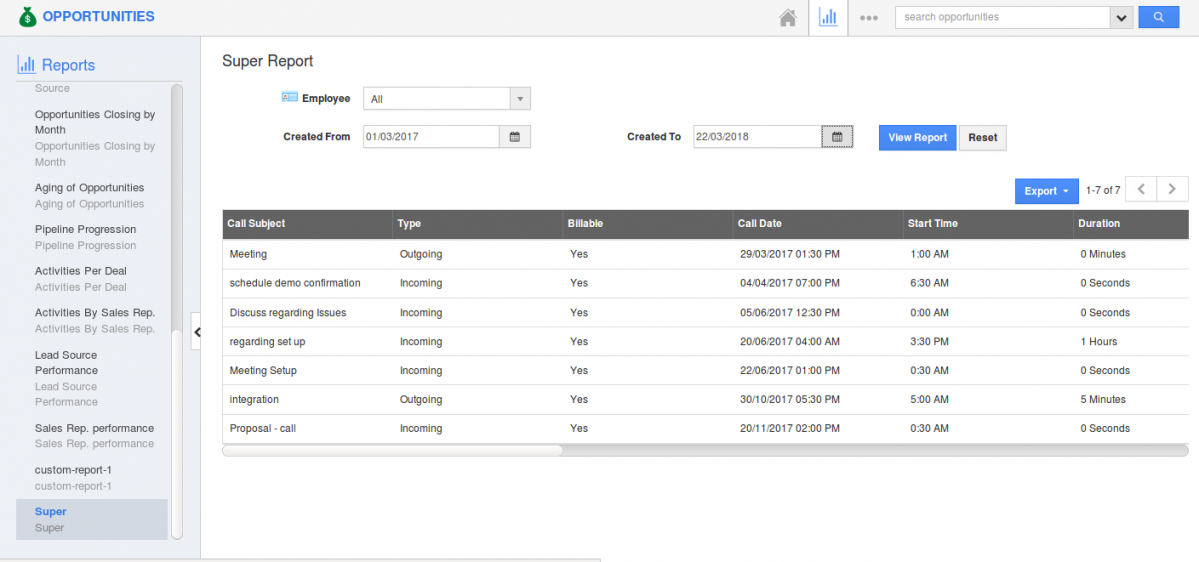
Move on to Opportunities -> Reports and you can view the created Object report. Select that report and provide with the required Created from and to date based on your Call log. Reports gets displayed which consists of Call logs associated with the Opportunities. You can export those reports if needed.
|
General Updates
- Reference App & Reference App field Update Implementation – This feature update will now allow the renamed object name to get reflected in the associated reference objects. This update is applicable in Contacts, Customers, Leads, Opportunities and Items App.
Latest Blogs

Role Of CRM In Travel And Tourism Industry
Travel and tourism have been a significant part of everyone’s life since the ancient period. When we skim through the pages of history, It should be noted that humans were initially nomads before they became settled in one place. They...
Read more →
WHAT IS CRM TECHNOLOGY?
Introduction CRM is a technology that helps manage the entire customer information and interactions in order to build and maintain superior customer relationships. The CRM solution replaces spreadsheets and other different applications, which makes it easy for the businesses to...
Read more →
Everything you need to know about the Annual Maintenance Contract!
1. What is an Annual Maintenance Contract? 2. Benefits of Maintenance Contracts 3. How can Apptivo CRM help you manage maintenance agreements and vendors? 4. Summary Think about getting the confidence that the machinery is well-maintained and performing optimally, without...
Read more →
