The Question:
I’m just getting started, and understand that uploading customers is one of the first tasks I need to take care of. Before I start entering all of my customers, I would like to make sure the app is configured well. Could somebody please explain the various configuration options, and how to work with them?
The Answer:
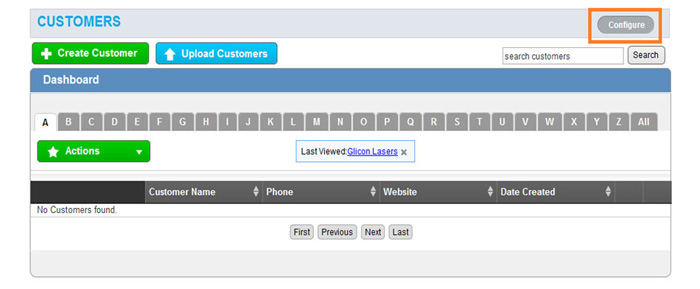
The customers app has several groups of configuration settings that allow you to adjust the way the app functions. Configuring the app before entering your information is always a good idea, so it’s great you checked here first!To configure your Customers App, start off by logging in and clicking on the Customers App in your app dashboard. In the upper right corner of the customers dashboard, click on the “Configure” button.
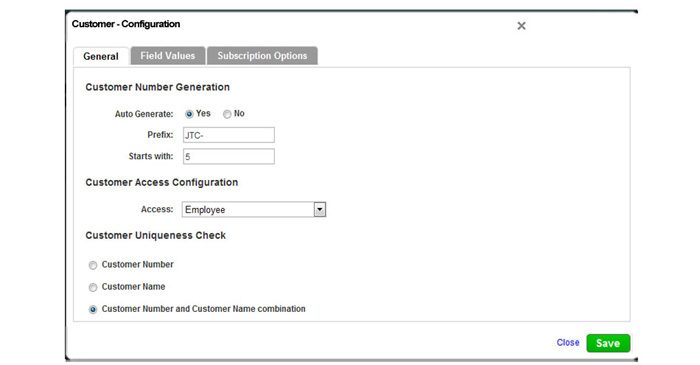
A popup will appear with three tabs, now we’ll go through each tab and adjust the settings:
- General
- Customer Number Generation
- Whenever you create a new customer, they will be assigned a unique identification number. You can either manually define this number, or you can set Apptivo to automatically generate a number for you.
- Customer Access Configuration
- Here you can control who is able to view customer records. If you select “employee”, then a customer will only be visible to the employee who is assigned to them, in addition to firm administrators. If you select “all”, any user with access to the customers app will be able to view all customer records.
- Customer Uniqueness Check
- In order to assure no duplicate customers are created, Apptivo will display an error when a duplicate is detected. Here you can select whether a “duplicate” is defined by a customer with the same name, same ID number, or a combination of name & ID number.
- In order to assure no duplicate customers are created, Apptivo will display an error when a duplicate is detected. Here you can select whether a “duplicate” is defined by a customer with the same name, same ID number, or a combination of name & ID number.
- Customer Number Generation
- Field Values
- Customer Category
- To make browsing your customer list easier, Apptivo allows you to categorized each customer record. Here you have the option to edit/disable an existing category, or create a new category that can be assigned to any customer. To disable a category, set the “End Date” field to the current date.
- Market Information
- Another method to help categorize customers is by defining which industry they belong to. Here you can control a list of markets which your customers exist in, and provide a description of each.
- Segment Information
- Segments are simply a more granular version of markets. Each market can be broken down into multiple segments in order to make browsing customers even simpler.
- Territories
- The last method used to categorize customers is the territory. Split your customers into specific regions to help better manage the customers, and/or to assign a specific territory to a single employee.
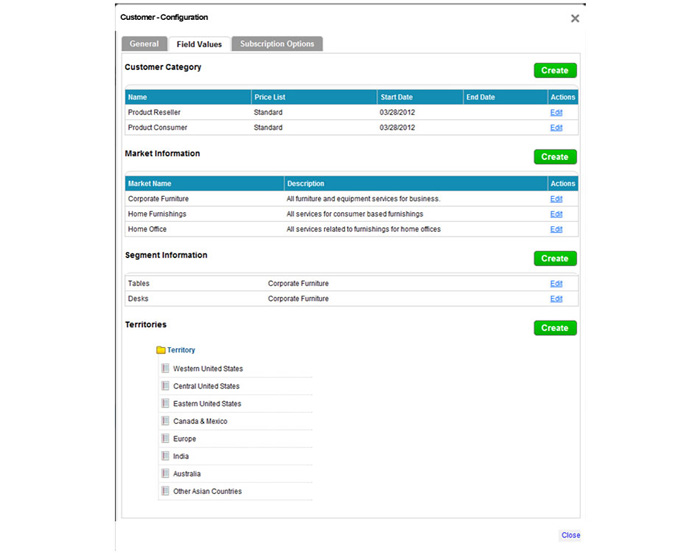
- The last method used to categorize customers is the territory. Split your customers into specific regions to help better manage the customers, and/or to assign a specific territory to a single employee.
- Customer Category
- Subscription Options
- The subscription options settings are only relevant to users who have a custom eCommerce website integrated with Apptivo. If you are interested in billing your customers on a recurring basis through your website, please contact us.
Back to Getting Started page
Latest Blogs
Role Of CRM In Travel And Tourism Industry
Travel and tourism have been a significant part of everyone’s life since the ancient period. When we skim through the pages of history, It should be noted that humans were initially nomads before they became settled in one place. They...
Read more →
WHAT IS CRM TECHNOLOGY?
Introduction CRM is a technology that helps manage the entire customer information and interactions in order to build and maintain superior customer relationships. The CRM solution replaces spreadsheets and other different applications, which makes it easy for the businesses to...
Read more →
Everything you need to know about the Annual Maintenance Contract!
1. What is an Annual Maintenance Contract? 2. Benefits of Maintenance Contracts 3. How can Apptivo CRM help you manage maintenance agreements and vendors? 4. Summary Think about getting the confidence that the machinery is well-maintained and performing optimally, without...
Read more →
