There are many apps inside of Apptivo CRM where you might perform sales cold calling. In this post we’ll cover the basics of where calling might happen, how to build a solid cold call process, and walk through the steps to perform calls as an end-user.
Apptivo Cold Calling Apps
First, let’s talk about calls in general within Apptivo. There are certain apps called “context apps”, which will contain phone numbers, emails, addresses, etc. These apps are: leads, contacts, customers, suppliers, distributors. While all apps provide a place to capture phone calls & notes, only these context apps have phone numbers. Specifically for cold calling, you are only dealing with people that you haven’t spoken to before, so either the Contacts App or Leads App would be used. The most common scenario is to have a list of leads (which could be imported from a spreadsheet or outside source), then quickly go through the list of leads calling then, and updating each sales lead as you go.
5 Guidelines for Setting Up Your Cold Calling Process
Before we get into the most efficient way to perform calling, let’s talk about managers can design a solid process for their team to work within. When approaching your CRM implementation, focus on these 5 areas:
- Segment Your Leads Well
- Bring the Right Information Forward
- Reduce Clutter
- Create a Simple & Standard Follow Up Process
- Train Users to Work in Multiple Tabs
1. Lead Segmentation
Take time to consider exactly what fields you configure in each app you use, and prepare your imported data ahead of time. Grouping leads by industry, size, source, job title, and other attributes can help you form a list of similar prospects, and deliver more targeted scripts, as well as being able to better measure results. Use the master layout feature to configure fields.
2. Displaying the Right Details
Once you’ve formed a target list of leads to cold call, we want to make sure that list shows all of the information needed to make the call. We want to avoid any extra places to check for information, unless absolutely required. Consider that different lists of leads might be better served with different information being visible, so work with your reps to identify what they need before placing a call. Build one or many standard sets of columns that appear on any list using the list layouts feature in each app’s settings.
3. Simplifying the Interface
First identify what is important for lead segmentation, then remove the rest! Any button or field that doesn’t add value will add clutter, and make the system harder to use. Use all of the different settings available to hide components, reduce the features/options to use, and re-arrange fields & links so the most valuable information appears on top. There are many features in Apptivo which help you simplify your CRM in this blog.
4. Cold Call Process
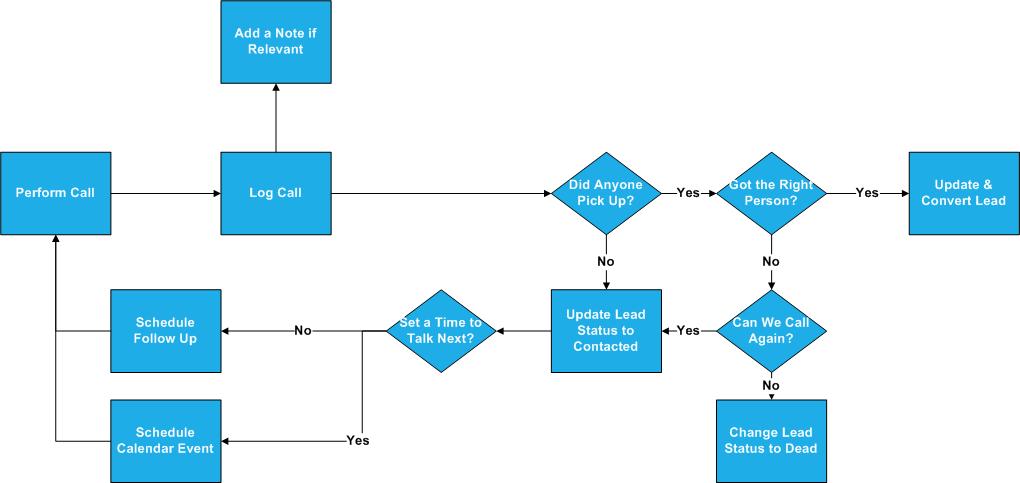
A big part of using the system efficiently is actually planning a process of how you’ll use it. Every company runs differently, has a long/short sales process, or has one or many people performing cold calling. Because of this, you’ll need to take some time to think about what triggers your team to move a lead to the next step, schedule a follow up, or when to mark the lead as dead. Start off by designing your process and testing it out to optimize. Here is an example process with a qualification point of getting in touch with the right person.
5. Efficient Navigation Training
When it comes to simple repetitive tasks in the system, you should take great care to save every click possible. In the next section we’ll cover the fastest way to perform each action as an end-user. Adopt this flow, fine-tune for your purposes, then train your team properly from day 1, so they start off with the best practices possible.
How to Perform Lightning-Fast Cold Calls as an End-User
To see the process in detail, check out the video above in this post. This is a specific set of clicks that get you where you need to go the fastest.
- Navigate to the leads app & select your list
- As a manager, we should already have this list created as saved view.
- Click anywhere on the first row to open that lead’s side panel view
- If you have contacted them before, right click on the “more details” button, and open it in a new tab to check out the history.
- If you haven’t contacted them before, we’ll perform actions right here and don’t need history.
- Click the call log icon on top of the side panel & capture the call notes.
- Based on the outcome of the call, perform the next step
- If you need to set a reminder for next time, click on the event or follow up icon on top of the side panel to schedule it.
- If you are ready to move to the next stage, open the detailed view in a new tab and convert the lead from there.
- Before leaving the lead, click on any field to edit & update information in the side panel, and/or add notes/documents using the icons on top.
- When ready, simply click on the next lead in your list to repeat & continue.
Summary
And that’s it, everything you need to know to go set up a cold calling process in your Apptivo crm system. Let us know what you think in the comments below!
Latest Blogs

Role Of CRM In Travel And Tourism Industry
Travel and tourism have been a significant part of everyone’s life since the ancient period. When we skim through the pages of history, It should be noted that humans were initially nomads before they became settled in one place. They...
Read more →
WHAT IS CRM TECHNOLOGY?
Introduction CRM is a technology that helps manage the entire customer information and interactions in order to build and maintain superior customer relationships. The CRM solution replaces spreadsheets and other different applications, which makes it easy for the businesses to...
Read more →
Everything you need to know about the Annual Maintenance Contract!
1. What is an Annual Maintenance Contract? 2. Benefits of Maintenance Contracts 3. How can Apptivo CRM help you manage maintenance agreements and vendors? 4. Summary Think about getting the confidence that the machinery is well-maintained and performing optimally, without...
Read more →
